Turning That Old Hoverboard Into A Learning Platform

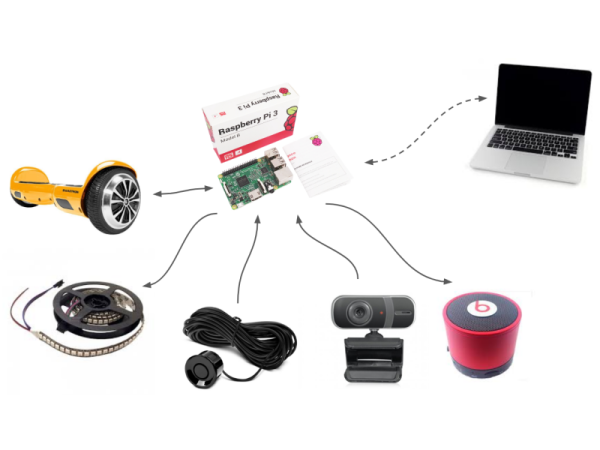
[Isabelle Simova] is building Hoverbot, a flexible robotics platform using Ikea plastic trays, JavaScript running on a Raspberry Pi and parts scavenged from commonly available hoverboards.

Self-balancing scooters a.k.a. Hoverboards are a great source of parts for such a project. Their high torque, direct drive brushless motors can drive loads of 100 kg or more. In addition, you also get a matching motor controller board, a rechargeable battery and its charging circuit. Most hoverboard controllers use the STM32F103, so flashing them with your own firmware becomes easy using a ST-link V2 programmer.

The next set of parts you need to build your robot is sensors. Some are cheap and easily available, such as microphones, contact switches or LDRs, while others such as ultrasonic distance sensors or LiDAR’s may cost a lot more. One source of cheap sensors are car parking assist transducers. An aftermarket parking sensor kit usually consists of four transducers, a control box, cables and display. Using a logic analyzer, [Isabelle] shows how you can poke around the output port of the control box to reverse engineer the data stream and decipher the sensor data. Once the data structure is decoded, you can then use some SPI bit-banging and voltage translation to interface it with the Raspberry Pi. Using the Pi makes it easy to add a cheap web camera, microphone and speakers to the Hoverbot.

Ikea is a hackers favourite, and offers a wide variety of hacker friendly devices and supplies. Their catalog offers a wide selection of fine, Swedish engineered products which can be used as enclosures for building robots. [Isabelle] zeroed in on a deep, circular plastic tray from a storage table set, stiffened with some plywood reinforcement. The tray offers ample space to mount the two motors, two castor wheels, battery and the rest of the electronics. Most of the original hardware from the hoverboard comes handy while putting it all together.

The software glue that holds all this together is JavaScript. The event-driven architecture of Node.js makes it a very suitable framework to use for Hoverbot. [Isabelle] has built a basic application allowing remote control of the robot. It includes a dashboard which shows live video and audio streams from the robot, buttons for movement control, an input box for converting text to speech, ultrasonic sensor visualization, LED lighting control, message log and status display for the motors. This makes the dashboard a useful debugging tool and a starting point for building more interesting applications. Check the build log for all the juicy details. Which other products from the Ikea catalog can be used to build the Hoverbot? How about a robotic Chair?

Continue reading “Turning That Old Hoverboard Into A Learning Platform”

Measuring Airflow In An HVAC System

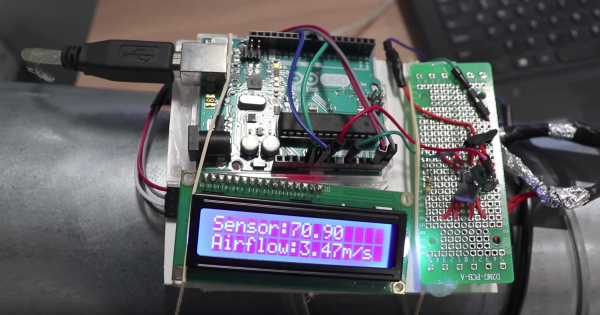
[Nubmian] wrote in to share his experiments with measuring airflow in an HVAC system. His first video deals with using with ultrasonic sensors. He found an interesting white paper that described measuring airflow with a single-path acoustic transit time flow meter. The question was, could he get the same effects with off-the-shelf components?

[Nubmian] created a rig using a pair of typical ultrasonic distance sensors. He detached the two transducers from the front of the PCB. The transducers were then extended on wires, with the “send” capsules together pointing at the “receive” capsules. [Nubmian] set the transducers up in a PVC pipe and blew air into it with a fan.

Continue reading “Measuring Airflow In An HVAC System”

Hackaday Prize Entry: Sonic Glasses

This year, the Hackaday Prize is going to find the most innovative and interesting assistive technologies. Whether that’s refreshable Braille displays or reliable utensils for the disabled, the finalists for the Assistive Technologies portion of the Prize will be creating some of the most interesting tech out there.

For his entry into the Assistive Technology part of the Prize, [Pawit] is building binaural glasses for the blind. It’s difficult to navigate unknown environments without a sense of sight, and these SonicScape glasses turn cheap distance sensors into head-mounted sonar.

The glasses are built around a pair of ultrasonic distance sensors (the HC-SR-04, if you’re curious), mounted in a convenient 3D-printed enclosure that looks sufficiently like a pair of glasses to not draw too many glares. (Although maybe we’d print them in black to lower the contrast.) Of note in this project is the Bluetooth connectivity to eliminate wires and independent left and right audio channels. That last bit — being able to hear in left and right — is something we haven’t seen before in devices like this and aims to greatly increase the usability of such a device.

Hackaday Prize Entry: Robo-Dog Learns To Heel

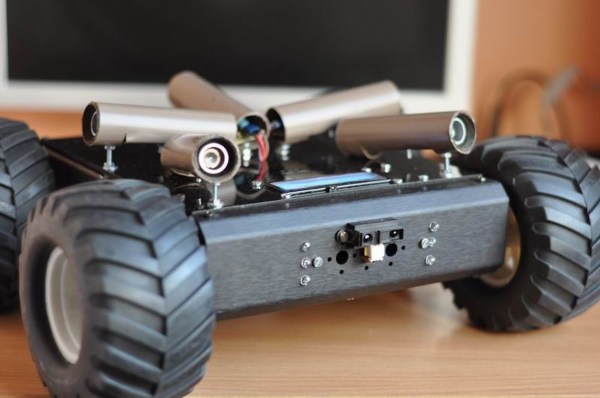
[Radu Motisan] is working on a small rover whose primary trick is being able to identify its owner. Robo-Dog is his proof of concept, a rover that uses five ultrasonic sensors to move toward the nearest obstruction. Obviously, this isn’t the same as being able to recognize one person from another, but it’s a start.

The sensors were home-built using ultrasonic capsules soldered into a custom board, with the tube-shaped enclosures made out of PVC pipe. He made an ultrasonic beacon that uses a 556 timer IC to emit 40 KHz pulses so he can get the hang of steering the robot purely with sound. If that fails, Robo-Dog also has an infrared proximity sensor in front. All of it is controlled by an ATmega128 board and a custom H-bridge motor controller.

[Radu] has been fine-tuning the algorithm, making Robo-Dog move faster to catch up with a target that’s far away, but slower to one that’s close by. It compares the readings from two sensors to compute the angle of approach.

Ultrasonic Raspberry Pi Piano

Cheap stuff gets our creative juices flowing. Case in point? [Andy Grove] built an eight-sensor HC-SR04 breakout board, because the ultrasonic distance sensors in question are so affordable that a hacker can hardly avoid ordering them by the dozen. He originally built it for robotics, but then it’s just a few lines of code to turn it into a gesture-controllable musical instrument. Check out the video, embedded below, for an overview of the features.

His Octasonic breakout board is just an AVR in disguise — it reads from eight ultrasonic sensors and delivers a single SPI result to whatever other controller is serving as the brains. In the “piano” demo, that’s a Raspberry Pi, so he needed the usual 5 V to 3.3 V level shifting in between.

The rest is code on the Pi that enables gestures to play notes, change musical instruments, and even shut the Pi down. The Pi code is written in Rust, and up on GitHub. An Instructable has more detail on the hookups.

All in all, building a “piano” out of robot parts is surely a case of having a hammer and every problem looking like a nail, but we find some of the resulting nail-sculptures arise that way. This isn’t the first time we’ve seen an eight-sensor ultrasonic setup before, either. Is 2017 going to be the year of ultrasonic sensor projects? Continue reading “Ultrasonic Raspberry Pi Piano”

Innocent TV Imprisoned Behind Mirror

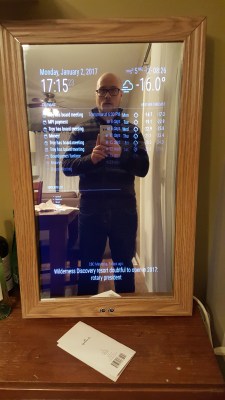
After following along with all the Magic Mirror builds, [Troy Denton] finally caved in and started building one for his girlfriend for Christmas. These popular builds are all pretty much bespoke, and this one is no different.

mirror2His victim TV didn’t have the ability to be switched on and off by the Raspberry Pi using HDMI/CEC, so he came up with an alternative. He got a couple of opto-isolators and soldered one to the on/off button on the TV’s control board. The Pi didn’t know whether it was switching the TV on or off, it just knew it was switching it. To solve this, [Troy Denton] connected another opto-isolator to the TV’s LED, this one the other way around. When the TV is turned on, the Pi now detects it.
The enclosure is fabbed from 2×4 lumber, the mirror is one-way acrylic which runs somewhere in the $75-100 range for this 27-9/16″x15-1/2″ application. The top and bottom rails include lines of holes to encourage airflow to keep things cool. the face plate is picture framing which makes it easy to mount the mirror. An ultrasonic range finder finishes off the build and when someone stands in front of this magic mirror, the Pi senses it and turns the monitor on.

Included in [Troy]’s post are the Python code and shell scripts he wrote as well as a bunch of pictures of the build process. We’ve seen Magic Mirrors builds before, including some small ones. They’re a cool addition to the house and a fairly simple build.

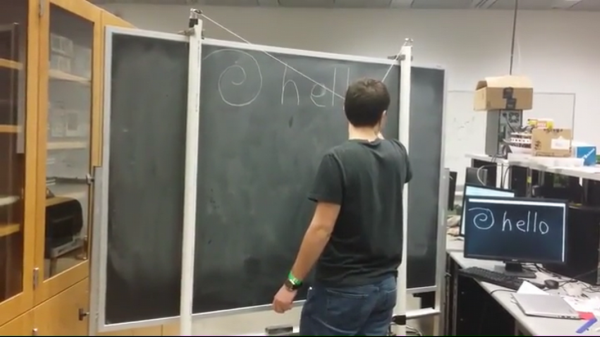
Blackboard Digitization For Under $40

Digital White/Black Boards or “Smart Boards” are very useful in modern classrooms, but their high cost often makes it difficult to convince administrators from loosening their purse strings. Cooper Union’s 2nd annual HackCooper event in New York wanted students to design and build hardware and software projects that both solve real problems and spark the imagination. At the 24 hour hackathon, the team of [harrison], [david] and [caleb] decided to put together a low-cost and simple solution to digitizing classroom black board content.

A chalk-holder is attached to two strings, each connected over a pulley to a weight. The weights slide inside PVC pipes at the two sides of the black board. Ultrasonic sensors at the bottom of each tube measure the distance to the weights. The weights sit in static equilibrium, so they serve the purpose of keeping the string taut without negatively interfering with the writer.

With a couple of calibration points to measure the extent of displacement of each weight, board width can be determined, making it easy to adapt to different sizes of boards. Once calibrated, the system can determine position of the chalk over the board based on some trigonometrical calculations. Since they had just 24 hours to hack the system together, they had to use a hand operated radio with a couple of buttons to provide user control. Pressing the “Write” button starts transmitting chalk movements to the digital screen. A second button on the radio remote serves to “Erase” the digital screen. After receiving the chalk position data, they had to do a fair amount of processing to eliminate noise and smooth out the writing on the digital screen.

A server allows the whole class to receive the chalk board data in real time. After each “Erase” command, the chalk board state is saved and logged on the server, thus allowing previous content to be viewed or downloaded. If only text is written, optical character recognition can be used to further digitize the content.

What makes the project really useful is the low cost. The sensors cost a dollar. The other parts – PVC pipe, weights/pulleys, Arduino and the Radio key fob – were all bought for under 40 dollars. For some additional cost (and maybe more time in their case) they could have automated the detection of when the chalk was actually doing the writing. The team have made their code available on Github. For a Chalk board at the other end of the cost spectrum, check this one out. Video below.

Continue reading “Blackboard Digitization For Under $40”