The Mini Console Revolution, And Why Hackers Passed Them By

The Raspberry Pi was initially developed as an educational tool. With its bargain price and digital IO, it quickly became a hacker favorite. It also packed just enough power to serve as a compact emulation platform for anyone savvy enough to load up a few ROMs on an SD card.

Video game titans haven’t turned a blind eye to this, realising there’s still a market for classic titles. Combine that with the Internet’s love of anything small and cute, and the market was primed for the release of tiny retro consoles.

Often selling out quickly upon release, the devices have met with a mixed reception at times due to the quality of the experience and the games included in the box. With so many people turning the Pi into a retrogaming machine, these mini-consoles purpose built for the same should have been immediately loved by hardware hackers, right? So what happened?

Continue reading “The Mini Console Revolution, And Why Hackers Passed Them By”

Pimped Out 70’s Home Intercom System, Now With More Pi

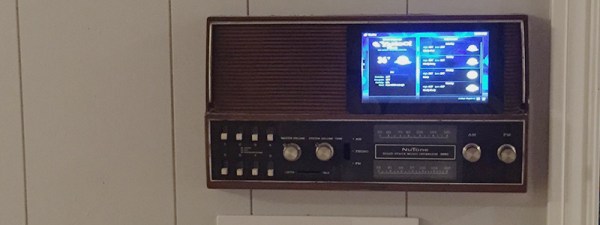
If you own a house that was built in the 1970’s, you might still have the remnants of a home intercom system on the walls of each room. They were consider the end-all-be-all of “home automation” back in the day. Now, they look dated and out of place (but still kind of retro-cool at the same time).  [Cpostier] decided that he wanted to keep his old intercom system, but give it an update with a Rasperry Pi and a 7 inch touch screen, and the results are totally groovy, man.

The original unit served two functions, as an intercom system, and also as a whole house music player.  [Cpostier] wasn’t interested in the intercom feature, and so he started with the traditional gutting of the 70’s dried up electronics. Each room received a new $7 speaker (from Amazon), and the main control panel was fitted with a Pi, TFT touch screen, and new amplifier. The Pi is running Kodi (formerly know as XBMC) and along with it being a great media player, it can also show weather data, or what ever else you would like.

Something magical happens when you blend new tech with old tech – we totally dig it.

Control Your HTPC With Scavenged IR Parts

If you’ve built yourself a home theater PC, one of your highest priorities is probably coming up with a convenient control solution. The easiest way to do this is to simply use something like a wireless keyboard and mouse. But, that’s not very conducive to an enjoyable home theater experience, and it feels pretty clunky. However, if you’ve got the right components lying around, [Sebastian Goscik] has instructions and an Arduino sketch that will let you control your HTPC with any IR remote control.

There are a number of ways you could control your HTPC, and we’ve featured more than one build specifically for controlling XBMC over the years. Unfortunately, most of those methods require that you spend your hard earned money (which is better spent on popcorn). [Sebastian’s] setup can be replicated with things you probably have on hand: an Arduino, an IR remote, and a scavenged IR receiver. The IR receiver can be found in many devices, like old stereos or TVs that themselves were controlled via an IR remote.

It starts with an Arduino Sketch that lets you can see on the serial monitor what code is being generated by the button presses on your remote. These are then scripted to perform any task or function you like when those buttons are pushed. The most obvious use here is simple directional control for selecting your movies, but much more complex tasks are possible. Maybe someone can program a T9 script to type using the number buttons on most remotes?

Using The Boxee Remote With A PC

When it was first announced in 2010, the Boxee remote was a stroke of genius. Not because it controlled the BoxeeBox, the set-top media center PC, mind you. It was impressive because the reverse side of the remote had a small qwerty keyboard, just the thing for searching menus loaded up with movies and TV shows and entering URLs. [Martin]’s BoxeeBox loved his BoxeeBox, but it’s an old device now, with some support for web streaming (including Netflix) gone.

Other media center devices have filled the void in [Martin]’s life, but he loved that Boxee remote. Getting it working on his XBMC-equipped PC was a top priority. This meant figuring out a way to connect the RF receiver from a BoxeeBox to a USB port. It turns out this is pretty easy, requiring only a few parts and half of a USB cable.

[Martin] traced out the connectors on the RF receiver for the BoxeeBox, and found the usual V+, V-, Power, and Ground connections found in a USB cable. The receiver operated at 3.3 Volts, so stepping down the voltage required regulator. The rest of the project was simply putting everything in a project box and stuffing it behind his PC.

Windows identifies the RF receiver as a normal keyboard, so everything went swimmingly. Since [Martin] built this small device, a few people have come up with better keyboard layouts for XBMC and the Boxee remote, allowing this device to function far into the future.

Hackaday Links: March 23, 2014

hackaday-links-chain

[Jack] sent us a link to a Metropolitan Museum of Art video showing off a mechanized desk that plays music and has a ton of hidden compartments. Furniture makers of yore built hidden compartments in furniture all the time. After all, there weren’t credit cards back in the day and you had to keep important documents, cash, and everything else on hand. What strikes us is that this mates woodworking of the highest caliber with precision mechanics.

Before you get rid of that old box spring, ask yourself if you need to store dimensional goods. If you rip off the outer fabric, the network of wire inside makes a reasonable lumber rack.

And since we’re talking trash, we enjoyed seeing this water bottle wire spool minder which [Daniel] sent our way.

You know those portable DVD players you can hang from a headrest to entertain the kids on long trips? Well [John’s] broke, and like chasing the dragon, once you’re hooked on watching videos during car trips there’s no going back. Luckily he was able to throw a Raspberry Pi at the problem. He now has a portable OpenElec XBMC device controlled via a smartphone.

[Jaromir] posted some breakout board footprints that you can use. It’s not the footprints that impress us, but the idea of using them to fill up board space when spinning a new PCB. [Thanks Sarah]

LEGO Gachapon. Need we say more? Okay, truth be told we had to look it up too; Wikipedia says it’s spelled Gashapon. These are coin-operated machines that dispense toys inside of plastic capsules. This one’s made of LEGO and it’s awesome.

[Mikhail] actually built his own ballast resistors for some HeNe laser tubes. This is a bit easier than it might sound at first, as they are much lower power than the tubes used in cutters. But none-the-less an interesting, and successful, experiment.

HTPC For Lunch

xbmcLunchbox

If you’re hungry for a portable HTPC (Home Theatre PC) solution, maybe packing everything into a stylish mini lunch box is the way to go. [tomhung] wanted a quick and easy way to drag his media around while he’s away from home, but in an intentionally portable, self-contained enclosure, and the Star Wars lunch box provided plenty of space for the necessary guts.

Inside, he’s stacked the RasPi and a USB hub on top of one another. Each is mounted to its own platform made out of plastic DVD covers, and kept separate by standoffs carved from what appear to be the casings of inexpensive plastic pens. The stack also includes a 250GB 2.5″ HD, which [tomhung] simply attached with velcro for easy removal. The cables underwent minor surgery to keep the rat’s nest under control, and although the interior may still cause cable management enthusiasts to cringe, the exterior of the box cleans up well for its evening out. [tomhung] fit a simple 6-port keystone wall plate to the face of the lunch box to provide simple connections for all the important plugs.

Hackaday Links: November 17, 2013

hackaday-links-chain

If you purchased a knock-off FM transmitter and were unhappy with its broadcast range [Thiagohersan] shows how to double the range with a simple transistor amplifier circuit. He also hacked it for used without the 12V car socket.

[Patrick Herd] had a project that required him to strip about twenty Mindstorm batteries from their plastic enclosures. It’s not too tough getting into them but it does require drilling out the plastic rivets. He made a jig and used a CNC mill to automate the process.

Speaking of CNC, [Bertho] added some abstraction to distance himself from what he calls the “50+ years archaic syntax and grammar that G-code programs have”. The project is a meta-compiler for G-Code.

If you need a cold one and don’t have a HaDuino on hand you’ll thank yourself for hacking together this five-cent workbench bottle opener.

Just make sure you do all the lathe work for a custom speaker enclosure before you start pounding back those brewskis. Not only does [Shaun’s] creation look modern and stylish, but it boasts more than enough power to bump some tunes.

Here’s a project that adds LED feedback to your XBMC installation. It uses a Raspberry Pi to run the media center software, and a script to monitor it and actuate the lights on an Adafruit add-on board. At first glance you may not think much of it, but this is all the logic control you need to automate your viewing room. Who doesn’t want a home theater that automatically dims once you’ve made your viewing selection?

And finally, [08milluz] snagged some reactive electronics in the form of Disney’s Mickey Mouse ears. Apparently they glow different colors at live shows and based on where they are worn within the park. He did a complete teardown to show off the hardware within. It turns out to be controlled by an MSP430 which are known for their low power consumption. [Thanks Spikeo55]