Acetone Smoothing Results In Working Motor

Here’s something only ’90s kids will remember. In 1998, the Air Hogs Sky Shark, a free-flying model airplane powered by compressed air was released. This plane featured foam stabilizers, wings, a molded fuselage that served as a reservoir, and a novel engine powered by compressed air. The complete Sky Shark setup included an air pump. All you had to do was plug the plane into the pump, try to break the pressure gauge, and let the plane fly off into a tree or a neighbor’s rooftop. It’s still a relatively interesting mechanism, and although we’re not going to see compressed air drones anytime soon it’s still a cool toy.

Since [Tom Stanton] is working at the intersection of small-scale aeronautics and 3D printing, he thought he would take a swing at building his own 3D printed air motor. This is an interesting challenge — the engine needs to be air-tight, and it needs to produce some sort of usable power. Is a standard printer up to the task? Somewhat surprisingly, yes.

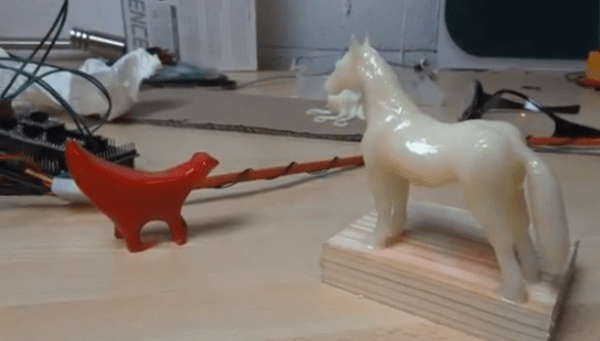
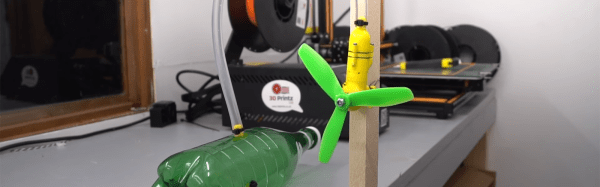
The design of [Tom]’s motor is more or less the same as what is found in the Air Hogs motor from twenty years ago. A piston is attached to a crank, which is attached to a flywheel, in this case a propeller. Above the cylinder, a ball valve keeps the air from rushing in. A spring is mounted to the top of the piston which pushes the ball out of the way, allowing air into the cylinder. At the bottom of the stroke, the ball closes the valve and air escapes out of the bottom of the cylinder. Simple stuff, really, but can it be printed?

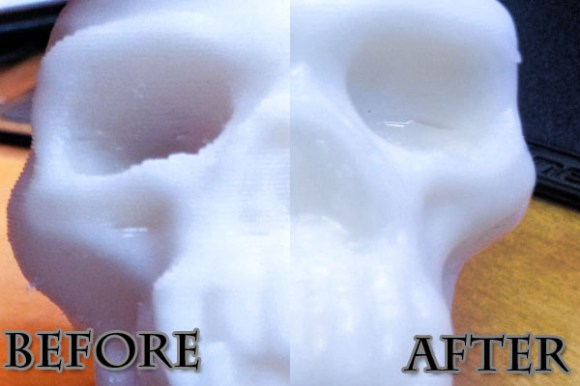
Instead of the usual printer [Tom] uses for his builds, he pulled out an old delta slightly modified for higher quality prints. Really, this is just a 0.2 mm nozzle and a few tweaks to the print settings, but the air motor [Tom] designed came out pretty well and was smoothed to a fine finish with acetone.

After assembling the motor, [Tom] hooked it up to a soda bottle serving as a compressed air reservoir. The motor worked, although it’s doubtful a plane powered with this motor would fly for very long. You can check out [Tom]’s video below.

Continue reading “Acetone Smoothing Results In Working Motor”

Using Acetone To Create Print Transfers

Looking for an easy way to print transfer a logo or image? Don’t have time to get transfer paper? Did you know you can use… regular paper? Turns out there’s a pretty awesome method that just uses Acetone to transfer the ink!

Using a laser printer, print off your desired logo or image. Don’t forget to mirror it! Place the paper onto the material you would like to transfer the graphic to, face down. It works best on wood and cloth, but can also be done on metal, glass and even plastic!  Continue reading “Using Acetone To Create Print Transfers”

Making PLA Stick To A 3D Printer Build Platform By Using Hairspray Or An Acetone ABS Slurry

[Chris] has been having some real problems getting PLA to stick to the build platform of his Printrbot. This is of course not limited to this brand of printers, and affects all extruder-based hardware using the PLA as a source material. He came up with a couple of ways to fix the problem.

The first is something we’re quite familiar with. The image above shows [Chris] applying a thin layer of hairspray to the platform. This is a technique the we use with our own 3D printer. The sheets of paper are used as a mask to help keep the sticky stuff off of the threaded rod. For more info on the hairspray trick [Chris] recommends that you read this article.

The second technique uses a slurry made from saturating a bottle of acetone with ABS leftovers. In the clip after the break he shows off a glass jar of the solvent with scraps from past print jobs hanging out inside. After a couple of days like that it’s ready to use. He takes a paper towel, wets it with the solution, and wipes on a very small amount. He does mention that this will eventually eat through the Kapton tape so apply it rarely and sparingly.

Continue reading “Making PLA Stick To A 3D Printer Build Platform By Using Hairspray Or An Acetone ABS Slurry”

Smoothing 3D Prints With Acetone Vapor

If you’ve ever used an extruding 3D printer, you know that the resulting prints aren’t exactly smooth. At the Southackton hackerspace [James] and [Bracken] worked out a method of smoothing the parts out using vapor. The method involves heating acetone until it forms a vapor, then exposing ABS parts to the vapor. The method only works with ABS, but creates some good looking results.

Acetone is rather flammable, so the guys started out with some safety testing. This involved getting a good air to fuel mixture of acetone, and testing what the worst case scenario would be if it were to ignite. The tests showed that the amount of acetone they used would be rather safe, even if it caught fire, which was a concern several people mentioned last time we saw the method.

After the break, [James] and [Bracken] give a detailed explanation of the process.

Continue reading “Smoothing 3D Prints With Acetone Vapor”

More Acetone-vapor Polishing Experiments

acetone-vapor-polishing-experiments

If you’re thinking of trying the acetone-vapor polishing process to smooth your 3D printed objects you simply must check out [Christopher’s] experiments with the process. He found out about the process from our feature a few days ago and decided to perform a series of experiments on different printed models.

The results were mixed. He performed the process in much the same way as the original offering. The skull seen above does a nice job of demonstrating what can be achieved with the process. There is a smooth glossy finish and [Christopher] thinks there is no loss of detail. But one of the three models he tested wasn’t really affected by the vapor. He thinks it became a bit shinier, but not nearly as much as the skull even after sending it through the process twice. We’d love to hear some discussion as to why.

There is about eight minutes of video to go along with the project post. You’ll find it after the jump.

Continue reading “More Acetone-vapor Polishing Experiments”

X-Cube Prism Becomes Dichroic Disco Ball

You’ve likely seen an X-cube, a dichroic prism used to split light into its constituent colours–you know, those fun little cubes you get when tearing apart a broken projector. Have you considered that the X-cube need not be a cube for its entire existence? [Matt] at “Matt’s Corner of Gem Cutting” on YouTube absolutely did, which is why he ground one into a 216-facet disco ball. 

That’s the hack, really. He took something many of us have played with at our desks thinking “I should do something cool with this” and… did something cool with it that most of us lack the tools and especially skills to even consider. It’s not especially practical, but it is especially pretty. Art, in other words.

The shape he’s using is known specifically to gemologists as “Santa’s Little Helper II” though we’d probably describe it as a kind of isosphere. Faceting the cube is just a matter of grinding down the facets to create the isosphere, then polishing them to brilliance with increasingly finer grit. This is done one hemisphere at a time, so the other hemisphere can be safely held in place with the now-classic cyanoacrylate and baking soda composite. Yes, jewelers use that trick, too.

We were slightly worried when [Matt] dumped his finished disco ball in acetone to clean off the cyanoacrylate– we haven’t the foggiest idea what optical-quality glue is used to hold the four prisms of an X-cube together and were a little worried acetone might soften the joints. That turned out not to be an issue, and [Matt] now has the most eye-catching sun-catcher we think we’ve ever seen.

We actually have seen suncatchers before, though admittedly it’s not a very popular tag around here. The closest build to this one was a so-called “hypercrystal” that combined an infinitiy mirror with a crystaline shape and dicloric tape for an effect as trippy as it sounds.

We also featured a deep-dive a while back if you want to know how these colourful, hard-to-pronounce coatings work.

Continue reading “X-Cube Prism Becomes Dichroic Disco Ball”

These are test stampings-- the final product looks a lot better.

2025 Component Abuse Challenge: Nail Your Next Decal

One of the hardest parts of a project — assuming it makes it that far — is finishing it up in an aesthetically pleasing manner. As they say, the devil is in the details, wearing Prada. Apparently the devil also has an excellent manicure, because [Tamas Feher] has come up with a way to introduce incredibly detailed decals (down to 0.1 mm) in cheap, repeatable fashion, using a technique borrowed from the local nail salon. 

The end result can look quite a bit better than the test piece above.

For those who aren’t in to nail art (which, statistically speaking, is likely to be most of you) there is a common “stamping” technique for putting details onto human fingernails. Nail polish is first applied to voids on a stencil-like plate, then picked up by a smooth silicone stamper, which is then pressed against the nail, reproducing the image that was on the stencil. If that’s clear as mud, there’s a quick demo video embedded bellow.

There’s a common industrial technique that works the same way, which is actually where [Tamas] got the idea. For nail salons and at-home use, there are a huge variety of these stencils commercially available for nail art, but that doesn’t mean you’re likely to find what you want for your project’s front panel.

[Tamas] points out that by using a resin printer to produce the stencil plate, any arbitrary text or symbol can be used. Your logo, labels, whatever. By printing flat to the build plate, you can take advantage of the full resolution of the resin printer — even an older 2 K model would more than suffice here, while higher res like the new 16 K models become the definition of overkill. The prints go quick, as they don’t need any structural thickness: just enough to hold together coming off of the plate, plus enough extra to hold your designs at a 0.15 mm inset. That doesn’t seem very thick, but remember that this only has to hold enough nail polish to be picked up by the stamper.

[Tamas] cautions you have to work fast, as the thin layer of nail polish picked up by the stamper can dry in seconds. You’ll want plenty of nail polish remover (or plain acetone) on hand to clean the stamper once you’ve finished, as well as your stencil. [Tamas] cautions you’ll want to clean it immediately if you ever want to use it again. Good to know.

While this is going outside of the nail art kit’s comfort zone, it might not quite be abuse. It is however a very useful technique to add to our ever-growing quiver of how to make front panels. Besides, we don’t specify you have to literally make components suffer; we just want to see what wild and wonderful substitutions and improvisations you all come up with.

Continue reading “2025 Component Abuse Challenge: Nail Your Next Decal”