The Internet Of Christmas Tree Watering

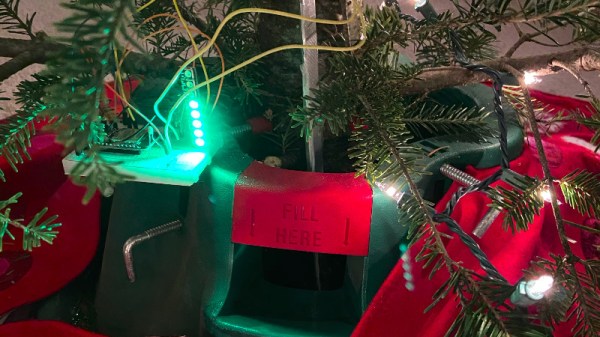
There’s nothing quite like a real Christmas tree, but as anyone who’s had one will know there’s also nothing like the quantity of needles that a real tree can shed when it runs short of water. It’s a problem [RK] has tackled, with a Christmas tree water level monitor that has integration with Adafruit’s cloud service to give a handy phone notification when more watering is required.

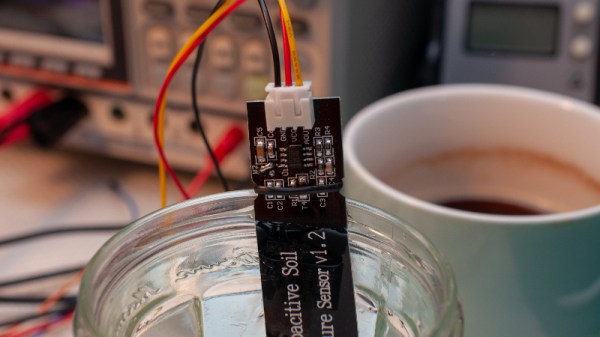
The real interest in this project lies in the sensor development path. There are multiple ways of water level sensing from floats and switches through resistive and light scattering techniques, but he’s taken the brave step of using a capacitive approach. Water can be used as a dielectric between two parallel metal plates, and the level of the water varies the capacitance. Sadly the water from your tap is also a pretty good conductor, so the first attempt at a capacitive sensor was not effective. This was remedied with a polythene “sock” for each electrode constructed with the help of a heat sealer. The measurement circuit was simply a capacitive divider fed with a square wave, from which an Adafruit Huzzah board could easily derive an amplitude reading that was proportional to the water level. The board then sends its readings to Adafruit.io, from which a message can be sent to a Slack channel with the notification enabled. All in all a very handy solution.

Plant care is a long-running theme in Hackaday projects, but not all of them need a microcontroller.

Trill: Easy Positional Touch Sensors For Your Projects

Creating capacitive touch-sensitive buttons is easy these days; many microcontrollers have cap-sense hardware built-in. This will work for simple on/off control, but what if you want a linear, position-sensitive input, like you’d find on a computer touchpad or your smartphone screen? Not so easy — at least until now. Trill is a family of capacitive touch sensors you can add to your projects as a linear slider, a square touchpad, or by creating your own touch surface.

Trill was created by the same team that designed Bela, an embedded platform for low-latency interactive applications, especially with audio. The new trio of Trill sensors rely on capacitive sensing to track finger movement, and communicate over I2C with your microcontroller or development board of choice. The Trill I2C library targets Arduino and Bela, but should be easy to port to any I2C host.

The hardware and software are both open-source — or will be as the Kickstarter that launched this morning has already met its goal. The firmware for the Cypress CY8C20636A (PDF) controller that powers these sensors will be released CC-BY-NC-SA. But, starting with the controller itself sounds like a lot of work that Trill has already done for you, so let’s have a look at what we know so far, along with a healthy dose of speculation.

Continue reading “Trill: Easy Positional Touch Sensors For Your Projects”

A Capacitive Soil Sensor Hack For Lower Voltage Supplies

A frequent beginner project involves measuring soil moisture levels by measuring its resistance with a couple of electrodes. These electrodes are available ready-made as PCBs, but suffer badly from corrosion. Happily there is a solution in the form of capacitive sensor probes, and it is these that [Electrobob] is incorporating in to a home automation system. Unfortunately the commercial capacitive probes are designed to run from a 3.3 V supply and [Bob]’s project is using a pair of AA cells, so a quick hack was needed to enable them to be run from the lower voltage.

The explanation of the probe’s operation is an interesting part of the write-up, unexpectedly it uses a 555 configured as an astable oscillator. This feeds an RC low pass filter of which the capacitor is formed by the soil probe, which in turn feeds a rectifier to create a DC output. This can be measured to gain a reading of the soil moisture level.

The probe is fitted with a 3.3 V LDO regulator, which is simply bypassed. Measurements show its output to be linear, so if the supply voltage is also measured an accurate reading can be gleaned. These probes are still a slightly unknown quantity to many who might find a use for them, so it’s extremely useful to be given this insight into them.

Raspberry Pi Catches The Early Bird

If you live in an area with high bird activity, setting up a bird feeder and watching some hungry little fellows visit you can be a nice and relaxing pastime. Throw in a Raspberry Pi with some sensors and it can also be the beginning of your next IoT project, as it was the case for [sbkirby] with his Bird Feeder Monitor project.

To track the arrival and departure times of his avian visitors, [sbkirby] attached a set of capacitive touch sensors to each side of his bird feeder, and hooked them up to a Raspberry Pi Zero W via a CAP1188 breakout board. The data is published via MQTT to another Raspberry Pi that serves as backend and stores the data, as well as to an optional additional camera-equipped Pi that will take a picture of each guest along the way. Taking into account that precipitation might affect the sensor readings, he also checks the current weather situation to re-calibrate the sensors if necessary, and also to observe a change in the birds’ presence and eating behavior based on weather conditions.

It seems that sensor-based animal feeding will always serve as inspiration for some new projects, whether feeding the animal itself is the goal, like most recently this fish feeder has shown, or whether the eating behavior is monitored and used for further research such as this squirrel-based weather forecast system.

Capacitive And Resistive Touch Sensors For Wearables

When you look at switching solutions for electronic wearables, your options are limited. With a clever application of conductive fabric and thread, you can cobble together a simple switch, but the vast array of switch solutions is much more than that. This one is different. The zPatch from [Paul Strohmeier], [Jarrod Knibbe], [Sebastian Boring], and [Kasper Hornæk] at the Human-Centred Computing Section at the University of Copenhagen gives eTextiles capacitive and resistive input. It’s a force sensor, a pressure sensor, and a switch, all made completely out of fabric.

The design of this fabric touch sensor is based around a non-woven resistive fabric made by Eeonyx. This fabric is piezo-resistive when compressed. This material is sandwiched between two layers of silver-plated polyamide fabric, which is then connected to the analog input of a microcontroller. On top of all this is a polyester mesh, with everything held together with iron-on sheets.

Reading this sensor with a microcontroller is extremely similar to a capacitive touch sensor made out of copper and FR4. All the code is available in a repo, and all the materials to reproduce this work can be found in the various links provided by the team. That last point — reproducibility — is huge for an academic work. Not only did the team manage to come up with something interesting, they actually provided enough documentation to reproduce their build.

In the video below, you can see how this sensor can be used to sense a hand hovering, a light touch, a hard press, or anything in between. Only two analog pins are required for each sensor, making the routing and layout of this eTextile should be relatively easy to integrate into clothing. It’s a great build, and we can’t wait to see the community pick up on these really cool sensors.

Continue reading “Capacitive And Resistive Touch Sensors For Wearables”

Get You An E-Textiles Sensor That Can Do Both

[Admar] is a software developer who was introduced to e-textiles in 2011. The bug firmly took hold, and these days he gives e-textile workshops at Eindhoven University of Technology. Here, students learn to build a single e-textile sensor that detects both presence and pressure. The workshop presentations are available on his site, which is itself a window into his e-textile journey.

Over the years, [Admar] has discovered that any e-textile project requiring more than a few connections is ripe for some kind of textile-friendly multi-point connector. Through trial and error, he designed a robust solution for use with an embroidery machine. The wires are made from conductive thread and soldered to a row of male header pins to make the transition out of fiber space. This transition requires solder, which quickly gets interesting when coupled with a fabric substrate and no solder mask. We wonder if spraying on mask beforehand would help, or if it would just soak in and stain and get in the way.

You can see the connector in practice in [Admar]’s capacitive multi-touch demo video after the break. He has stacked two pieces of fabric, each with a wire bus made of conductive threads, with the traces at right angles. Both sensors are wired to a Cypress PSoC5 to create a sensor matrix, and then to a laptop for visualization purposes. As his fingers approaches the fabric, the bar graphs roar upward to show increased capacitance. Once he makes contact, each finger appears as a yellow dot illustrating pressure.

E-textile projects aren’t limited to traces sewn by hand or embroidery machine. Circuit boards can be knitted, too.

Thanks for the tip, [Melissa]!

Building This TARDIS Is Anything But A Snap

As an avid fan of the show Dr Who, [Adam Sifounakis] saw a model for a laser-cut TARDIS that piqued his curiosity that eventually grew into a multi-week project involving multiple setbacks, missteps, revamps and — finally — gratification. Behold, his sound activated TARDIS.

First and foremost, assembling and painting the model was a fun puzzle — despite a few trips to the store — with a little backtracking on the painting due to impatience. Next, the creation of a pulsing soft white LED circuit timed with an audio clip to really sell the image of a mini-TARDIS proved to be a tedious ordeal, paying off in the end with a satisfying glow through the vellum-diffused windows on the model.

How to trigger the lights? [Sifounakis] initially wanted a capacitive sensor to trigger the sound effects, but that way lay dragons — and madness — so he went with snap-activated effect to activate the TARDIS like the Doctor himself. After struggling with building his own microphone setup, he switched to an electret mic with adjustable gain which worked like a charm. Setting up this TARDIS’ Adafruit Pro Trinket brain involved a snag or two, and after that it was smooth sailing!

Until he hit another hitch with the power circuit too, that is. Luckily enough, adding a capacitor to give the circuit a bit more juice on boot solved the issue. All that was left to do was dismantle and rebuild his circuit after all this troubleshooting and substitutions, and — finally — install it in his model.

With much satisfaction and a final rework of the LED pulsing effect, it was done. Check it out!

Continue reading “Building This TARDIS Is Anything But A Snap”