Hackaday Links: October 11, 2015

[Kratz] just turned into a rock hound and has a bunch of rocks from Montana that need tumbling. This requires a rock tumbler, and why build a rock tumbler when you can just rip apart an old inkjet printer? It’s one of those builds that document themselves, with the only other necessary parts being a Pizza Hut thermos from the 80s and a bunch of grit.

Boot a Raspberry Pi from a USB stick. You can’t actually do that. On every Raspberry Pi, there needs to be a boot partition on the SD card. However, there’s no limitation on where the OS resides,  and [Jonathan] has all the steps to replicate this build spelled out.

Some guys in Norway built a 3D printer controller based on the BeagleBone. The Replicape is now in its second hardware revision, and they’re doing some interesting things this time around. The stepper drivers are the ‘quiet’ Trinamic chips, and there’s support for inductive sensors, more fans, and servo control.

Looking for one of those ‘router chipsets on a single board’? Here you go. It’s the NixCoreX1, and it’s pretty much a small WiFi router on a single board.

[Mowry] designed a synthesizer. This synth has four-voice polyphony, 12 waveforms, ADSR envelopes, a rudimentary sequencer, and fits inside an Altoids tin. The software is based on The Synth, but [Mowry] did come up with a pretty cool project here.

Inkjet Transfers To Wood

Color Image on wood board

You can’t feed a piece of wood through a stock inkjet printer, and if you could it’s likely the nature of the material would result in less than optimal prints. But [Steve Ramsey] has a tutorial on inkjet transfers to wood over on his YouTube Channel which is a simple two-step method that produces great results. We really love quick tips like this. Steve explains the entire technique while creating an example project – all in under 2 minutes of video. We don’t want to get your hopes up though – this method will only work on porous absorbent surfaces like bare wood, not on PC boards. We’ve featured some great Inject PCB resist methods here in the past though.

The transfer technique is dead simple. [Steve] uses the backing from a used sheet of inkjet labels (the shiny part that normally gets thrown away). He runs the backing sheet through his inkjet printer. Since plastic coated backing sheet isn’t porous, the ink doesn’t soak in and dry. He then presses the still wet page onto a piece of wood. The wet ink is instantly absorbed into the wood. A lacquer clear coat seals the image in and really make the colors pop. We’d like to see how this method would work with other porous materials, like fabrics (though the ink probably wouldn’t survive the washing machine).

Click past the break for another example of [Steve’s] work, and two videos featuring the technique.

Continue reading “Inkjet Transfers To Wood”

Perfect PCBs With An Inkjet Printer

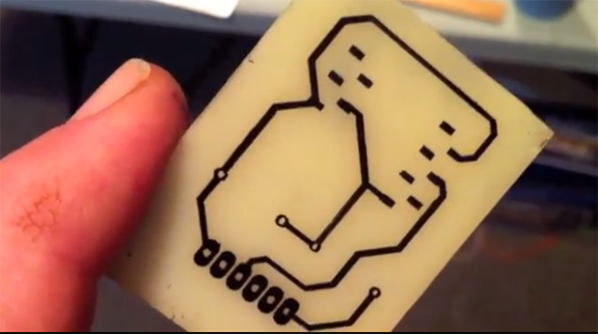
Instead of mucking about fabbing PCBs with the toner transfer method, or making masks for photosensitive boards, the holy grail of at-home circuit board manufacturing is a direct inkjet-to-etch method. [Don] isn’t quite there yet, but his method of producing circuit boards at home is one of the easiest we’ve ever seen.

[Don]’s boards begin by taking the output from Eagle and printing them with an Epson Artisan 50 inkjet printer. By sticking a piece of cardstock in the printer before the copper board, he’s able to precisely align the traces and pads onto the copper board.

When the board comes out of the printer, it’s only covered in ink. While some specialty inks are enough of an etch resist, [Don] comes up with a clever way to make sure acid doesn’t eat away copper in the needed places – he simply dusts on toner from a copier or laser printer, blows off the excess, and bakes the entire board in a toaster oven.

The result, seen above, are perfect traces on a circuit board without the need for ironing sheets of photo paper onto copper boards.

As far as the, “why didn’t someone think of this sooner” ideas go, this one is at the top. [Don] says the method should work  on sheets of aluminum for printing solder paste masks. Impressive work, and now the only thing left to do is getting two-layer boards down pat. For more direct to copper printing check out the hacks we’ve covered in years past.

Continue reading “Perfect PCBs With An Inkjet Printer”

Build A Bioprinter From Very Old Inkjet Cartridges

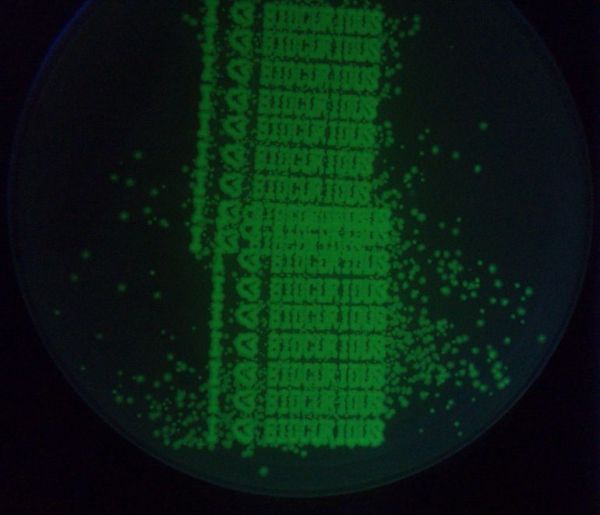
This column of messages was printed with Escherichia coli. That’s the bacteria better known as E. coli which can cause so many problems if it makes its way into our food. But the relative size and the fact that this strain was engineered to glow in the dark makes it a perfect candidate for Bio Printing. We find it even more interesting that it was printed using hacked inkjet and computer parts.

There are legitimate uses for this type of technology. But this project is aimed more at getting the word out about the method and how easy it can be. For us, it’s the close look at modern inkjet print heads that was the most interesting. It turns out that common cartridges have an overly high-resolution for this to work well. In order to get so many dots in such a small area the nozzle openings end up being too small for most biological material to fit through. There is also an issue with a filter built into the silicone technology inside.

The solution was to use the InkShield to drive cartridges from very old printers. This lets the team command the cartridge with an Arduino, making it dead simple to tweak the way the material is deposited. They mounted the cartridge holder (using decades-old technology in the form of HP Deskjet 500 cartridges) on the sled of an optical drive and went from there.

Take a glance at the printer in action in the clip after the break.

Continue reading “Build A Bioprinter From Very Old Inkjet Cartridges”

Printing PCBs On A Junked Epson Printer

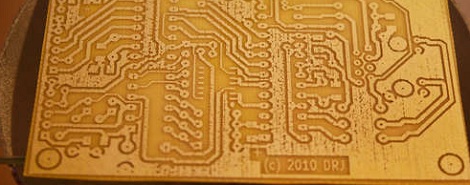
When it comes to making PCBs at home really quickly, there’s not much to improve upon with [Ryan]’s bodged up Epson printer that prints an etch mask directly on a piece of copper clad board.

Like most of the direct to copper PCB printer conversions we’ve covered ( 1, 2, 3 ), [Ryan]’s build relied on an Epson printer and Mis Pro yellow ink. The Mis Pro ink is one of the most etch-resistive substances that can be shot out of an inkjet printer, and Epson printer cartridges use a piezo pump that is perfect for squirting ink out on command.

After tearing the printer apart and lifting the print head a bit, [Ryan] needed a proper feed system to control where on the copper he was printing. He managed to make a board carrier out of a sheet of aluminum. By taping down the copper clad board, everything seems to work phenomenally.

After the break you can check out how fast [Ryan] can print out a fully etch-resisted PCB. It’s not improbable that he could produce a few dozen boards an hour; something our toner transfer PCB production method would kill for.

via makezine

Continue reading “Printing PCBs On A Junked Epson Printer”

Computer-aided Paint Brush

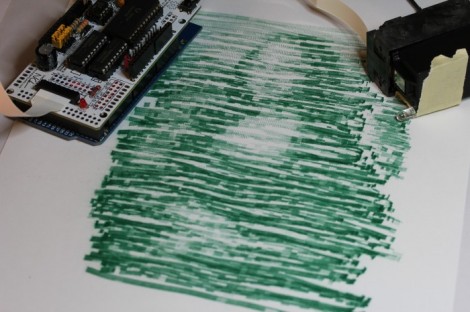
[Nirav] painted this masterpiece by hand… with a little help from a computer. He calls it the semi-automatic paintbrush because you do need to move it over the canvas by hand, but a computer decides when to dispense the ink.

He’s using a piece of hardware we looked at back in September called the InkShield that got a boost from Kickstarter. It’s an Arduino shield that drives an inkjet printer cartridge. The trick is how to know when the cartridge is in position for printing.

The system uses visual processing for that. [Nirav] added an IR led to the cartridge, and uses a camera to extrapolate its position. He actually reused a Python homography module which he had written for use with a projector. That setup was developed as a digital white board, but works just as well for this purpose.

He mentions that results like this won’t be featured in an art museum. But the look is unique, and we’d love to make a set of geeky thank-you notes using the technique.

Printable Solar Cells That Can Be Folded Up When Not In Use

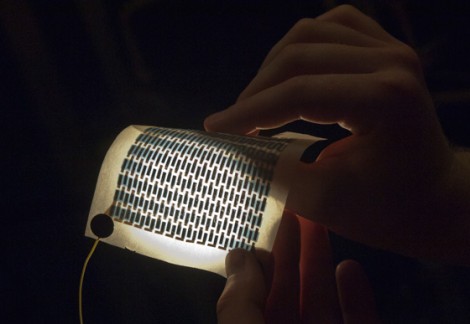
Here’s a photovoltaic cell that can be printed onto paper. The manufacturing technique is almost as simple as using an inkjet printer. The secret is in the ink itself. It takes five layers deposited on the paper in a vacuum chamber. But that’s a heck of a lot easier than current solar cell fabrication practices. In fact, is sounds like the printing process is very similar to how potato chip bags are made. This is significant, because it could mean a fast track to mass production for the technology.

It isn’t just the easy printing process that excites us. Check out the video after the break where a test cell is placed on top of a light source while being monitored by a multimeter. It’s been folded like a fan and you can see a researcher sinch up the cell into a small form for storage. It’s a little counter-intuitive; for instance, you wouldn’t want to make a window shade out of it because it would have to be down during the day to get power. Be we think there’s got to be some great use for these foldable properties. Continue reading “Printable Solar Cells That Can Be Folded Up When Not In Use”