Smart Sphere Or Magnetic Magic

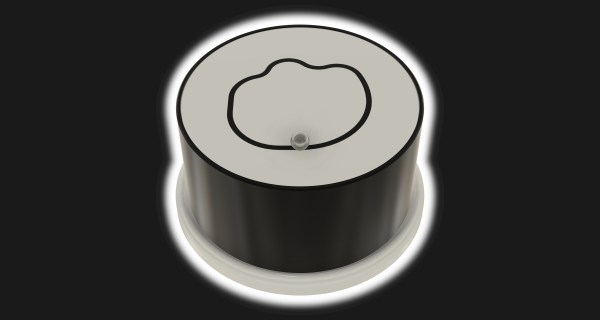
Sometimes a coworker sees something on your desk, and they have to ask, “Where can I get one of those?” and that has to be one of the greatest compliments to a maker. [Greg Zumwalt] nailed it with his “Marblevator Line Follower.” Roboticists will immediately recognize a black line on a white surface, but this uses hidden mechanics instead of light/dark sensors. Check out the video after the break to see the secrets, or keep bearing with us.

Inside the cylinder is a battery, charging circuit, inductive receiving coil, and a motor turning a magnet-laden arm beneath the cap. The overall effect is an illusion to convince people that the marble has a mind of its own. You can pick up the cylinder, and it keeps moving as expected from an autonomous bot. The black line is actually a groove, so the bearing follows a curvy course without any extra movements from the magnets within. The two-tone look is super-clean, but the whimsy of a “smart bearing” makes this an all-around winner.

“Marblevator Line Follower” is not the first Marblevator we featured, and we love our bouncing-bearing baubles and music-making machines.

Continue reading “Smart Sphere Or Magnetic Magic”

RPi Tank Invades Living Room, Teaches OpenCV

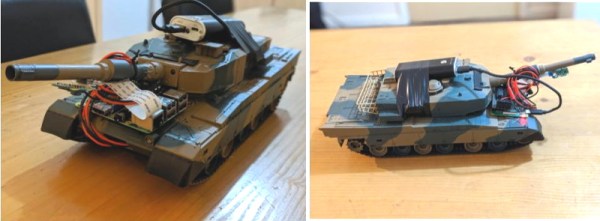
If you’re looking for a simple project to start exploring the intersection of OpenCV and robotics, then the RPi Tank created by [Vishal Varghese] might be a good place to start. A Raspberry Pi and a few bits of ancillary hardware literally taped to the top of a toy M1 Abrams tank becomes a low-cost platform for testing out concepts such as network remote control and visual line following. Sure, you don’t need to base it around an Abrams tank, but if you’re going to do it you might as well do it with style.

As this is more of a tech demonstrator, the hardware details are pretty minimal. [Vishal] says you just need a relatively recent version of the Raspberry Pi, a MotoZero motor controller, and a camera module. To provide juice for the electronics you don’t need anything more exotic than a USB power bank, which in his case has been conveniently attached to the top of the turret. He doesn’t provide exact details on how the MotoZero gets wired into the Abram’s motors, but we imagine it’s straightforward enough that the average Hackaday reader probably doesn’t need it spelled out for them.

Ultimately, the software is the heart of this project, and that’s where [Vishal] really delivers. He’s provided sample Python scripts ordered by their level of complexity, from establishing a network connection on the Raspberry Pi to following a line of tape on the ground. Whether used together or examined individually, these scripts provide a great framework to get your first project rolling. Literally.

Line following robots, in their many forms, have been a favorite hacker project for years. Whether they home in with an analog circuit or replace the lines with hidden wires, they’re a great way to get started with semi-autonomous robotics.

Hackaday Prize Entry: E.R.N.I.E. Teaches Robotics And Programming

[Sebastian Goscik]’s entry in the 2017 Hackaday Prize is a line following robot. Well, not really; the end result is a line following robot, but the actual project is about a simple, cheap robot chassis to be used in schools, clubs, and other educational, STEAM education events. Along with the chassis design comes a lesson plan allowing teachers to have a head start when presenting the kit to their students.

The lesson plan is for a line-following robot, but in design is a second lesson – traffic lights which connect to a main base through a bus and work in sync. The idea of these lessons is to be fairly simple and straightforward for both the teachers and the students in order to get them more interested in STEM subjects.

What [Sebastian] noticed about other robot kits was that they were expensive or complicated or lacked tutorials. Some either came pre-assembled or took a long time to assemble. [Sebastian] simplified things – The only things required after the initial assembly of the chassis are: Zip-ties, electrical tape and a few screws. The PCB can’t be disassembled, but the assembled PCB can be reused.

The hardware [Sebastian] came up with consists of some 3mm material that can be laser cut (acrylic or wood) and a sensor board that has 5 IR LEDs and corresponding IR sensors. The chassis can be put together using nothing more than a Phillips screwdriver, and the sensor PCBs are well documented so that soldering them is as easy as possible. An Arduino is used as the brains of the unit.

[Sebastian] has come up with a great project and the idea of a platform like this with a couple of lesson plans included is a great one. He’s released the hardware under an Open Hardware license as well so others can share and add-on. Of course, there are other line following robots, like this miniature one created with analog circuitry, and there are other open source robots for teaching, like this one. But [Sebastian]’s focus on the lesson plans is a really unique way of approaching the problem – one that will hopefully be very successful.

Continue reading “Hackaday Prize Entry: E.R.N.I.E. Teaches Robotics And Programming”

Black Line Follower: A Modern Bristlebot

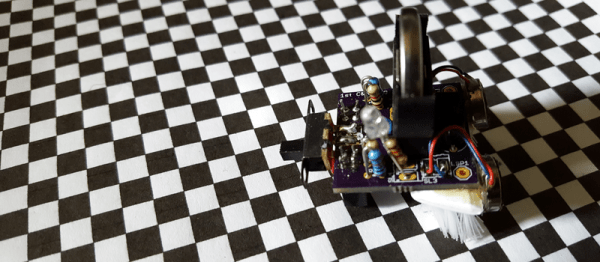
It’s been a while since we’ve seen much action on the bristlebot front, which is too bad. So we’re happy to see [Extreme Electronics]’s take on the classic introductory “robot”: the Black Line Follower. The beauty of these things is their simplicity, so we’ll just point you to his build instructions and leave the rest to you.

The original bristlebot is a fantastic introduction to electronics, because it’s simple enough that you can cobble one together in no time. A battery, a pager motor, and a toothbrush head are all you need. But it goes where it wants, rather than where you want it to go.

Adding steering is as simple as tying two bristlebots together and firing one motor at a time to execute a turn. The Black Line Follower is of this style.

Of course, any good idea can be taken to extremes, as in this giant weight-shifting bristlebot, or this super-tiny IR-controlled bristlebot.

But that was more than five years ago now. What happened to the mighty engines of bristlebot creativity? Has the b-bot seen its finest hour? Or are we just waiting for the next generation to wiggle up to the plate?

Continue reading “Black Line Follower: A Modern Bristlebot”

Line Following Robot Trains Runners

Can your line following robot move faster than [Usain Bolt] who has been described as “The World’s Fastest Timed Human”? Puma, the athletic footwear, apparel and accessories company, created such a robot to help train their company sponsored athletes.

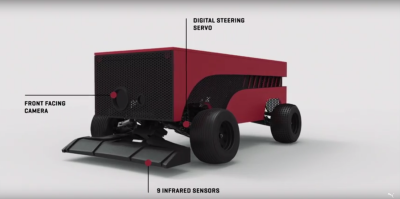
The shoebox-sized robot exceeds [Bolt]’s top speed of 44-km/hour. At that speed, following a line gets tricky. It took the development team 8 prototypes to attain that capability. Inside the BeatBot an Arduino reads 9 infrared sensors for line detection at 100 samples a second. A digital servo controls the Ackerman steering mechanism to follow the line on the track or floor. Wheel encoders provide the data for speed and distance measurement.

The user can set the distance of the run and the time to beat. Run pacing can also be adjusted. LEDs on the robot provide the starting ‘gun’ and help the runner see the BeatBot using peripheral vision. Two GoPro cameras, front and rear, provide a visual record of the run.

Puma believes that actually running against a competitor, even a robot, improves performance more than just running against the clock. They’re betting a grown-up line follower will help Olympic class athletes improve their performance. Continue reading “Line Following Robot Trains Runners”

This Analog Cambot Plays Outside The Lines

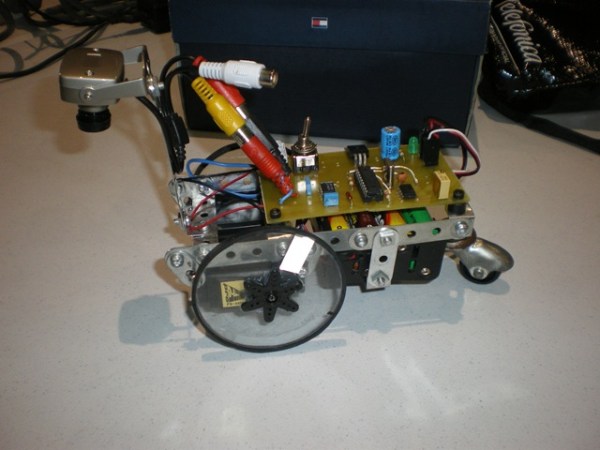
There are quite a few flavors of line following robot. No matter how they’re made, most are built for speed and accuracy. The Cambot by [Jorge Fernandez] however makes use of a traditional video camera to read visual input instead of the reflective sensors we’re used to seeing in these types of robots. Because of this it lacks those swift and agile qualities, but scores points with its unique analog design, over-sized tricycle wheels, and stylish RCA jacks poking out on the side.

Coupled with a PIC 16F84A microcontroller, [Fernandez] divides the video input from the camera into 625 lines. The PIC is responsible for scanning horizontally across these lines and translating the proportions of black and white into PWM pulses. The duration these proportions are seen by the camera determines the PWM frequency fed to the left and right servo motors driving the robot.

As far as line-followers go, this is a refreshing retro approach to the concept. [Hernandez] outlines the finesse about driving his cambot on his blog (an English translation can be read here) and provides a complete schematic for those who are interested in whipping up their own quirky little machine.

Continue reading “This Analog Cambot Plays Outside The Lines”