Safe Cracking Is [Nate’s] Latest R&D Project

We love taking on new and awesome builds, but finding that second part (the “awesome”) of each project is usually the challenge. Looks like [Nathan Seidle] is making awesome the focus of the R&D push he’s driving at Sparkfun. They just put up this safe cracking project which includes a little gamification.

The origin story of the safe itself is excellent. [Nate’s] wife picked it up on Craig’s List cheap since the previous owner had forgotten the combination. We’ve seen enough reddit/imgur threads to not care at all what’s inside of it, but we’re all about cracking the code.

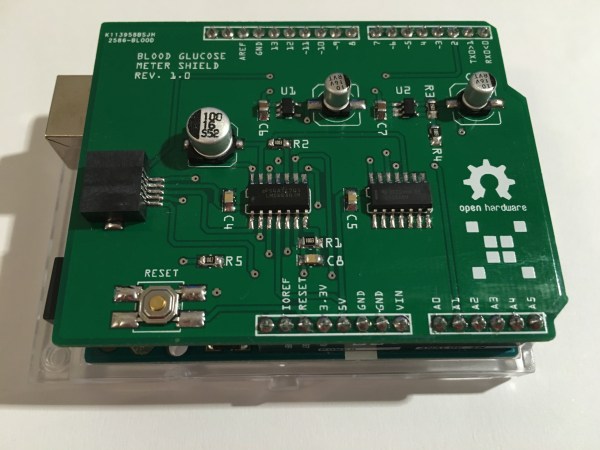
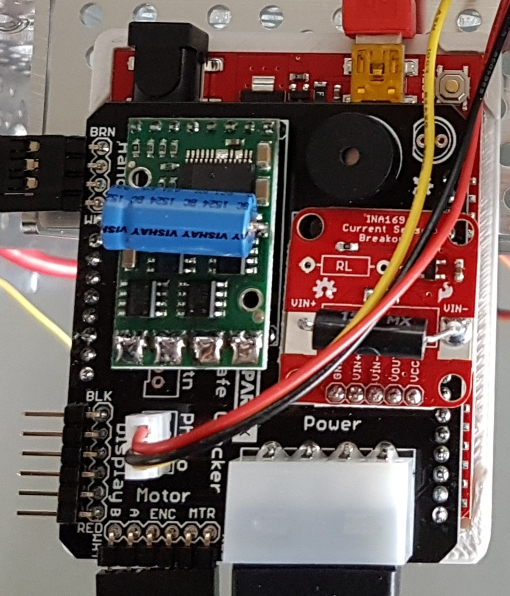
The SparkX (the new rapid prototyping endeavor at Sparkfun) approach was to design an Arduino safe cracking shield. It has a motor driver for spinning the dial and can drive a servo that pulls the lever to open the door. There is a piezo buzzer to indicate success, and the board as a display header labeled but not in use, presumably to show the combination currently under test. We say “presumably” because they’re not publishing all the details until after it’s cracked, a process that will be live streamed starting Wednesday. This will keep us guessing on the use of that INA169 current sensor that plugs into the safecracking shield. There is what appears to be a reflectance sensor above the dial to keep precise track of the spinning dial.

Electrically this is what we’d expect, but mechanically we’re in love with the build. The dial and lever both have 3D printed adapters to interface with the rest of the system. The overall framework is built out of aluminum channel which is affixed to the safe with rare earth magnets — a very slick application of this gear.

The gamification of the project has to do with a pair of $100 giveaways they’re doing for the closest guess on how long it’ll take to crack (we hope it’s a fairly fast cracker) and what the actual combination may be. For now, we want to hear from you on two things. First, what is the role of that current sensor in the circuit? Second, is there a good trick for optimizing a brute force approach like this? We’ve seen mechanical peculiarities of Master locks exploited for fast cracking. But for this, we’re more interested in hearing any mathematical tricks to test likely combinations first. Sound off in the comments below

Ask Hackaday: What Can You Do With Origami?

At some point, most of us have learned a little of the ancient art of origami. It’s a fascinating art form, and being able to create a recognizable model by simply folding paper in the right order can be hugely satisfying. Most of us move on to other pursuits once we master the classic crane model, but the mathematics behind origami can lead some practitioners past the pure art to more practical structures, like this folding ballistic barrier for law enforcement use.

The fifty-pound Kevlar and aluminum structure comes from Brigham Young University’s College of Mechanical Engineering, specifically from the Compliant Mechanisms Research program. Compliant mechanisms move by bending or deflecting rather than joints between discrete parts, and this ballistic shield is a great example. The mechanism is based on the Yoshimura crease pattern, which can be quickly modeled with a piece of paper. Scaling that up to a full-sized structure, light enough to be fielded but strong enough to stop a .44 Magnum round, was no mean feat. But as the video below shows, the prototype has a lot of potential.

Now it’s your turn: what applications have you seen for compliant mechanisms? Potential applications range in scale from MEMS linkages for microinjecting cells to huge antennas that unfurl in orbit. We’ve featured a few origami-like structures before, like this self-assembling robot or a folding quadcopter, but neither of these really rates as compliant. This elegant parabolic satellite antenna is more like it, though. There are applications for designing origami and a mathematical basis for the field; has anyone tried using these tools to design compliant structures? Sound off in the comments below.

Continue reading “Ask Hackaday: What Can You Do With Origami?”

Make Your Own Arduino Header Pins

There are two kinds of people in the world (and, no, this isn’t a binary joke). People who love the Arduino, and people who hate it. If you’ve ever tried to use a standard prototype board to mount on an Arduino, you’ll know what kind of person you are. When you notice the pins aren’t on 0.1 inch centers, you might think, “What the heck were those idiots thinking!” Or, you might say, “How clever! This way the connectors are keyed to prevent mistakes.” From your choice of statement, we can deduce your feelings on the subject.

[Rssalnero] clearly said something different. We weren’t there, but we suspect it was: “Gee. I should 3D print a jig to bend headers to fit.” Actually, he apparently tried to do it by hand (we’ve tried it, too). The results are not usually very good.

He created two simple 3D printed jigs that let you bend an 8-pin header. The first jig bends the correct offset and the second helps you straighten out the ends again. You can see the result in the picture above.

Continue reading “Make Your Own Arduino Header Pins”

Hackaday Prize Entry: Reverse Engineering Blood Glucose Monitors

Blood glucose monitors are pretty ubiquitous today. For most people with diabetes, these cheap and reliable sensors are their primary means of managing their blood sugar. But what is the enterprising diabetic hacker to do if he wakes up and realizes, with horror, that a primary aspect of his daily routine doesn’t involve an Arduino?

Rather than succumb to an Arduino-less reality, he can hopefully use the shield [M. Bindhammer] is working on to take his glucose measurement into his own hands.

[Bindhammer]’s initial work is based around the popular one-touch brand of strips. These are the cheapest, use very little blood, and the included needle is not as bad as it could be. His first challenge was just getting the connector for the strips. Naturally he could cannibalize a monitor from the pharmacy, but for someone making a shield that needs a supply line, this isn’t the best option. Surprisingly, the connectors used aren’t patented, so the companies are instead just more rigorous about who they sell them to. After a bit of work, he managed to find a source.

The next challenge is reverse engineering the actual algorithm used by the commercial sensor. It’s challenging. A simple mixture of water and glucose, for example, made the sensor throw an error. He’ll get it eventually, though, making this a great entry for the Hackaday Prize.

The HackadayPrize2016 is Sponsored by:

Teensy Gets A Prop Shield

God of microcontrollers and king of electrons [Paul Stoffregen] is famous for his Teensy microcontroller dev boards, and for good reason. If you have a project that does more than blink a few pins, but doesn’t need to run a full Linux build, any one of the Teensy dev boards are a great option. As a dev board, [Paul] has released a few ‘shields’ that add various functionality – for example the audio adapter board that is able to play CD quality audio and perform DSP and FFT operations. Now, [Paul] has launched a new shield designed for interactive light and sound effects on art installations and for the rest of the crew at Burning Man. It’s called the Prop Shield, and adds more sensors, audio amps, and blinkies than a Teensy has ever had.

The Teensy Prop shield is equipped with 10DOF motion sensors, including a FXOS8700 accelerometer/magnetometer, a FXAS21002 gyroscope, and an MPL3115 altimeter and temperature sensor. A two Watt LM48310 audio amplifier can drive 4 or 8 ohm speakers, and 8 Megabytes of Flash memory can hold all the data for audio or a very long string of APA102 individually addressable LEDs.

The combination of motion sensors, audio amplifiers, and LED drivers may seem like an odd combination, but this is a shield for very odd projects. Stage effect, wearables, and handheld props become very easy with this board, and haunted houses are about to get really cool. With the on-board Flash, this board makes for a very capable data logger, and although the altitude sensor only reads pressure up to about 40,000 feet, this could be a very handy board for high altitude balloons.

The Prop Shield is available now in [Paul]’s shop. There are two versions, one ‘wit’ the motion sensors for $19.50, and the other ‘witout’ motion sensors for $8.40. The distinction is based on the Philly Cheesesteak protocol.

For the last few weeks, [Paul] has put the prop shield in the hands of a few dozen beta testers. Their impressions are in a forum thread, and like all of [Paul]’s projects, the response has been very good.

Tiny Raspberry Pi Shield For High-Quality RF Signals

Among its many tricks, the Raspberry Pi is capable of putting clock signals signal out on its GPIO pins, and that turns out to be just the thing for synthesizing RF signals in the amateur radio bands. What [Zoltan] realized, though, is that the resulting signals are pretty dirty, so he came up with a clever Pi shield for RF signal conditioning that turns a Pi into a quality low-power transmitter.

[Zoltan] stuffed a bandpass filter for broadband noise, a low-pass filter for harmonics, and a power amplifier to beef up the signal a bit into a tiny shield that is cleverly engineered to fit any version of the Pi. Even with the power amplifier, the resulting transmitter is still squarely in the realm of QRP, and the shield is optimized for use as a WSPR beacon on the 20-meter band. But there’s plenty of Pi software available to let hams try other modes, including CW, FM, SSB, and even SSTV, and other signal conditioning hardware for different bands.

Yes, these are commercially available products, but even if you’re not in the market for a shield like this, or if you want to roll your own, there’s a lot to learn from [Zoltan]’s presentation at the 2015 TAPR Digital Communications Conference (long video below). He discusses the difficulties encountered getting a low-profile shield to be compatible with every version of the Pi, and the design constraints that led to the decision to use SMT components.

Continue reading “Tiny Raspberry Pi Shield For High-Quality RF Signals”

Finally, A Modern Theremin

Ever wanted to own your own Theremin but couldn’t justify dropping hundreds of dollars on one? Now you can build your own, or buy it for a quintuplet of Hamiltons. The Open.Theremin.UNO project has built up antenna-based oscillator control around the ubiquitous Arduino Uno board.

So what’s the Arduino in there for? This is a digital Theremin, but check out the video below and you’ll agree that it sounds amazing and has excellent response. The aluminum antennas used for volume and pitch are attached to the top portion of the shield but it sounds like they’re not included in the kit. Don’t fret, you can use a variety of materials for this purpose. On the bottom you need to connect a speaker cable, and also a ground wire if that cable’s not grounded.

As the name implies, this is Open Hardware and we’re quite happy with the documentation on their site and the BOM (found on the GitHub repo). This design was shown off back in 2013 hiding in a pack of cigarettes. If you don’t want to build your own they’re selling kits on their site for 48 Euro delivered, or on Tindie for $55.

Okay, we’ve screwed this up so many times that we’re going to try to get it right here: the Theremin was not heard in the opening of Star Trek the original series, or in the opening of Doctor Who. It wasn’t featured in “Good Vibrations” either. As far as we can tell, it’s not used for anything in pop culture at all… but recognizing the sound and knowing what one is remains core geek knowledge.

If you want a Theremin to play using your entire body you need the Theremin Terpsitone.

Continue reading “Finally, A Modern Theremin”