Etching a printed circuit board generally takes a bit of time and uses a lot of etchant. [TechShopJim] posted a method that uses a sponge to reduce the amount of etchant used while speeding up the entire process. First, a resist is applied using either a sharpie or the toner transfer method. Using gloves to handle everything, he soaked a sponge in ferric chloride and continually wiped a copper-clad board until all the exposed copper was removed. This technique moves the etchant around more, keeping “fresh” etchant closer to the copper. If you can’t procure ferric chloride, you can also use our method that uses 2 household chemicals: hydrogen peroxide and hydrochloric acid.
Month: July 2009
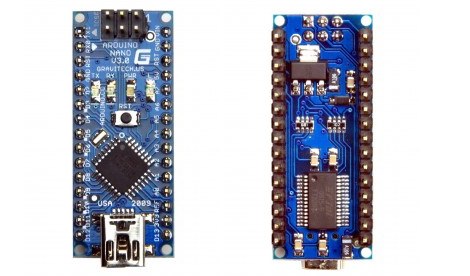
Arduino Nano Updated
The official Arduino Nano design has been updated to version 3.0. Like other new Arduino designs, it’s using the ATmega328 instead of the ATmega168. It’s also a slightly more reasonable $35. The small board is designed to be plugged directly into a breadboard and accessed via mini USB cable. This new design is also two layers instead of four making it easier to produce and modify. The new Nanos will ship at the end of the month.
4 LED RGB Controller
[Steven] was inspired by the BlinkM and Shiftbrite modules, but really wanted something that could be controlled via RS232. He decided to build his own RGB LED module capable of PWM that fit his needs. He’s using a PIC16F628 microcontroller as the base. Each module has 4 individually addressable LEDs with multiple intensities for each color. The units can be daisy chained as well. The schematics and PCB files are available on his site for download.
[via Hacked Gadgets]
Parts: 4×20 VFD Character Display (NA204SD02)
Futaba makes vacuum florescent character displays that can be used as a drop-in replacement for common character LCDs. VFDs have a wider viewing angle, and generally look cooler.
Futaba’s character displays can be interfaced using the standard 8-bit or 4-bit parallel LCD interface, or a simple two-wire protocol. The protocol type is set by resistors on the back of the display, so it’s not particularly easy to change without a hot-air rework station. Today we’ll demonstrate a serially-interfaced VFD using the Bus Pirate.
Continue reading “Parts: 4×20 VFD Character Display (NA204SD02)”
The Prism: Laser Synth-Guitar
[youtube=http://www.youtube.com/watch?v=HP2zbGes2Bg]
This is an interesting instrument. Part laser harp, part guitar, the Prism seems to have some potential. [Jeff-o] put some major time and effort into refinishing a guitar, building the circuit and putting it all together. He did a great job, the instrument looks fantastic and appears to work. We do have a request though; please post a video of it being played as an instrument. So many of these electronic instrument projects just spit out random noises. While we understand that some people are into that, we would love to hear some control. How about intentionally changing notes to make a melody? Based on the description, it should have control for pitch, and even speed of the oscillation. So let’s hear some music. We don’t care if you’re any good, just please play some music with it. If you would like to build your own, he has the schematics and PCB layout available for download.
Photo Interrupters Explained
[Eric] sent in this very informative writup on how to use Photo interrupters. These things can be used for many things, he lists pellet dispensing and limit switches. He found one in his junk box and realized he knew very little about it. After some exploring and research, he’s here to educate the rest of us. There’s a good breakdown of the circuit itself which is pretty simple as well as a test circuit and some sample code.
Chainsaw Powered Bicycle
We’ve covered weed whacker bicycles before and you can even buy 66cc conversion kits now. [geoff390] posted a few videos over on YouTube about another motor option. In the first video embedded below, he goes over the basic parts of his bike. The chainsaw motor is mounted to the side of the back tire and a metal drive wheel extending from the chainsaw shaft makes contact with it. The motor assembly is mounted on a hinge and the friction between the drive wheel and the back tire is adjusted with a turnbuckle. He posted a more detailed second video in which he goes over some of the finer details of the bike and some of the issues he’s had. Continue reading “Chainsaw Powered Bicycle”