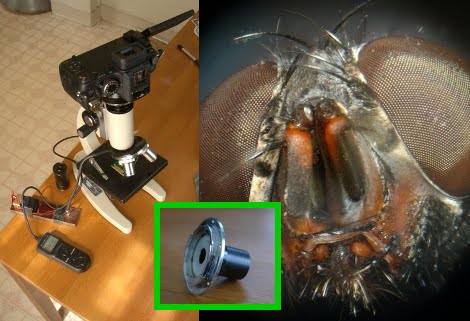
[Ben Krasnow] is capturing some great snapshots using a microscope adapter and some tricks. The camera attachment is just a lens adapter ring with a tube added. Unlike other microscope imaging hacks we’ve seen he used a real microscope but found that the pictures had a bit of light distortion to them. The camera sensor was picking up a glare reflected on the inside of the black tube. By adding a washer and repositioning the apparatus he got over that hurdle. The final part of the puzzle is image processing. By taking several pictures at different focal lengths and compositing them he gets killer photos like the compound eyes of that house fly seen above.
Year: 2010
1W Blue Laser – Remarkably Easy And Dangerous
[youtube=http://www.youtube.com/watch?v=lE3F7vjYx4U]
We’ve been covering Laser Hacks pretty much since the beginning but it’s surprising to see the niche market that has sprouted up around building powerful handheld modules. [Styropyro] filmed the video above as a tutorial on building a 1W blue laser. The “flashlight” that he starts with includes a heat sink intended for a laser diode. It seems there’s a lot of choices when choosing one of these build kits. A one Watt blue laser diode is press fit into the heat sink and wired in place. The body of the device receives a boost converter to get the batteries up to 1A, and once the assembly is complete the burning begins. It lights candles, matches, and pops balloons; the normal laser demo goodies.
So it’s a pretty easy build. But it’s also easy for someone being careless to damage their eyes. As [Styropyro] mentions in his comments, just looking at the dot created by the laser will damage your sight.
Microsoft Engineers Reinvent The Optimus Keyboard
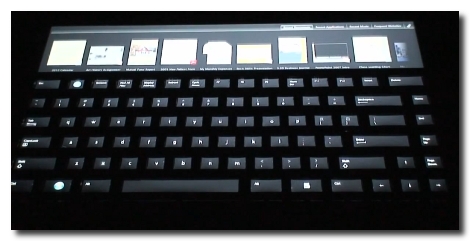
Looks like Microsoft has come up with a pretty slick little keyboard. It’s very much like the Optimus, which has an OLED screen in every key, except that it doesn’t have a screen in every key. Instead there’s just one screen on the whole unit and they keys have been overlayed on top while allowing the image to show through. Brilliant really, since this should drastically reduce the $2400 price tag of the original. That is, if you could buy the device. Microsoft’s not selling this hardware (yet anyway), but offering it up as test hardware for the UIST Innovation Contest. It will be interesting to see what the students come up with. This keyboard should be easier to program for since it involves manipulating just one screen. There is also extra space at the top that is touch-sensitive. See for yourself after the break.
Continue reading “Microsoft Engineers Reinvent The Optimus Keyboard”
FPSLIC Powered LED Matrix
[Mathieu] built this display in hopes that he can play pong on it. You can imagine the headache that awaits when trying to figure out how to drive the 6144 bi-color LEDs. I must have worked out because the thing looks great in the video after the break. The solution he chose was a bit unfamiliar to us though. He used a Field Programmable System Level Integrated Circuit produced by Atmel, or FPSLIC. This is a kind of mash-up of components we’re more accustomed to.
The AT94K is a single chip that houses an 8-bit AVR microcontroller, and FPGA, and SRAM. This project uses that FPGA to handle the multiplexing of the display via code written in VHDL. The AVR core receives data via a USB port, stores two images in the SRAM (one for each LED color), and then outputs it to be drawn on the display. On second thought, this project sounds like fun and it’s a great way to get start learning that VHDL you’ve been putting off. Continue reading “FPSLIC Powered LED Matrix”
Replace Batteries With USB Power
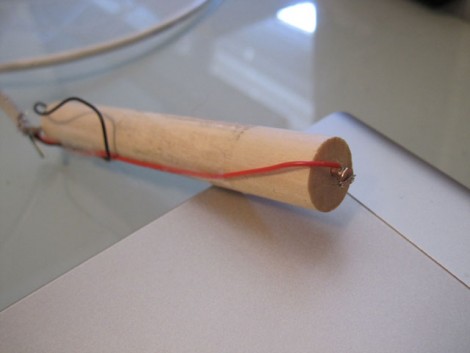
[Mark Bog] thought it was a waste to use batteries for his desktop touch pad. Quite frankly we agree that if you can avoid using disposable cells you should. He ditched the dual AA batteries inside of his Magic Trackpad and built a battery-sized adapter to feed it some juice. It consists of a dowel of similar diameter with a screw in each end. He scavenged a USB cord, connecting hot and ground wires to the corresponding pole of the adapter. Now his Trackpad is USB powered and never in need of a battery replacement or even a recharge.
We’re not familiar with the inner workings of Apple’s Magic Trackpad. We assume there’s a voltage regulator inside and we hope it doesn’t have a problem working with the 5V regulated power coming in from the adapter. If you’ve got the skinny on the hardware we’d love to hear about it in the comments. One last thing: because the forum linked above requires a login to view the images in the post, we’ve embedded the rest of them after the break for your convenience.
Modchip Hacks PS3 Via USB Port
[youtube=http://www.youtube.com/watch?v=4jOEbZEkp9A]
It’s been a long time coming, but the video above shows a modchip circumventing the PlayStation 3 security by running a game from a hard drive. The sites Ozmodchips.com which sells the modchip, and psx-scene.com which has confirmed them as working are both unstable right now due to heavy traffic. But here’s what we know. The device is called the PS Jailbreak and can be used to dump PS3 games to the hard drive of a PlayStation3 running the most current firmware (3.41). Dumped games can then be played from the hard drive by selecting them from a menu that the modchip spawns. It’ll cost you though. The current preorder price is $169.99 AUD or $147.47 US dollars with a projected delivery date of August 27th.
[Thanks Charlie via Slashdot]
Todays Arduino Moment
We have gotten a number of Arduino tips in the last couple days, and we thought we would combine them for your convenience. The first tip we received was for some hints provided by [Bill] on some digitalWrite() alternatives. Similar to some previous research we covered, this tip also includes some tips on how to make the direct register writing a little easier by using #define to simplify things. Obviously this wont be as idiot-proof as digitalWrite() is, but we think you can handle it.
Our second tip is for a set of OLED displays from 4dsystems sold as Arduino Shields. They have a couple of different sizes from .96″ to 1.7″, depending on your needs and budget. There is no official display library for them yet, but 4dsystems have been kind enough to provide a few resources to work from. Hopefully we’ll see a few great applications from this, maybe a much bigger pixel Mario? A much smaller Game of Life? Feel free to send us your projects, or leave your ideas in the comments!