Separating A Working Scanner From Its Broken Printer

The laser printer portion of this all-in-one machine gave up the ghost and [Entropia] couldn’t get it working again. But the scanner was still functioning so he decided to separate the scanner from its dead printer module.

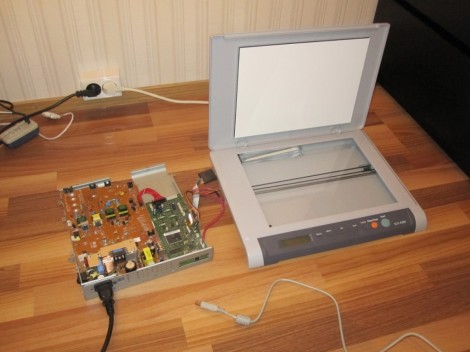
The model in question is a Samsung SCX-4200. The design is actually perfect for separation because the scanner sits on top of the out feed tray of the printer. It can even be lifted to allow more room for printed pages to pile up. All he has to do is separate the hinged connector and reroute the flat cables. But the real question in [Entropia’s] mind was whether or not the control board would work without the laser printer components connected to it.

He carefully disassembled the unit, spilling toner here and there which is left over from a catastrophic knock-off toner cartridge incident. A quick test showed him that although the drivers complain that the paper tray is open, the scanner does still work. He glued the controller board seen on the left to the bottom of the scanner enclosure, and added some felt feet. Now his scanner is closer to the size you’d expect. And on the plus side he gained a geared stepper motor, laser scanning unit, exhaust fan, and a couple of solenoids to use in future projects.

A Six-year Adventure Into The World Of CNC Fabrication

Hackaday doesn’t always get the entire back story of a build. The usual assumption is that someone decided to build something, and with just a little bit of effort the project makes it into the Hackaday tip line. This doesn’t do justice to the builder, with skills honed after years of practice and experience. A 200-word summary is deceiving, and makes everything look almost too easy. [Michal] decided to buck that trend and sent in his half-decade long adventure of becoming one of the best micro-scale machinists we’ve ever seen.

In 2006, with years of robots made out of hot glue and cardboard behind him, and the quality of 3D printers not up to his exacting specifications, [Michal] snapped. He sunk the better part of $3000 into a Roland MDX-15 desktop mill. After several months of futzing about with acrylic sheet, [Michal] came across the wonderful machining properties of modeling board.

Determined to do something useful with this modeling board, [Michal] started looking into resin casting. Casting in resin is a common technique in the artist and model maker communities to mass produce small plastic parts. After getting his hands on eight liters of polyurethane resin, [Michal] made a useful part guiding the direction his skill set would grow in the coming years.

After years of experimenting with techniques, materials, and mediums, [Michal] eventually honed his craft and was able to finally start building real robots. These projects were a far cry from the cardboard and milk jug contraptions made earlier in his career. [Michal] was now producing incredibly precise gear assemblies with accuracies within 0.002 mm.

You may remember [Michal] from his robot with pivoting wheels we showcased last week. He got a lot of email from people wanting to know how to start delving into his unique blend of artistry, engineering, and craftsmanship. The good news is you can now learn from his mistakes, so a planetary gearbox shouldn’t take more than a few months to finish.

Simple Tweak Alerts You When You’ve Left Your Headlights On

landrover-headlight-buzzer

[Paul McGuinness] owns a Series III Land Rover, and as the vehicle as formerly used by the British military, it’s lacking some of the modern amenities he was accustomed to. Overlooking the lack of power steering and all-around drum brakes, the one item that [Paul] really missed was a buzzer that let him know when he left the lights running.

On more than one occasion, he’s had to have “The Sarge” jump started after leaving the lights running all day. Explaining the humiliation involved with jump-starting a Land Rover with a Nissan Micra (an unfortunate excuse for a vehicle, known here in the states as the Nissan Versa) in his blog, [Paul] decided that he’d had enough – it was time to build a headlight warning buzzer.

The circuit itself is straightforward, consisting of a normally closed relay connected to his headlights and ignition, along with a buzzer. When the key is in the ignition and the lights are on, the relay is open and the buzzer is silent. However, if the lights are on and the relay is not supplied power from the ignition, it closes and sounds the alarm.

A simple fix for a frustrating problem – we like that.

Adding An Electronic Lock To A DIY Book Safe

electronic-book-safe

DIY book safes are well and good, but if you give someone enough time to peruse your book collection, the 3-inch thick “Case study on Animal Husbandry Techniques during the 14th Century” is likely to stand out among your collection of hand-bound “Twilight” fan fiction. In an attempt to teach his friend a bit about microcontrollers and circuits, [Jonathan] spent some time adding a bit more security to your run of the mill book safe.

The pair started out with the time-consuming process of gluing the book’s pages together and creating enough hollow space for both storage and the electronics. With that out of the way, they installed a latch and servo motor inside the cavity, the latter of which is controlled using an Atmega328p with the Arduino bootloader. To gain access to the goodies stashed away inside, Jonathan hooks up a small PS/2 keypad and enters a passcode. This triggers the servo motor, opening the latch.

While the latch likely only adds a nominal bit of security to the book safe, it’s a fun enough learning exercise to justify the time spent putting it together.

Continue reading to see a short video of [Jonathan’s] electronic latching book safe in action.

Continue reading “Adding An Electronic Lock To A DIY Book Safe”

Advanced Compass/accelerometer Library For Arduino

We don’t have much personal experience with DOF hardware, but this Arduino library which reads and compensates for three-axis magnetometer and accelerometer data looks very impressive. It should work for existing hardware, but there’s also a demo design using a Honeywell HMC5883L compass and a Freescale MMA8453Q accelerometer which you can build yourself. Unfortunately these come in QFN packages (like most cheap accelerometers these days) so you may need to be creative when soldering.

What’s so special about this library? Watch the video after the break (use 720p in fullscreen to get the full effect) and you’ll see three different scatter plots of the output data. The image above is a capture of the third example, which is using the hard iron offset and accelerometer compensation. That is to say, metal on and around the board is accounted for, as well as the physical orientation of the device. Even if you have no prior experience with this type of hardware it’s easy to see the usefulness of this kind of software compensation.

Continue reading “Advanced Compass/accelerometer Library For Arduino”

Veronica Gets VRAM And Its Own Boot Logo

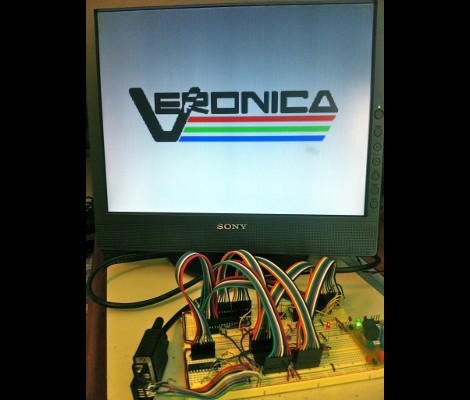
[Quinn Dunki] just reported in on the latest iteration in her computer project which is called Veronica. This time she added RAM to increase the VGA performance of her build. Like just about every other part of the project, [Quinn] knew what she wanted to do, but had to overcome a lot of issues along the way.

The goal is to implement a 256×240 display with 8-bit color depth. [Quinn] says this is on par with game console technology from the 1980’s. The problem is that the 10MHz AVR controller can’t really keep up with the scan rate of this size of display. The answer is to add RAM which stores all of the color data, the microcontroller will simply advance the address pointer on the memory chips to match the sync rate of the VGA output.

After hooking up her hardware design she gets a screen full of uninitialized pixel data. But moving from there to the final product seen above was quite frustrating. It turns out that noise on the breadboard was most of the problem, further compounded by entire breadboard row which wasn’t contacting the wires to make the temporary connections. A bit of jockeying for position and by Jove, she’s got a boot screen.

That breadboard sure has become crowded since her first VGA experiments.

Water Strider Robot Does It With Lego Parts

This Lego watercraft uses drinking bottles as pontoons arranged in a pattern that make it look very much like a Water Strider, the insects that dance on the surface of a lake.

After the break you can see a video of the rig gracefully navigating a local pond, along with a raft of ducks. It’s quiet enough not to startle them, which is nice. We don’t get a good look at the propulsion system, but [Vimal Patel] calls the floats “hockey bottles” in his Flickr comments. They appear to be Lego themed and we’re wondering if they are some type of packaging for a small set that doubles as a sports drinking bottle once the pieces are removed? The rig includes a camera which provides a great persepcive very near the water level.

This isn’t his only floating creation. He’s got a second rig that was used to film some of the footage of this one.

Continue reading “Water Strider Robot Does It With Lego Parts”