3d Printed Nes Portable Looks Fantastic And Contains No Hot Glue

[Parker] emailed us today to show off his latest NES portable build. This time he’s using the standard “top loader” NES instead of the typically used NES on a chip. This is pretty cool since the NES on a chip has compatibility issues with some games. For the screen, he uses a common PSone screen with a slight power modification. From the factory, the screen takes 7.4 V and converts it down to 5V to use. He removed this and ran it directly from his own 5V power source. It may not seem like that big of a deal, but with portables, every bit counts. He also ditched the sound amplifier from the PSone screen in favor of something a little more efficient. He seems to have done a pretty good job because he says it gets roughly 10 hours at full volume right now.

Another cool aspect of this deign is that the cartridge serves as a sort of stand for the unit, although the button placement looks like it might be a tiny bit awkward when used this way.

 

Building Sensors For The Scratch Programming Language

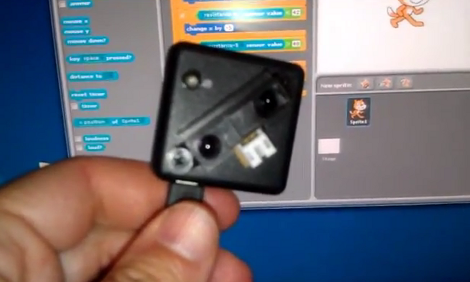
[Kevin Osborn] is making it a bit easier for young programmers to write programs that interact with the physical world. The device he’s holding in the picture is an Arduino based accelerometer and distance sensor meant for the Scratch language.

Scratch is a programming language developed at MIT. It has kids in mind, and focuses on graphical building blocks. This can make it quite a bit easier to introduce youngsters to programming concepts without the roadblocks and gotchas that come with learning syntax.

As you can see in the clip after the break, [Kevin’s] Arduino sketch includes hooks that automatically pull the accelerometer and distance data into the Scratch environment. We figure his example provides everything you need to get just about any type of sensor up and running, be it a magnetometer or LDR (both of which would make a nice burglar-alarm type project). Give it a try with your own hardware and see what you can accomplish.

Continue reading “Building Sensors For The Scratch Programming Language”

Retrotechtacular: Shakey Shows Off Robotics Innovation From 1972

In this installement of Retrotechtacular we’re taking a look at Shakey, a robot developed between 1966 and 1972 at the Stanford Reserach Lab. This was a glorious time when students had long hair but still wore long sleeves and ties to do their research.

The robot is actually communicating wirelessly with the PDP-10 computer which handles the processing. No computer monitor is used for interacting with the robot. Instead, a teletype machine lets you type out your commands on paper, and the response from the machine is printed back to you on the same sheet. There’s a camera which is used for image recognition, and sensors that give feedback when the body comes in contact with an obstacle.

We’d sure love to know what kind of budget this project had, but alas we couldn’t find any info about that. You can go and see Shakey in person if you want to. This info page mentions that the machine is on display at the Computer History Museum in Mountain View, California.

Continue reading “Retrotechtacular: Shakey Shows Off Robotics Innovation From 1972”

Giving A Powerpoint Presentation With An Apple ][

When [Vince] saw a coworker give a presentation with an iPad, he thought to himself what a tremendous waste of computing resources he was witnessing; an iPad is just as powerful as an early Cray supercomputer, and displaying slides isn’t a computationally intensive task. We’re assuming [Vince]’s train of thought went off the rails at that point, because he came up with a neat way to give a presentation with an Apple ][.

To get his slides onto his Apple ][, [Vince] created a tool to convert the text and images for a presentation to an Applesoft BASIC program. Yes, six-color images are supported in a wonderful 280×192 resolution. The presentation was transferred onto a CompactFlash card and loaded onto the Apple with the help of a CFFA card, making it much faster to load images during the presentation than a 5.25″ disk would allow.

Of course, after the presentation some of [Vince]’s coworkers wanted to play Oregon Trail, a request easily handled by the voluminous CF card loaded with Apple ][ programs. You can check out video demo/walkthrough of his presentation after the break.

Continue reading “Giving A Powerpoint Presentation With An Apple ][“

Cheap Wooden Hexapod Frame Greatly Reduces Cost

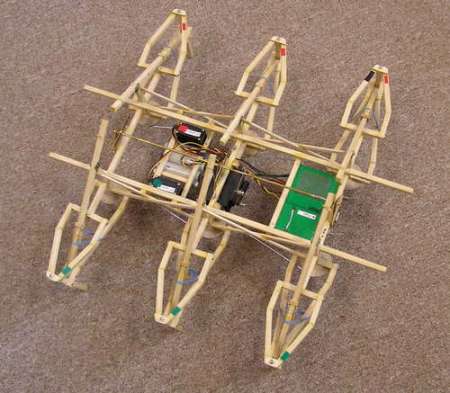
[Balline] really wanted to play with a hexapod but found the cost to be prohibitive. Being a mechanical engineer, he was able to fairly quickly come up with a stable 3 servo design that would allow him to experiment with the platform. He chose to use wood as the construction material to help reduce costs even more.  As you can see in the video after the break, his design gets around fairly well.  His cost for the whole thing, including the 3 servos, the basic stamp hobby board, the recycled batteries, and the frame, was under $100.

This is a great system to start with, though he unfairly compares the cost to the dancing ones he had seen in the past. C’mon, your bot ain’t no [Lou Vega]. It is still pretty cool though.

Continue reading “Cheap Wooden Hexapod Frame Greatly Reduces Cost”

Electric Imp Connects Projects To The Internet

If you’re planning a build that communicates wirelessly to that ‘Internet of things’ we’ve been hearing about, you might want to check out the Electric Imp. This tiny little card connects your project to the Internet without all the hassle of configuring an embedded wireless device.

Inside the Electric Imp is a good bit of hardware: an ARM CortexM3, and an 802.11b/g/n wi-fi module that will connect to your wireless network automatically. There are also a few pins left over for serial, I2C, SPI and PWM applications.

Instead of manually configuring the DNS and WPA encryption, the Electric Imp does all of this automatically. We have no idea how the Electric Imp configures itself, but we’d bet it’s something along the lines of plugging the SD card-sized Imp into a computer and piggybacking off the computer’s credentials. The Imp also uses a cloud service, but we’ll bet once Imps are out in the wild, you’ll be able to use them with your own network.

The Electric Imp card itself will sell for about $25, but there are also dev kits to turn the Imp into an Arduino-compatible board. If everything goes as planned, the Imp will be released sometime this summer; we’ll probably see a few Electric Imp projects finished before August.

EDIT: [Kevin] over at Electronic Imp wrote in and told us about the configuration process:

We have an iOS and Android app where the user enters their wireless network’s SSID and the password, then they hold the screen up to the Imp. There’s a photosensor in the Imp that picks up the phone’s flashing and configures the device optically, without the need of plugging it in to a computer, setting up a temporary network for config, or any other cumbersome mechanisms.

We’re basically looking at a much cooler version of the Timex Datalink here. Awesome.

Snake-like Robot Can Roll Around In A Ring

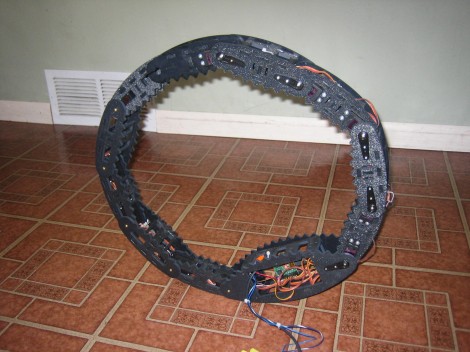
A lot of 3D printing and a many servo motors went into this snake-like robot, and it’s only about half of what [Toby Baumgartner] plans to accomplish. In this orientation the snake is rolled into a circle, and apparently some special movements in the segments allow it to roll around like this. He compares it to a tank tread without the tank attached to it. Notice that each link is rounded on the outside. When the snake opens itself up, the toothed inside of the links contacts the ground for added traction.

It looks like eventually the larger link at the bottom will be about three times as wide. This will make room for him to mount a second ring of links. The idea is that the larger link will act as the body and this can unfold itself into a quaruped. Motors that allow the segments to pivot side to side would make it something like a four-legged spider bot.