DIY Filament: The Filabot Wee

filabotwee

Now there’s yet another option for making your own 3D printer filament: the Filabot Wee. It looks like their once open source model that they pulled from Thinigiverse earlier this year has received a significant makeover, though we aren’t sure what parts may have changed. (EDIT: Filabot says the Wee is still open source, and that once they’ve updated the files they will be available again.)

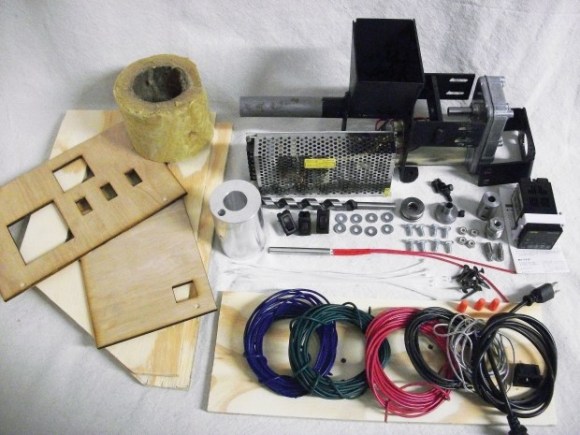
As you would expect, the Wee has a PID temperature controller and is capable of extruding both ABS and PLA pellets into either 1.75mm or 3mm-diameter filament. Speed varies depending on materials and thickness, but can reach 5 to 20 inches per minute of filament extrusion. Though the Filabot gang is selling the extruder as a kit, you can probably save a few bucks if you have access to a laser cutter and some other basic materials.

You should expect to spend more for Filabot parts ($649) than you would for the original Lyman extruder, though perhaps a more fair comparison would be the new third version of the Lyman extruder, whose bill of materials approaches $900. Considering Lyman’s recent comments that indicate an extrusion rate of 40-50 inches per minute, the extra bucks may be worth it. You can check out a demonstration video of the Filabot Wee after the break.

Continue reading “DIY Filament: The Filabot Wee”

Hack Your Stove In The Name Of Homebrewing

stovehack

[Tim] is a homebrewer. Temperature profiling during the mashing process is apparently even more critical than the temperature curve of a solder reflow oven. His stove just wasn’t giving him the level of control he needed, so [Tim] added a PID temperature controller to his stove. Electric stoves generally use an “infinite switch” to control their burners. Infinite switches are little more than a resistor and a bimetallic strip in a single package. Not very good for accurate temperature control. The tricky part of this hack was to make it reversible and to have little visual impact on the stove. A stove top with wires hanging out would not only be dangerous electrically, it would also create a hazardous situation between [Tim] and his wife.

[Tim’s] brewpot only fit on the stove’s largest burner, so that was the only one that needed PID control. To keep things simple, he kept the commercial PID controller outside the stove’s enclosure. Inside the stove, [Tim] added a solid state relay. The relay is mounted to a metal plate, which screws to the back of the stove. The relay control lines run to an audio jack on the left side of the stove. Everything can be bypassed with a switch hidden on the right side of the stove. In normal operation, the switch is in “bypass” mode, and the stove works as it always has. When mashing time comes along, [Tim] flips the switch and plugs the jack into his PID controller. The temperature sensor goes into the brewpot itself, so no stove modification was needed there.

The end result is a very clean install that both [Tim] and his wife can enjoy.  Save a few bottles for us, [Tim]!

If You Own A Camera You Need To Try Light Graffiti

Do you have a camera that’s capable of controlling how long of an exposure it takes?  With this and any small light source, you can make a really awesome illuminated image like the one featured above.  Combine this with the hacking skills that you’ve hopefully learned from reading Hackaday, and the visual possibilities are endless.

Let’s look at the background of this entertaining light hacking technique, and how you can make images like this yourself!

Continue reading “If You Own A Camera You Need To Try Light Graffiti”

Learn Engineering And Draw Narwhals

narwhals

Using LEGO robots and other ‘intro to robotics’ platforms is a great introduction to kinematics and programming, but if you’re teaching a classroom of people who don’t know what a 1/4-20 screw is, perhaps it’s not the right introduction to engineering. That’s the thinking behind NarwhalEdu’s upcoming, Kickstarted online course: give kids a bunch of servos, bolts, and a microcontroller, and they’ll be able to build anything, and not just what the instructions for a Mindstorm’s robot says.

Robots, Drawing, and Engineering is an online course built around a simple SCARA arm robot. It’s made out of laser cut hardboard and powered by three servos and an Arduino Nano with an extension shield. After building this robot in the first hour of the online class, students then learn a little programming and get their robot drawing everything from narwhals to nyan cats and faces.

In the second part of the course, students then tear apart their robot kit and start making other, cooler interesting devices. There’s a contest for the coolest project that will hopefully go a long way to show how creative engineering can be.

Two videos below of the NarwhalEdu SCARA arm in action.

Continue reading “Learn Engineering And Draw Narwhals”

Building A Crystal Clear Whiteboard

[Michael Peshkin] teaches mechanical engineering at Northwestern University. He likes to use diagrams to illustrate his point, but he also likes to face his students when doing so. His solution was to develop this clear whiteboard which ends up unlocking a lot more than just some hand-drawn schematics.

It’s a bit hard to see what he’s written on the board in the image above but squint and see if you can figure out what’s wrong with this style of teaching? Everything he’s writing is backwards. That’s not actually a problem in this case as [Michael] uses flip teaching. He records and posts all of his lectures online. Classroom time is then used for question and answer on the lecture subjects. In order to get the text to read the correct way he just bounces the camera off of a mirror.

The board itself is a huge sheet of tempered glass attached to the metal frame using bolts through holes in the pane. This leave the edges free. He added extruded rail to the top and bottom to embed strips of LEDs. They light the inside of the glass, and excite the fluorescent dry erase marker ink making it much more visible. [Michael] didn’t stop with the board, he  also rigged up a lighting system that gives him a lot of options, and uses a monitor for dealing with digital overlays. He can put up a diagram on the computer, watching the monitor to see where his marker is making annotations. All this happens in real-time which means no post production! See a demo of these features after the break.

This could all be done without the glass at all, but that would make it quite a bit more difficult for the person doing the writing.

Continue reading “Building A Crystal Clear Whiteboard”

Using DMA To Drive WS2812 LED Pixels

It’s pretty well known by now that the LED pixel hardware which is starting to be commonplace, both WS2811 and WS2812, needs pretty strict timing in order to address them. There are libraries out there which mean almost no work on your part, but that’s no fun. [Elia] started looking into what it takes to drive the hardware, trying out a few 8-bit micros before moving to 32-bit with the help of an STM32VL Discovery Board. The move to a beefier processor brings a lot of speed, but why bit bang everything? He came up with a way to use the PWM and DMA features of the chip to drive the LEDs.

DMA is the Direct Memory Access unit that allows you to change the values being sent to the pixel without interrupting the processor. This is done by pre-loading the data at a memory location. This buffer is automatically read by the DMA unit — its values are used to set the PWM timer compare trigger in order to send out logic values show in the diagram above.

If you do want to delve further into this topic here’s a collection of techniques for driving the WS2811.

Continue reading “Using DMA To Drive WS2812 LED Pixels”

Tricky Repair Of Power Driver For CNC Machine

tricky-power-driver-repair

Designing and building something from scratch is one thing. But repairing fried electronics is a much different type of dark art. This video from [Mike’s Electric Stuff] is from more than a year ago, but we didn’t think you’d mind since what he accomplishes in it is so impressive. He’s got a burnt out pick and place hybrid power module which isn’t going to fix itself.

The power module construction includes a part that has chip-on-board-style MOSFETs and the circuitry that goes with them enclosed in a black plastic housing. It’s kind of like a submodule was encapsulated using the same plastic as integrated circuits. After cracking it open it appears the bonding wire has burnt away. [Mike] connects a jumper wire to one of the board traces in order to use an external MOSFET. This is much easier said than done since the module substrate is ceramic designed to dissipate heat. We’re amused by his technique of melting the jumper into the plastic housing to protect it from the heat sink that goes over the package. In the end he gets his CNC running again. This may not be the best long-term fix but he just needed to continue running until a proper replacement part arrives.

Oh, one more thing: the Metcal vacuum desolderer he uses in the video… do want!

Continue reading “Tricky Repair Of Power Driver For CNC Machine”