RFToy Makes Wireless Projects Easier

[Ray] has created RFToy, a simple gadget to aid in setting up wireless systems with a variety of common radio modules. RFToy is an open source microcontroller board running on an ATmega328. While RFToy is Arduino code compatible, [Ray] chose to ditch the familiar Arduino shield layout for one that makes it easier to install RF modules, and is more handheld friendly.

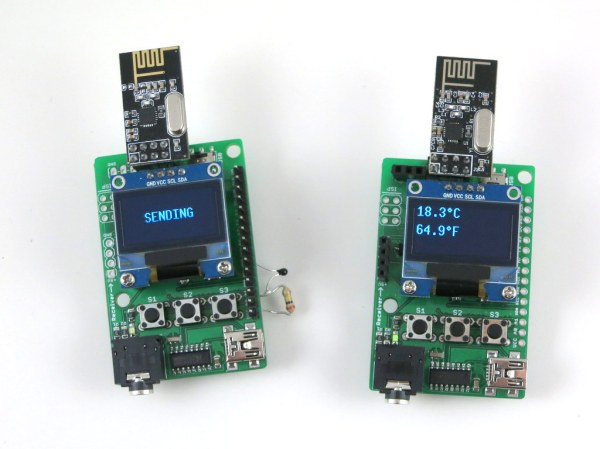
[RFToy] includes headers for the popular nRF24L01 2.4 GHz transceiver, as well as 433/315 transmitters and receivers found in many low-cost wireless electronic devices. The 128×64 pixel OLED screen and 3 button interface make it easy to set up simple user interfaces for testing new designs.

[Ray] hasn’t broken any new ground here. What he has done is create a simple tool for wireless projects. Anyone who’s worked on a wireless system can tell you that tools like this are invaluable for debugging why your circuit isn’t talking. Is it the transmitter? The receiver? Something else in the power supply circuit?

Check out [Ray’s] demo video after the break. In it, he sniffs, records, and plays back signals from several remote-controlled outlets. [Ray] also has a great demo of sending temperature data back and forth using an nRF24L01.

Continue reading “RFToy Makes Wireless Projects Easier”

Developed On Hackaday: $50k Reached In A Week!

Around 500 awesome people backed the Mooltipass offline password keeper crowdfunding campaign, raising a total of $50k in less than a week… which is nearly half our goal.

The development team and I would therefore like to thank our readers for their support. We were featured by several electronics websites, which definitely helped spreading the world of open source security devices. Many interesting discussions spawned in either our comments section or official Google Group. One new contributor even started looking into implementing TOTP on the Mooltipass.

Another hot topic was a possible smaller and more powerful Mooltipass v2, implementing other functionalities like U2F and encrypted file storage. You may therefore wonder why we didn’t start with it… the reason is simple: limited resources. Our project is made by (great) non-remunerated contributors who took a lot of their spare time to work on the Mooltipass v1. We therefore preferred working on something we’d be sure we could deliver rather than wasting $4M by making promises. We therefore hope that our crowdfunding campaign might allow an even bigger collaboration around a Mooltipass v2!

An MSP430 Clone Of The Canon RC-1 Remote

For reasons we both agree with and can’t comprehend, most ‘prosumer’ SLR cameras don’t have mechanical shutter releases. Instead, IR LEDs are brought into the mix, the Canon RC-1 remote trigger being the shutter release of choice for people who didn’t choose Nikon. [Vicente] cloned the Canon RC-1, but he didn’t do it to save money; there’s a lot to learn with this project, and making his own allows him to expand it with more features in the future.

Studying the function of the Canon RC-1, [Vicente] found that some compromises needed to be made. The total power emitted by an IR LED is usually a function of its beamwidth; a smaller beamwidth means more photons reaching the IR receiver in the camera. This also means the remote must be aimed at the camera more accurately. In the end, [Vicente] decided on a higher power LED with a tighter beamwidth that’s just slightly below the optimum wavelength for the receiver. It’s all an exercise in compromise, but other components could see similar performance.

With the LED selected, [Vicente] moved on to building the actual controller. He chose an MSP430 microcontroller for its low power consumption, driving the LED with a watch battery and a transistor. Put together on a piece of protoboard, it’s actually pretty close to a TV-B-Gone. With everything soldered up, it’s good enough to trigger his camera’s shutter from about 5 meters away. Future improvements include cleaning up the code, making the timing more accurate with a crystal, and implementing low power mode on the MSP430.

The Raspberry Pi Model A+

A few months ago we were lucky to get the scoop on a new Raspberry Pi a few days before it was officially announced. This model ended up being the Raspberry Pi Model B+, with improvements that included more USB ports, not-dumb mounting holes, more GPIOs, and a decent microSD card connector. Today, we’re proud to leak another revision to the Raspberry Pi ecosystem – the Raspberry Pi Model A+

There really aren’t many details for this new revision of the Raspi, but we can make some educated guesses. The new model features the same not-dumb mounting holes as the B+, 58mm wide by 49mm wide. All the ports are moved to two sides of the board, and the analog audio and video are combined into one 3.5mm jack. Like the normal Model A, this one doesn’t have Ethernet and only one USB port, but the improvements seen from the B to the B+ are still there: a good microSD card socket is on the back, and the 40-pin GPIO header replaces the old 26-pin header. There’s no word if the A+ will feature a RAM upgrade – when the Model B was ramping up production The Foundation decided to bump the RAM up to 512MB. This could happen with the A+, but we’re not holding our breath.

There’s no word when the A+ will be announced, or when it will start shipping. The educated guess would say tomorrow morning, with an analysis of how much power this thing consumes a week after it starts shipping.

Hackaday Links Column Banner

Hackaday Links: November 9, 2014

After many years of searching, [Dan Wood] finally got his hands on something he’s wanted for the past twenty-two years: an Amiga 4000. No, it’s not the queen bee of Amiga land – that honor would fall to the 68060-equipped 4000T, but [Dan]’s 4000 is decked out. It has a 256MB RAM expansion, Ethernet, USB, and a Picasso IV graphics card that gives it better resolution and color depth than most modern laptops.

[Pistonpedal] has a fully automatic pneumatic can crusher that is far too cool to be wasted on a case of Keystone. A funnel at the top guides the cans in to be crushed one at a time and ejected into a garbage can underneath. Great for recycling.

Coming over from ‘normal’ programming into the world of embedded development? [AndreJ] has the AVR C Macro for you. It’s a great way to get away from all those ~=, |=, and &=s that don’t make any sense at all.

[CNLohr] has a reputation for running Minecraft servers on things that don’t make any sense at all. The latest build is a light up redstone ore block equipped with an ESP8266 WiFi chip.

Oh, the Hackaday overlords and underlings are in Munich for this little shindig we’re doing. If you in town for Electronica come on down. If you have a copy of Neil Young’s Trans, bring it to the party.

Watering circuit

Solar Powered Circuit Waters Your Plants


If you want your plants to stay healthy, you need to make sure they stay watered. [Dimbit] decided to build his own solar powered circuit to help automatically keep his plants healthy. Like many things, there is more than one way to skin this cat. [Dimbit] had seen other similar projects before, but he wanted to make his smarter than the average watering project. He also wanted it to use very little energy.

[Dimbit] first tackled the power supply. He suspected he wouldn’t need much more than 5V for his project. He was able to build his own solar power supply by using four off-the-shelf solar garden lamps. These lamps each have their own low quality solar panel and AAA NiMH cell. [Dimbit] designed and 3D printed his own plastic stand to hold all of the solar cells in place. All of the cells and batteries are connected in series to increase the voltage.

Next [Dimbit] needed an electronically controllable water valve. He looked around but was unable to find anything readily available that would work with very little energy. He tried all different combinations of custom parts and off-the-shelf parts but just couldn’t make something with a perfect seal. The solution came from an unlikely source.

One day, when [Dimbit] ran out of laundry detergent, he noticed that the detergent bottle cap had a perfect hole that should be sealable with a steel ball bearing. He then designed his own electromagnet using a bolt, some magnet wire, and a custom 3D printed housing. This all fit together with the detergent cap to make a functional low power water valve.

The actual circuit runs on a Microchip PIC microcontroller. The system is designed to sleep for approximately nine minutes at a time. After the sleep cycle, it wakes up and tests a probe that sits in the soil. If the resistance is low enough, the PIC knows that the plants need water. It then opens the custom valve to release about two teaspoons of water from a gravity-fed system. After a few cycles, even very dry soil can reach the correct moisture level. Be sure to watch the video of the functioning system below. Continue reading “Solar Powered Circuit Waters Your Plants”

Deck The Halls With A Raspberry Pi Controlled Christmas Tree

You know the holiday season is getting close when the Christmas light projects start rolling in! [Osprey22] is getting a jump on his holiday decorations with his Christmas Tree light show controlled by a Raspberry Pi. Yes, we know he could have done it with an Arduino, or a 555, but the Raspi makes for a convenient platform. With a WiFi module, code changes can be made remotely. The Raspberry Pi’s built-in audio interface also makes it easy to sync music to flashing lights, though we’d probably drop in a higher quality USB audio interface.

[Osprey22’s] Raspberry Pi is running his own custom python sequencer software. It takes an mp3 file and a sequence file as inputs, then runs the entire show. When the music isn’t playing, the Pi loops through a set of pre-defined scenes, changing once per minute.

The hardware itself is pretty straightforward. The Raspberry Pi controls 8 solid state relays through its GPIO interface. 8 strings of lights are more than enough for the average tree. [Osprey22] topped the tree off with a star made of wood and illuminated by a string of 25 WS2801 RGB LED pixels.

Click past the break to see [Osprey22’s] tree in action!

Continue reading “Deck The Halls With A Raspberry Pi Controlled Christmas Tree”