Hyperlapse Makes Your HeadCam Videos Awesome

hyperlapse First person video – between Google Glass, GoPro, and other sports cameras, it seems like everyone has a camera on their head these days. If you’re a surfer or skydiver, that might make for some awesome footage. For the rest of us though, it means hours of boring video. The obvious way to fix this is time-lapse. Typically time-lapse throws frames away. Taking 1 of every 10 frames results in a 10x speed increase. Unfortunately, speeding up a head mounted camera often leads to a video so bouncy it can’t be watched without an air sickness bag handy. [Johannes Kopf], [Michael Cohen], and [Richard Szeliski] at Microsoft Research have come up with a novel solution to this problem with Hyperlapse.

Hyperlapse photography is not a new term. Typically, hyperlapse films require careful planning, camera rigs, and labor-intensive post-production to achieve a usable video. [Johannes] and team have thrown computer vision and graphics algorithms at the problem. The results are nothing short of amazing.

The full details are available in the team’s report (35MB PDF warning). To obtain usable data, the fisheye lenses often used on these cameras must be calibrated. The team accomplished that with the OCamCalib toolbox. Imported video is broken down frame by frame. Using structure from motion algorithms, hyperlapse creates a 3D models of the various scenes in the video. With the scenes in this virtual world, the camera can be moved and aimed at will. The team’s algorithms then pick a smooth path that follows the original cameras trajectory. Once the camera’s position is known, it’s simply a matter of rendering the final video.

The results aren’t perfect. The mountain climbing scenes show some artifacts caused by the camera frame rate and exposure changing due to the varied lighting conditions. People appear and disappear in the bicycling portion of the video.

One thing the team doesn’t mention is how long the process takes. We’re sure this kind of rendering must require some serious time and processing power. Still, the output video is stunning.

Continue reading “Hyperlapse Makes Your HeadCam Videos Awesome”

PirateCade Is An Impressive Feat Of Woodworking And Design

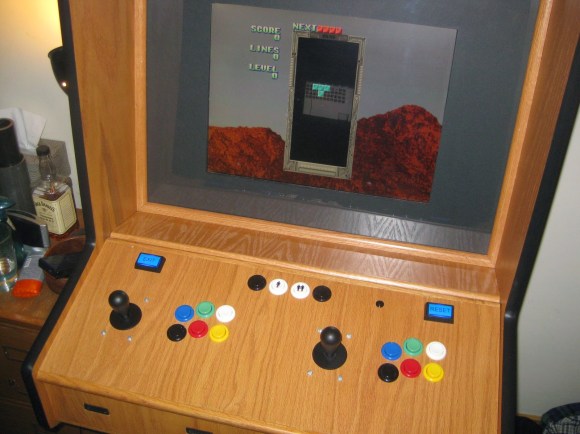
Retro Arcade Machine Keeps the Classics

A six month journey of blood sweat and tears is finally over for [David Carver] and what he is left with is nothing short of beautiful. He calls it the PirateCade. We call it the perfect arcade cabinet.

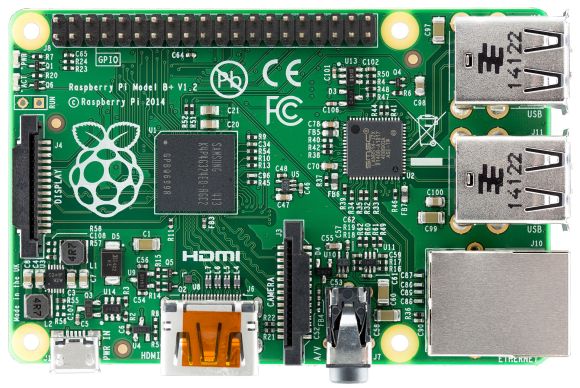
This project is actually [David’s] very first Raspberry Pi project – at least it was, until his Pi crapped out on him. After running into too many problems with it and SD card corruptions, [David] decided against the RetroPie project platform and decided to upgrade to a full-blown PC, using an AtomicFE front-end and the Ultimark Ipac.

The entire cabinet is hand made out of solid wood; he didn’t have access to any fancy CNC routers or laser cutters. We gotta hand it to him, he’s quite the cabinet maker for an electronics guy. Continue reading “PirateCade Is An Impressive Feat Of Woodworking And Design”

Adding Features To The DoorBot

network sniffing doorbell

There’s an interesting network-enabled doorbell on the market from Edison Junior called the DoorBot that boasts some useful features, notably that it can make calls to a phone when someone pushes the button for the doorbell. However, [MadBeggar] saw the potential in this device and couldn’t wait to get some more functionality out of it, so he has reverse engineered the communications protocol for the doorbell.

His goals for the project were to implement third-party notifications such as text messaging, VoIP/SIP integration, and maybe even a desktop client. So far he has only been able to analyze the communications protocol but he hopes that others will be able to build upon his work or even add features he hasn’t thought of yet. The makers of the device promise to eventually deliver on some of these features but so far haven’t delivered.

There are some other projects out there that integrate wireless connectivity with a doorbell. However, [MadBeggar] notes that the DoorBot really stands out among all of the internet-enabled doorbell, mostly because nothing else around is as clean or is as easy to install as the DoorBot. He just wishes that the software wasn’t so clunky and that it had its full potential unlocked with these extra features. We’d say he’s on the right track!

Flex Sensing For A DIY Data Glove

cyber

[Cyber] has been testing out intuitive input methods for virtual reality experiences that immerse the user further into the virtual world than archaic devices like a keyboard or mouse would allow. One of his biggest interests so far was the idea of a data glove that interacts with an Arduino Uno to interface with a PC. Since commercial products are yet to exist on a readily available level, [Cyber] decided to build his own.

He started out with a tiny inertial measurement unit called a Pololu MinIMU-9 v2 that tracks orientation of the 3-axis gyro and accelerometer. The USB interface was soldered into place connecting the wires to an Arduino Uno. From there, he hooked up a flex sensor from Spectra Symbol (which were supposedly used in the original Nintendo Power Gloves) and demoed the project by tracking the movement of one of his fingers. As the finger bent, the output printed on the serial monitor changed.

[Cyber] still needs to mount a glove on this system and construct a proper positional tracking method so that physical movement will be mirrored in a simulation.

[Cyber’s] day job has had him busy these last few months, which has forced the project into a temporary hold. Recently though, [Cyber] has been an active member and an influence in the local Orange County VR scene helping to build a nice development culture, so we’re hoping to see more updates from him soon.

To view what he has done up to this point, click the link at the top of the page, and check out the video after the break:

Continue reading “Flex Sensing For A DIY Data Glove”

Raspberry Pi Backup Scripts

Raspberry Pi

[Matthew’s] recent blog post does a good job explaining the basics of the Raspberry Pi’s file system. The Linux operating system installed on a Pi is generally installed on two different partitions on an SD card. The first partition is a small FAT partition. All of the files on this partition are used for the initial booting of the Pi. This partition also includes the kernel images. The second partition is the root file system and is generally formatted as ext4. This partition contains the rest of the operating system, user files, installed programs, etc.

With that in mind you can deduce that in order to backup your Pi, all you really need to do is backup all of these files. [Matt] has written some scripts to make this a piece of cake (or pie). The first script will simply copy all of the files into a gzipped archive. You can save this to an external SD card, USB drive, or network share.

The second script is perhaps more interesting. This script requires that you have one free USB port and a USB SD card reader. The script will automatically format the extra SD card to contain the two critical partitions. It will then copy the “boot” files to the new boot partition and the root file system files to the new SD card’s root partition. When all is said and done, you will end up with an SD card that is an exact copy of your current running file system.

This can be very handy if you have multiple Pi’s that you want to run the same software, such as in a Pi cluster. Another good example is if you have spent a lot of time tweaking your Pi installation and you want to make a copy for a friend. Of course there are many ways to skin this cat, but it’s always fun to see something custom-built by a creative hacker.

Self-Assembling Origami Robots

orgami-robots-harvard

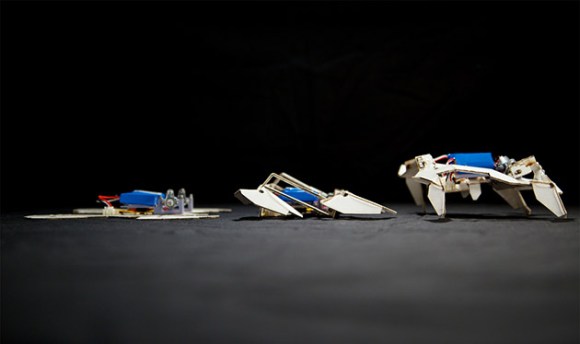
MIT engineers have developed a technique to address the challenges involved in manufacturing robots at a cheap and accessible level. Like a plant folding out its petals, a protein folding into shape, or an insect unveiling its wings, this autonomous origami design demonstrated the ability for a mechanical creature to assemble itself and walk away. The technique opens up the possibility of unleashing swarms of flat robots into hard to reach places. Once on site, the robots mobilize from the ground up.

The team behind the project used flexible print circuit boards made out of paper and polystyrene, which is a synthetic aromatic polymer typically found in the commercially sold children’s toy Shrinky Dinks™. Each hinge had embedded circuits that were mechanically programmed to fold at certain angles. Heat was applied to the composite structure triggering the folding process. After about four minutes, the hinges would cool allowing the polystyrene to harden. Some issues did arise though during the initial design phase due to the amount of electrical current running the robots, which was ten times that of a regular light bulb. This caused the original prototypes to burn up before the construction operation was completed.

In the long-term, Core Faculty Member [Robert] would like to have a facility that would provide everyday robotic assistance to anyone in the surrounding community. This place would be accessible to everyone in the neighborhood helping to solve whatever problems might arise, which sounds awfully like a hackerspace to us. Whether the person required a device to detect gas leaks or a porch sweeping robot, the facility would be there to aid the members living nearby.

A video of [Robert] and [Sam] describing the project comes up after the break:

Continue reading “Self-Assembling Origami Robots”

Poor Audio Quality Made Great: Listen To Vintage Music Using An Antique Radio Without Removing The Insides

Sometimes it is not how good but how bad your equipment reproduces sound. In a previous hackaday post the circuitry of a vintage transistor radio was removed so that a blue tooth audio source could be installed and wired to the speaker. By contrast, this post will show how to use the existing circuitry of a vintage radio for playing your own audio sources while at the same time preserving the radio’s functionality. You will be able to play your music through the radio’s own audio signal chain then toggle back to AM mode and listen to the ball game. Make a statement – adapt and use vintage electronics.

Pre-1950’s recordings sound noisy when played on a high-fidelity system, but not when played through a Pre-War console radio. An old Bing Crosby tune sounds like he is broadcasting directly into your living room with a booming AM voice. You do not hear the higher frequency ‘pops’ and ‘hiss’ that would be reproduced by high-fidelity equipment when playing a vintage recording. This is likely due to the fact that the audio frequency signal chain and speaker of an antique radio are not capable of reproducing higher frequencies. Similarly, Sam Cooke sounds great playing out of an earlier transistor radio. These recordings were meant to be played on radios from the era in which they were recorded.

Choosing an Antique Radio

Vintage radios can be found at garage sales, estate sales, hamfests, antique shops, antique radio swap meets, and Ebay. Millions of radios have been manufactured. People often give them away. For this reason, antique radios are relatively inexpensive and the vast majority are not rare or valuable.

Generally speaking, tube radios must be serviced and may not even work. Transistor radios often work to some level. Try to find a radio that is clean and uses a power supply transformer or batteries.

Click past the break to learn how to restore these radios to working condition

Continue reading “Poor Audio Quality Made Great: Listen To Vintage Music Using An Antique Radio Without Removing The Insides”