Unlocking A Door With A Phone – Easy As Pi!

doorman2

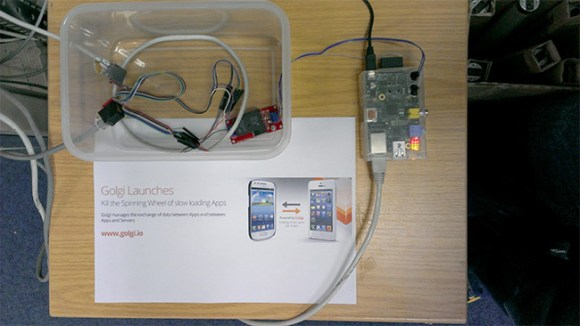
[Ian] has created a way for his office colleagues to get inside the door, even if they have forgotten their keys. This office automation, Raspberry Pi set up is appropriately named the ‘Doorman’ and provided an alternative method of unlocking the entry system.

His solution tapped into the existing security circuit, which is closed by a simple relay, which is connected to the main piece of hardware; a Raspberry Pi. On one side of the Pi is the GPIO pins that allow control access while the other side links to the internet. The company’s internal system is responsible for authenticating users, issuing keys and processing access requests. A mobile client, aka a smartphone, can request a set of keys from the Doorman.

[Ian] used the Golgi SDK to speed up the development of the in-house app. With the wires in place, the Doorman has become a great success, and now forgotten keys are a thing of the past. And even though staff members no longer need to buzz into the office interrupting their co-workers, the development team has plans to beef up their office automation system. Already other innovations are being created to be integrated in with the Doorman.

Now all that’s left is to show a video demonstration of the Doorman, which can be seen after the break:

Continue reading “Unlocking A Door With A Phone – Easy As Pi!”

Retrotechtacular: We Heard You Like Tubes, So Here’s A Film About Tube Tubes From The Webtubes

EF80

This lovely little number is the EF80 pentode thermionic valve, or vacuum tube, made by Mullard beginning in 1950. They were used in radio and radar applications, but most of them wound up in VHF television sets. This week’s Retrotechtacular takes a close look at the assembly of and on-site materials production for the EF80 in particular.

The film begins with slow and careful hand assembly of an EF80. The cathode is inserted into a mica disc, and a series of three grids are placed over the cathode. The semicircular anode sits around the outermost grid. Another mica disc is placed on top which does triple duty as a spacer, a base for the getter/plate assembly, and a firewall against the getter flash.The dark lining of the upper part of the tube is the residue of the vaporized getter, which is heated after the first stage of air removal.

Before the vacuuming begins, the inner assembly is mounted on a glass base with nine pins that have been pre-bent to meet the inner assembly wires. The heater, dissipating shield, and a meshy cylinder are added, and then the getter on its plate. A tube is slipped over the assembly and fused to the base in a jig, forming an airtight seal. Continue reading “Retrotechtacular: We Heard You Like Tubes, So Here’s A Film About Tube Tubes From The Webtubes”

Your 15 Days To Be Excellent

15-days-to-be-excellent

This is it. It’s time to step up and be a hardware hacker.

If you haven’t submitted your entry for The Hackaday Prize, get out that graph paper and mechanical pencil and start scribbling. The coming fortnight is your time to shine.

As of right now you have exactly fifteen days to tell us about your concept for an Open, Connected device. This doesn’t mean you have to finish the build, there’s time for that after the August 20th deadline. What you do need to do is describe your idea and explain how you plan to build a working prototype for the final deadline in early November.

I’ve appealed to your vanity — it’s hard to call yourself a hacker if you sit on the sidelines for this one! Now I’ll appeal to your want of recognition and the prizes that dreams are made of. Right now we haven’t quite crossed the 500 entry mark. When was the last time you had a chance as good as 1 in 500 for such a huge bag of booty?

THP Entry: A Holonomic Drive 3D Printer

holo

[Sugapes] always wanted to cut a few corners and build a really, really cheap 3D printer, but the idea of using linear actuators – pricing them, sourcing them, and the inevitable problems associated with them – scared him away. One day, he realized that moving in a plane in the X and Y dimensions wasn’t hard at all; cars and robots do this every day. Instead of moving a 3D printer bed around with rods and pulleys, [Sugapes] is moving his 3D printer around with wheelsIt’s different, it’s interesting, and it’s the perfect project to show of his creativity for The Hackaday Prize.

The drive system [Sugapes] is using is called a holonomic drive system. In his build, three omnidirectional wheels are attached to continuous rotation servos, each of them mounted 120 degrees apart. The print bed is simply placed on these wheels, and with the right control algorithms, [Sugapes] can move the bed in the X and Y axes. With an extruder on a Z axis above the bed, this setup becomes a 3D printer with a theoretically unlimited XY build axis. Pretty clever, huh?

There are a few problems [Sugapes] will have to overcome to turn this project into a proper printer. The omnidirectional wheels aren’t the best at transferring movement to the bed, so a quartet of USB optical computer mice are being used for a closed loop system. [Sugapes] put up a video of his project, you can check that out below.


SpaceWrencherThe project featured in this post is an entry in The Hackaday Prize. Build something awesome and win a trip to space or hundreds of other prizes.

Continue reading “THP Entry: A Holonomic Drive 3D Printer”

What Could Possibly Go Wrong Giving A Robot A Chainsaw?

Chainsaw wielding robot

[Morgan Rauscher] is a rather eccentric artist, inventor, maker, professor… jack of all trades. His latest project is called the Art-Bot – and it’s an 8′ robotic arm equipped with a chainsaw. Did we mention you can control it via arcade buttons?

He’s been building sculptures for over 10 years now, and has enjoyed observing the evolution of automated manufacturing – from CNC machines to laser cutters and even now, 3D printers. He loves the technologies, but fears machines are making it too easy – distancing us from the good old physical interaction it once took to make things with a few simple tools. His Art-Bot project attempts to bridge that gap by bringing tactile transference to the experience.

The cool part about the Art-Bot is that it is mostly made of recycled materials – in particular, bicycle parts!

Making a robot from bicycle parts is really not that difficult, and I highly recommend it.

The rest of the robot consists of electric actuators (linear), the control circuitry, and of course — a chainsaw. For safety’s sake, [Morgan] also built a polycarbonate wall around it to protect users from it going on a murderous rampage wood chips and other debris thrown from the robot.

Continue reading “What Could Possibly Go Wrong Giving A Robot A Chainsaw?”

Automated Bathtub Prepares Your Bath Just The Way You Like It

Automated Bathtub Controlled by Arduino

We live in the future don’t we? Is there a reason why only rich people have touchscreen controlled showers and temperature regulated bathtubs? [Raptor_Demon] shows us how to make our very own automated bathtub for cheap, using our favorite microprocessor — the Arduino.

The system controls the filling of the tub, monitors the temperature based on a user profile — and it even adds bubbles. Why do you need this? You probably don’t — but why not, wouldn’t it be nice to press a button and have a bath drawn for you? It uses an Arduino compatible board that controls 3 relays for the water system, a DS18b20 temperature sensor on the inlet and a second wireless (434mhz) Arduino compatible board for monitoring the tub temperature and adding bubble bath using a hacked automated soap dispenser.

[Raptor_Demon] showcased his prototype at the Maker Faire NC 2013 and 2014 where it was a huge hit. He even had a full size tub going, in which he would sit in during his explanation — check it out!

Continue reading “Automated Bathtub Prepares Your Bath Just The Way You Like It”

A Mechanically Scanned LIDAR For Autonomous Robots

LIDAR[Patrick] has spent a lot of time around ground and aerial based autonomous robots, and over the last few years, he’s noticed a particular need for teams in robotics competitions to break through the ‘sensory bottleneck’ and get good data of the surrounding environment for navigational algorithms. The most well-funded teams in autonomous robotics competitions use LIDARs to scan the environment, but these are astonishingly expensive. With that, [Patrick] set out to create a cheaper solution.

Early this year, [Patrick] learned of an extremely cheap LIDAR sensor. Now [Patrick] is building a robotics distance measurement unit based on this sensor.

Early experiments with mechanically scanned LIDAR sensors centered around the XV-11 LIDAR, the distance sensor found in the Neato Robotics robot vacuum cleaner. [Patrick] became convinced a mechanically scanned LIDAR was the way forward when it came to distance measurement of autonomous robots. Now he’s making his own with an astonishingly inexpensive LIDAR sensor.

The basic idea of [Patrick]’s project is to take the PulsedLight LIDAR-Lite module, add a motor and processing board, and sell a complete unit that will output 360° of distance data to a robot’s main control system. The entire system should cost under $150 when finished; a boon to any students, teams, or hobbyists building an autonomous vehicle.

[Patrick]’s system is based on the PulsedLight LIDAR – a device that’s not shipping yet – but the team behind the LIDAR-Lite says they should have everything ready by the end of the month, all the better, because between these two devices, there’s a lot of cool stuff to be done in the area of autonomous robots.