Selectric Typewriter Goes From Trash Can To Linux Terminal

If there’s only lesson to be learned from [alnwlsn]’s conversion of an IBM Selectric typewriter into a serial terminal for Linux, it’s that we’ve been hanging around the wrong garbage cans. Because that’s where he found the donor machine for this project, and it wasn’t even the first one he’s come across in the trash. The best we’ve ever done is a nasty old microwave.

For being a dumpster find, the Selectric II was actually in pretty decent shape. The first couple of minutes of the video after the break show not only the minimal repairs needed to get the typewriter back on its feet, but also a whirlwind tour of the remarkably complex mechanisms that turn keypresses into characters on the page. As it turns out, knowing how the mechanical linkages work is the secret behind converting the Selectric into a teletype, entirely within the original enclosure and with as few modifications to the existing mechanism as possible.

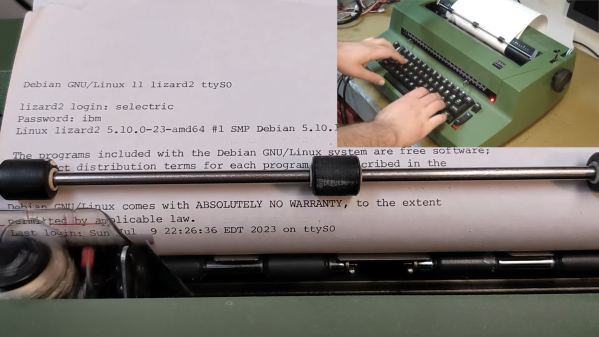
Keypresses are mimicked with a mere thirteen solenoids — six for the “latch interposers” that interface with the famous whiffletree mechanism that converts binary input to a specific character on the typeball, and six more that control thinks like the cycle bail and control keys. The thirteenth solenoid controls an added bell, because every good teletype needs a bell. For sensing the keypresses — this is to be a duplex terminal, after all — [alnwlsn] pulled a page from the Soviet Cold War fieldcraft manual and used opto-interrupters to monitor the positions of the latch interposers as keys are pressed, plus more for the control keys.

The electronics are pretty straightforward — a bunch of MOSFETs to drive the solenoids, plus an AVR microcontroller. The terminal speaks RS-232, as one would expect, and within the limitations of keyboard and character set differences over the 50-odd years since the Selectric was introduced, it works fantastic as a Linux terminal. The back half of the video is loaded with demos, some of which aptly demonstrate why a lot of Unix commands look the way they do, but also some neat hybrid stuff, like a ChatGPT client.

Hats off to [alnwlsn] for tackling a difficult project while maintaining the integrity of the original hardware.

Continue reading “Selectric Typewriter Goes From Trash Can To Linux Terminal”

Reverse Engineering An Oil Burner Comms Board, With A Few Lucky Breaks

Here’s a question for you: How do you reverse engineer a circuit when you don’t even have it in hand? It’s an interesting problem, and it adds a level of difficulty to the already iffy proposition that reverse engineering generally presents. And yet, not only did [themole] find a way to replicate a comms board for his oil burner, he extended and enhanced the circuit for integration into his home automation network.

By way of backstory, [themole] has a wonky Buderus oil burner, which occasionally goes into safety mode and shuts down. With one too many cold showers as a result, he looked for ways to communicate with the burner controller. Luckily, Buderus sells just the thing — a serial port module that plugs into a spare slot in the controller. Unluckily, the board costs a bundle, and that’s even if you can find it. So armed with nothing but photos of the front and back of the board, the finding of which was a true stroke of luck, he set about figuring out the circuit.

With only a dozen components or so and a couple of connectors, the OEM board gave up its secrets pretty easily; it’s really just a level shifter to make the boiler talk RS-232. But that’s a little passé these days, and [the78mole] was more interested in a WiFi connection. So his version of the card includes an ESP32 module, which handles wireless duties as well as the logic needed to talk to the burner using the Buderus proprietary protocol. The module plugs right into the burner controller and connects it to ESPHome, so no more cold showers for [themole].

We thought this one was pretty cool, especially the way [themole] used the online photos of the board to not only trace the circuit but to get accurate — mostly — measurements of the board using an online measuring tool. That’s a tip we’ll keep in our back pocket.

Thanks to [Jieffe] for the tip.

Old 3D CAD Mouse Gets New Lease Of Life

[Jacek Fedorynski] had an old Magellan/SpaceMouse 3D mouse with a serial interface which made it impossible for him to use with modern hardware and software. The problem he faced was two pronged – the absence of serial interfaces in the hardware and the lack of appropriate drivers for the operating system. So he built a low cost, simple adapter to use his RS-232 Magellan/SpaceMouse with modern software.

The hardware required to build the adapter was minimal. A Raspberry Pi Pico, a MAX3238 based RS-232 adapter, a null modem adapter and a DB9 gender changer. Of course, a combination null modem – gender changer would have made things even simpler. Four of the GPIO pins from the Pico are mapped to the serial RX, TX, RTS and CTS pins.

On the software side, the code emulates a 3DConnexion SpaceMouse Compact, so it can be used with software like Fusion 360, 3ds Max, SolidWorks, Inventor, Maya and many others. On the host computer, only the standard 3DxWare driver package is needed. On the host computer, the old Magellan/SpaceMouse 3D will appear like a modern SpaceMouse Compact connected over USB. The only downside to this is that the SpaceMouse Compact has just two programmable buttons, so only two of the many buttons on the old Magellan mouse can be mapped.

Flashing the code to the Pico is also straightforward using the BOOTSEL mode. Hold down the BOOTSEL button when plugging in the Pico and it appears as a drive onto which you can drag a new UF2 file. Just drag-n-drop [Jacek]’s magellan.uf2 firmware and you’re done.

If you’d rather build your own, modern 3D mouse, check out the DIY Cad Mouse You Can Actually Build.

DIY Wireless Serial Adapter Speaks (True) RS-232

There is a gotcha lurking in wait for hackers who look at a piece of equipment, see a port labeled “Serial / RS-232”, and start to get ideas. The issue is the fact that the older the equipment, the more likely it is to be a bit old-fashioned about how it expects to speak RS-232. Vintage electronics may expect the serial data to be at bipolar voltage levels that are higher than what the typical microcontroller is used to slinging, and that was the situation [g3gg0] faced with some vintage benchtop equipment. Rather than deal with cables and wired adapters, [g3gg0] decided to design a wireless adapter with WiFi and Bluetooth on one end, and true RS-232 on the other.

The adapter features an ESP32 and is attached to a DB-9 plug, so it’s nice and small. It uses the ST3232 chip to communicate at 3 V logic levels on the microcontroller side, supports bipolar logic up to +/-13 V on the vintage hardware side, and a rudimentary web interface allows setting hardware parameters like baud rate. The nice thing about the ST3232 transceiver is that it is not only small, but can work from a 3 V supply with only four 0.1 uF capacitors needed for the internal charge pumps.

As for actually using the adapter, [g3gg0] says that the adapter’s serial port is exposed over TCP on port 23 (Telnet) which is supported by some programs and hardware. Alternately, one can connect an ESP32 to one’s computer over USB, and run firmware that bridges any serial data directly to the adapter on the other end.

Design files including schematic, bill of materials, and PCB design are shared online, and you can see a brief tour of the adapter in the video, embedded below.

Continue reading “DIY Wireless Serial Adapter Speaks (True) RS-232”

USB Adaptor Isolates Multiple Serial Interfaces

You need a Swiss Army knife of serial communications? Ollie is a compact isolated USB adaptor that provides USB, CAN bus, and two UARTs at logic, RS-232, and RS-485 signaling levels, as well as an isolated power supply.  [Slimelec] has managed to squeeze all this into a package the size of a harmonica.  We like the technique of making the enclosure from PCB material, complete with clearly labeled switch, LED and connector pinout names.

So far, only the compiled firmware is available for this project, but hardware files, and presumably the source code and documentation, are coming soon.

The central themes here are  isolation and flexibility. We can’t find the isolation voltage in the project specifications, but the CANable project on which this adaptor is based provides 2.5 kV galvanic isolation.  A single isolated USB interface is also provided over a standard Type A connector. The four-wire logic-level UART signals are available on a 2 x 7 box header, and are voltage selectable.  The RS-232, RS-485, and CAN signals are on an 8-pin pluggable screw terminal block, or you can use a DB9 connector with a pluggable adaptor board.

Whether you need a troubleshooting aid for field testing, are using CAN bus on your projects, or just want to isolate your expensive computer from sketchy prototype hardware, have a look at this project.

Vintage Plotter Gets Bluetooth Upgrade

Recently [iot4c] stumbled upon this gorgeous Robotron Reiss plotter from 1989, brand-new and still in its original box. Built before the fall of the Berlin Wall in East Germany, it would be a crime to allow such a piece of computing history to go unused. But how to hook it up to a modern system? Bad enough that it uses some rather unusual connectors, but it’s about to be 2020, who wants to use wires anymore? What this piece of Cold War hardware needed was an infusion of Bluetooth.

While the physical ports on the back of the Robotron certainly look rather suspect, it turns out that electrically they’re just RS-232. In practice, this means converting it over was fairly straightforward. With a Bolutek BK3231 Bluetooth module and an RS-232 to UART converter, [iot4c] was able to create a wireless adapter that works transparently on the plotter by simply connecting it to the RX and TX pins.

A small DC buck converter was necessary to provide 3.3 V for the Bluetooth adapter, but even still, there was plenty of room inside the plotter’s case to fit everything in neatly. From the outside, you’d have no idea that the hardware had ever been modified at all.

But, like always, there was a catch. While Windows had no trouble connecting to the Bluetooth device and assigning it a COM port, the 512 byte buffer on the plotter would get overwhelmed when it started receiving commands. So [iot4c] wrote a little script in Node.js that breaks the commands down into more manageable chunks and sends them off to the plotter every 0.1 seconds. With this script in place the Robotron moved under its own power for the first time in ~30 years by parsing a HP-GL file generated by Inkscape.

If you’re interested in a plotter of your own but don’t have a vintage one sitting around, never fear. We’ve seen an influx of DIY plotters recently, ranging from builds that use popsicle sticks and clothespins to customizable 3D printed workhorses.

Vintage Speech Synthesizer Croons The Oldies

If you listened to the National Weather Service Weather Radio in the US about 25 years ago, you’ll no doubt remember [Perfect Paul], one of the synthesized voices used to read current conditions and weather forecasts. The voice came from a DECtalk DTC01, a not inexpensive voice synthesizer first made in 1984 that also gave voice to [Stephen Hawking] for many years.

Long obsolete, the DECtalk boxes have a devoted following with hobbyists who like to stretch what the device can do. Some even like to make it sing, after a fashion, and [Michael] decided that making a DECtalk sing “Xanadu”, the theme song from the 1980 [Olivia Newton-John] musical extravaganza, was a good idea. Whether it actually was is debatable, and we’ll take exception with having that particular ditty stuck in our head as a result, but we don’t judge except on the merits of the hack.

It’s actually easy if you have a DECtalk; the song is a straight ASCII file with remarkably concise instructions on which phonemes the box needs to generate. Along with inflection, tone, and timing instructions, the text file looks almost completely unlike English while still somehow being readable. The DECtalk accepts the file over RS-232, which would be easy enough to do with a modern computer, but [Michael] upped his game a bit by using a TRS-80 Model 100 computer as a serial terminal. The synthesized song is in the video below, with the original included for reference by those who didn’t experience endure the late disco-era glory days.

DECtalks seem pretty rare in the wild, so we appreciate this glimpse at what they can do. There are other retro speech synthesizer hacks, though: the simulated walnut goodness of the Votrax and the MicroVox come to mind, as does the venerable TI Speak and Spell.

Continue reading “Vintage Speech Synthesizer Croons The Oldies”