How To Weigh An Eyelash

So you’re a boxer, and you’re weighing in just 80 micrograms too much for your usual weight class. How many eyelashes do you need to pluck out to get back in the ring? Or maybe you’re following the newest diet fad, “microcooking”, and a recipe calls for 750 micrograms of sugar, and you need to know how many grains that is. You need a microgram scale.

OK, we can’t really come up with a good reason to weigh an eyelash, except to say that you did. Anyway, not one but two separate YouTube videos show you how to build a microgram balance out of the mechanism in a panel meter. You know, the kind with the swinging pointer that they used to use before digital?

Panel meters are essentially an electromagnet on a spring in the field of a permanent magnet (a galvanometer). When no current flows through the electromagnet, the spring pulls the needle far left. As you push current through the electromagnet, it is attracted to the fixed permanent magnet, fighting the spring, and tugs the pointer over to the right. More current equals more pull.

Continue reading “How To Weigh An Eyelash”

The Modular Bench Power Supply To Rule Them All

Right now, [The Big One] is using an ATX power supply as a bench power supply for all his electronics projects. It works, but it’s not ideal. The next step up from a power supply from an old computer is, in order, one of those Chinese deals on Amazon, a used HP supply, or for the very cool people among us, building your own. [The Big One] is very, very cool and he’s building the modular bench supply to rule them all.

This is not your $100 china special power supply that [The Big One] would have to buy again in a few months. Inside this massive power supply is a massive transformer and rectifier that fans out to multiple power supply modules. The modules themselves will be based on an OPA548 that will be able to supply up to 3A with current limiting.

Each of these channels will be controlled by an ATMega32u4, with all the fancy stuff you’d expect from the ultimate supply; USB for setting voltage, current, and logging data, a nice LCD character display, and it’s surprisingly cheap; just about $100 for the transformer, and about $50 for each module.

It’s shaping up to be a great build, and with all the features, a power supply that would also make a great kit. If you have any input you’d like [The Big One] to hear, let him know on the project page.

Why You Should Care About Software Defined Radio

It hasn’t become a household term yet, but Software-Defined Radio (SDR) is a major player on the developing technology front. Whether you’re building products for mass consumption, or just playing around for fun, SDR is worth knowing something about and I’ll prove it to you.

Continue reading “Why You Should Care About Software Defined Radio”

Know Your Speed On Rollerblades

[Anurag] is a computer engineering student with a knack for rollerblading. Rollerblades are not a transportation device that are often fitted with speedometers, so [Anurag] took that more as a challenge and designed this Arduino-powered computer to give him more information on his rollerblade rides.

The device uses an Arduino as the brain, and counts wheel revolutions (along with doing a little bit of math) in order to calculate the speed of the rider. The only problem with using this method is that the wheels aren’t on the ground at all times, and slow down slightly when the rider’s foot is off the ground. To make sure he gets accurate data, the Arduino uses an ultrasonic rangefinder to determine the distance to the ground and deduce when it should be taking speed measurements.

In addition to speed, the device can also calculate humidity and temperature, and could be configured to measure any number of things. It outputs its results to a small screen, but it could easily be upgraded with Bluetooth for easy data logging. If speed is truly your goal, you might want to have a look at these motorized rollerblades too.

RasPi Power Controller

WiFi Controlled Power Outlets With Raspberry Pi

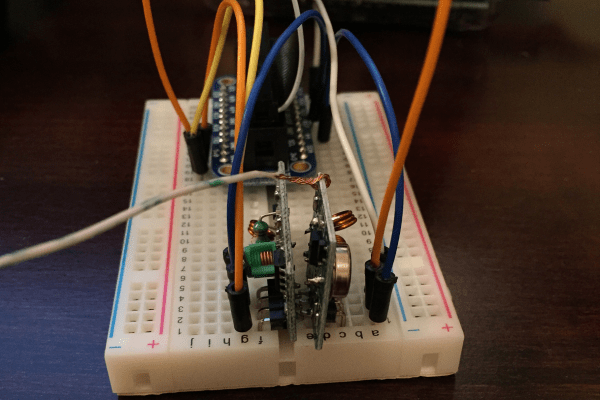
[Tim] was looking for a way to control his power outlets using WiFi. He looked into purchasing a WeMo but he realized that he could build something even better with more bang for his buck. He started out by purchasing a five pack of Etekcity wireless remote control outlet switches. These are kind of like the WeMo, only they aren’t controlled via WiFi. Instead, they come with an RF controller. [Tim] just needed to find a way to bridge the gap between the RF remote and WiFi.

[Tim] decided to use a Raspberry Pi as the brains of the controller. He also purchased a SMAKN 433MHz RF receiver and transmitter for communicating with the wireless outlet switches. The wiring for the modules is pretty simple. There are only four wires. There are power and ground wires for each module. Then the transmitter needs two GPIO pins while the receiver only needs one.

[Tim] began with a fresh installation of Raspbian. He then installed Wiring Pi, which gives you the ability to interface with the GPIO pins in a way that is similar to Arduino. He also installed Apache and PHP to create a web interface for switching the outlets. The last step was to write some custom software. The software included a script that allowed [Tim] to sniff out the controls of his RF remote. The correct codes are entered into the “toggle.php” file, and everything is set. All [Tim] has to do now is browse to his Pi’s web server and click a button. All of the custom code is available via git.

Clocked 8-Bit Random Pattern Generator For A CMOS Synth

A random noise generator is pretty handy when working with music, and building one using a micro-controller can be pretty trivial. So it’s nice when someone comes along and builds it from a few analog and digital parts. [acidbourbon] built his Clocked 8-BIT Random Pattern Generator for  CMOS Synth  inspired and motivated by the recent article Logic Noise: Sweet, Sweet Oscillator Sounds by [Elliot Williams]. It’s 8-bit output can be used as a random sequencer for DIY CMOS synths.
This pattern generator is suited to to be used in combination with a 4051 8-channel analog multiplexer. But it sounds quite interesting on it’s own (best enjoyed in stereo, check out the video after the break). After building some CMOS synth circuits, [acidbourbon] moved on to make some sequencers and multiplexers which then let him to devise this random pattern generator which could be gated using a clock signal.

The basic principle is straight forward – generate noise, amplify it, apply a clock to get the gated noise output. His design choices for the various sections are well explained, based on constraints that he had to work with. Everything needs to work at 5V, but his noise generator circuit requires 12V to work. He choose to use a charge pump to generate -5V, resulting in a 10V supply, which was barely enough, but worked. A boost regulator might probably have served better to generate 12V, but maybe he already had the ICL7660 charge pump IC lying around in his parts bin. The rest of the circuit uses standard CMOS/TTL devices, and [acidbourbon] provides all of the design files for what looks like a neat, single sided PCB that can easily be made using the toner-transfer method.

Video below.

Continue reading “Clocked 8-Bit Random Pattern Generator For A CMOS Synth”

Omnibus Seen In The Wild

February 9th has come and gone and the Hackaday Omnibus 2014 is now shipping. If you were one of the early adopters who pre-ordered, thank you very much it should be in your hands shortly! If you missed out on the Pre-Order, don’t worry you can still get a copy of your very own but we only ordered a small over-run so don’t wait too long.

The Omnibus celebrates the best our writers and illustrators published in 2014 with an 80-page full color volume printed on premium paper. From tales of technology past, to current events, the Omnibus tells the story of what the high points in hardware were last year. We have fallen in love with having a physical version of this content since the proof copies hit our hands a month ago. We believe that this is a conversation waiting to happen — set it out and watch your friends gravitate toward it.

We’ve already seen them popping up on Twitter and we’d love to see more. Make sure to Tweet a picture of your copy to @Hackaday with hashtag #hadOmnibus. We’re happy to see any pictures shared, but if you’re one of the lucky souls who works with awesome hardware make sure to take some ‘extreme’ shots. For instance, reading while you wait for the cyclotron to warm up, the nuclear sub to surface, or your ride to pick you up from Amundsen-Scott.

This is our first ever print edition and we’ve gone to great lengths to make sure it’s something you’ll be proud to have on your coffee table, bookshelf, or anywhere for years to come.

[Photos via @jbdatko, @JeremySCook, @rdcampbell13, @ToddTerrazas]