The Antikythera Mechanism

It’s no secret that a great deal of Western civilization was informed by the ancient Greeks. They revolutionized mathematics and geometry, developing astronomy along the way. They built ornate statues, beautiful temples to the gods, and amphitheaters for live entertainment with astonishing acoustics. The influence of the ancient Greeks shaped almost every field of human knowledge, from the arts and architecture to politics, philosophy, science, and technology.

This article was written for the Omnibus vol #02
Order yours now

Like the Babylonians, the Greeks paid close attention to the night sky. Our nearest celestial neighbor, the Moon, was particularly important to them from a planning perspective. For instance, debts might be due on the new Moon. By heeding the Moon’s phases and taking note of eclipse cycles, they found that their harvests were more fruitful, and they had fewer incidents at sea.

As savvy and well-rounded as ancient Hellenistic culture appears to have been, it’s not unreasonable to imagine that the Greeks could have created some kind of computing machine to make their Moon-centered scheduling easier. Based on fragments from in a shipwreck that was discovered in 1900, it seems they did exactly this. Based on scientific dating of the coins and pottery found in the wreck and inscriptions on the bronze remnants, historians and scientists believe the Greeks created a mechanical computer capable of calculating the positions of the Sun and the Moon on any given day. This marvelous device is known as the Antikythera mechanism.

The mechanism was housed in a wooden box and controlled with a knob on one side. It is believed that the front of the box was a display made up of a set of concentric rings with graduations, and that each ring corresponded with one celestial body. Pointers attached perpendicularly to output gears moved around the rings as the knob was turned, showing the paths and positions of these celestial bodies over time. This Earth-centric planetarium also displayed the phase of the Moon as well as the positions of the five major planets known to the ancient Greeks—Mercury, Venus, Mars, Jupiter, and Saturn.

Continue reading “The Antikythera Mechanism”

Pre-order This Graphically Stunning Print Edition Of Hackaday

Now is your chance to hold a piece of Hackaday in your hands. Last year we announced our first ever print edition. We continue that tradition with a much bigger offering. Hackaday Omnibus vol #02 gathers the best content from Hackaday over the last year. This includes in-depth original content, incredible art, the events that mattered over the last 12 months, and a few cryptic easter eggs.

omnibus-vol2-on-your-coffee-table[Joe Kim], Hackaday’s Art Direct, really outdid himself with the cover this year. Inspired by an epic movie, the illustration includes a shoutout to almost every article found within. Of course there is a lot more of his work inside, along with the efforts of dozens of writers, artists, editors, and more.
All 128 pages of Omnibus vol #02 were painstakingly laid out by [Aleksandar Bradic] who enlisted the help of a dedicated core of Hackaday.io members to help pore over the final drafts, ensuring the presentation is immaculate. Along the way some of them teamed up to roll in those easter eggs that I previously mentioned. We don’t even know what all of it means, you should be the first to solve the mystery.

Most of the 31 articles that grace these pages have run past the front page of Hackaday. But there are a few that were written specifically for the print edition. These will be published on our front page starting in 90 minutes and continuing for a few weeks. It is important to us to share these great works without the need to purchase anything. But the Omnibus is truly one of the coolest pieces of tech literature that you can own. It deserves a place on your coffee table, reception area at work, and as a gift for all who love to know how things work, how things were built, and the legacy of knowledge that has come from generations of hacking.

We’re only running a single printing of this gorgeous volume. Make sure you get one of your own by placing a pre-order now. Be one of the first 500 using coupon code OMNIBUS2015 and get it for just $10! Show that you support great content and help make future projects like this possible.

3 Billion Devices And A Sega Genesis Run Java

A few years ago, [Mike]’s friend gave him an old Sega Genesis with the very cool and somewhat rare SegaCD drive attached. The SegaCD gave him an idea – while it’s not easy to burn a cartridge and play homebrew games on a real Genesis console, everyone has a CD burner somewhere. [Mike] began writing his demo and then realized adding Java would be easy on the 68000. The result is Java on three billion devices and a Sega Genesis.

This project is built around Java Grinder a Java byte code compiler that will compile classes, factories, and all the horrible Java design.design.pattern.pattern.patterns() into assembly language. Already, there are a lot of platforms supported by Java Grinder, including the Commodore 64, the TI99, and thanks to some work from [Joe Davisson], the Apple IIgs

With a byte code compiler, an assembler, and an API for the Sega-specific hardware, [Mike] set about building his demo. Since this was a Sega, it needed the ‘SEGA’ sound at the start. [Mike] ended up recording his voice saying ‘JAVA!’ This plays through the Z80 on the Genesis.

The complete demo – viewable in its emulated format below – has everything you would expect from a proper demo. Starfields, dancing sprites, and even a Mandelbrot pattern make it into the three-minute long demo.

Continue reading “3 Billion Devices And A Sega Genesis Run Java”

Laser Cutting Bathymetric Maps

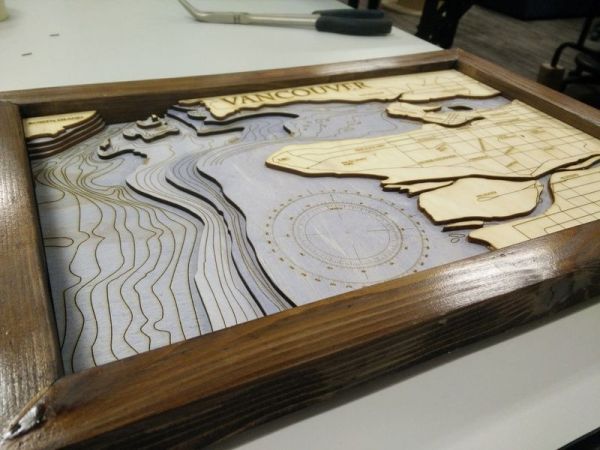
Bathymetry is the underwater equivalent to topography. And with the right map data, you can make some amazing 3D laser cut maps that feature both land masses — and the details under the sea. [Logan] just learned how to do this, and is sharing his knowledge with us.

[Logan] holds the typical hacker belief: The best way to learn something is just to start the project and figure it out as you go. Which also makes him an excellent candidate for helping others to learn what not to do. His goal of the project was to create a visually stunning map of Vancouver that helps to emphasize the depth of the ocean just off the coast.

To do this he obtained bathymetry data from the Fisheries and Oceans of Canada, and city map data from Open Street Map, a service we’re very familiar with that has provided data for many cool hacks, like this Runner’s GPS unit. The tricky part now is combining the data in order to laser it.

Continue reading “Laser Cutting Bathymetric Maps”

USB Volume Control

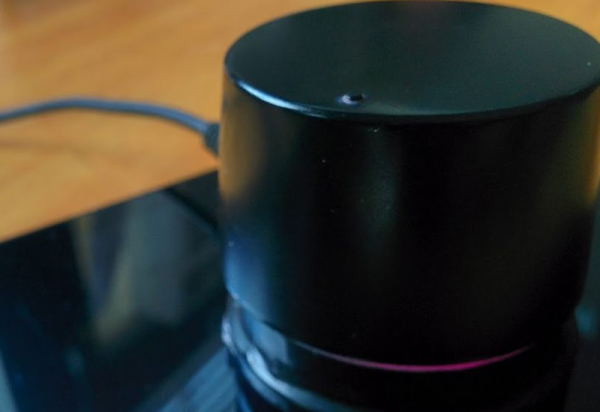
If you buy expensive computer speakers, they often have a volume knob you can mount somewhere on your desk so you aren’t dependent on the onboard volume control. [Kris S] decided to build his own version of the remote volume control. Not surprisingly, it uses an Arduino-compatible Digispark board and a rotary controller. The Digispark (that [Kris S] bought for $2) is compatible with the Adafruit Trinket. This is key because the Trinket libraries are what make it easy to send media keys over the USB (using the HID interface) to control the volume.

Really, though, the best part of the build is the good looking knob made out of a pill bottle (see the video below). The micro Digispark is small enough to fit in the lid of the pill bottle, and some wax and pellets add some heft to the volume control. Continue reading “USB Volume Control”

Control Your HTPC With Scavenged IR Parts

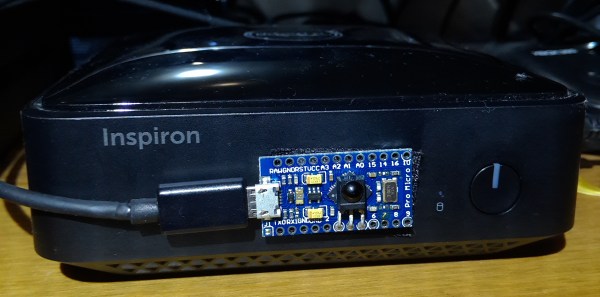
If you’ve built yourself a home theater PC, one of your highest priorities is probably coming up with a convenient control solution. The easiest way to do this is to simply use something like a wireless keyboard and mouse. But, that’s not very conducive to an enjoyable home theater experience, and it feels pretty clunky. However, if you’ve got the right components lying around, [Sebastian Goscik] has instructions and an Arduino sketch that will let you control your HTPC with any IR remote control.

There are a number of ways you could control your HTPC, and we’ve featured more than one build specifically for controlling XBMC over the years. Unfortunately, most of those methods require that you spend your hard earned money (which is better spent on popcorn). [Sebastian’s] setup can be replicated with things you probably have on hand: an Arduino, an IR remote, and a scavenged IR receiver. The IR receiver can be found in many devices, like old stereos or TVs that themselves were controlled via an IR remote.

It starts with an Arduino Sketch that lets you can see on the serial monitor what code is being generated by the button presses on your remote. These are then scripted to perform any task or function you like when those buttons are pushed. The most obvious use here is simple directional control for selecting your movies, but much more complex tasks are possible. Maybe someone can program a T9 script to type using the number buttons on most remotes?

Hackaday Links: November 22, 2015

There’s a new documentary series on Al Jazeera called Rebel Geeks that looks at the people who make the stuff everyone uses. The latest 25-minute part of the series is with [Massimo], chief of the arduino.cc camp. Upcoming episodes include Twitter co-creator [Evan Henshaw-Plath] and people in the Madrid government who are trying to build a direct democracy for the city on the Internet.

Despite being a WiFi device, the ESP8266 is surprisingly great at being an Internet of Thing. The only problem is the range. No worries; you can use the ESP as a WiFi repeater that will get you about 0.5km further for each additional repeater node. Power is of course required, but you can stuff everything inside a cell phone charger.

I’ve said it before and I’ll say it again: the most common use for the Raspberry Pi is a vintage console emulator. Now there’s a Kickstarter for a dedicated tabletop Raspi emulation case that actually looks good.

Pogo pins are the go-to solution for putting firmware on hundreds of boards. These tiny spring-loaded pins give you a programming rig that’s easy to attach and detach without any soldering whatsoever. [Tom] needed to program a few dozen boards in a short amount of time, didn’t have any pogo pins, and didn’t want to solder a header to each board. The solution? Pull the pins out of a female header. It works in a pinch, but you probably want a better solution for a more permanent setup.

Half of building a PCB is getting parts and pinouts right. [Josef] is working on a tool to at least semi-automate the importing of pinout tables from datasheets into KiCad. This is a very, very hard problem, and if it’s half right half the time, that’s a tremendous accomplishment.

Last summer, [Voja] wrote something for the blog on building enclosures from FR4. Over on Hackaday.io he’s working on a project, and it’s time for that project to get an enclosure. The results are amazing and leave us wondering why we don’t see this technique more often.