The Ultimate Traveler’s Toolkit

Looking for a better way to store your tools during transportation? While we certainly wouldn’t recommend trying to check this thing as a carry-on (oh and prepare for it to be searched even in checked luggage), this clever use of a road case is probably one of the best tool boxes we’ve ever seen.

This is [Robb Godshaw’s] tool box. It’s been developed over the past five years as he’s become a skilled maker. You might remember him best from his ironic project “Why are we limited to C-Clamps?” — a clamp offering of the entire alphabet.

He also picked up the road case close to home for Hackaday — at Apex Electronics Surplus in LA — one of our favorite places to find parts. But the most clever part of the project is the way he’s divided the case for different tools.

Continue reading “The Ultimate Traveler’s Toolkit”

Graduation cap LED display demo

Stealthy Mortar Board Unleashes Bling At Graduation Ceremony

Decorating graduation caps is often frowned upon by the administration but [Dan Barkus] is challenging his school authorities to keep from smiling when they see what he has in store. His build will dazzle the audience by mounting 1024 RGB LEDs in a 32×32 matrix on top of his cap, but hidden under the cap’s black cloth. When the LEDs are off he’s indistinguishable, and when he fires up the LEDs, shine through and put on a heck of a show. He can type messages on his phone to be displayed on the cap. He can even display images and animated GIFs.

LED array control components

The LED display is an Adafruit 32×32 RGB LED matrix panel.  To control the display, [Dan] uses a Teensy, a 32 bit ARM Cortex-M4 microcontroller board. Wireless communication is done via a JBtek HC-06 Bluetooth board.

The LED display can draw up to 4 amps at full white brightness so he picked up a USB battery with two output ports, one capable of 2.1 amps and the other 2.4 amps. He then hacked together a cable that has two USB connectors on one end, connected in parallel, and a DC jack on the other end. Altogether the battery bank is capable of up to 4.5 amps output combined out those two ports, meeting the LED display’s needs. The DC jack is plugged into the Teensy and all power goes through there.

One problem [Dan] had was that the Bluetooth module was booting up before the Teensy. It didn’t see the Teensy in time, causing the Bluetooth not to work. The solution he found is shown in the 2nd video embedded below. The fix powers the Bluetooth module separately, using a current limiting resistor and a capacitor to build up the voltage, delaying just long enough for the Teensy to win.

Continue reading “Stealthy Mortar Board Unleashes Bling At Graduation Ceremony”

Unary Clock For The Binary-Challenged

If binary clocks have you confused by all the math required to figure out what time it is, we have the solution for you: a unary clock. After all, what’s simpler than summing up powers of two? Powers of one! To figure out the time, you start with the ones digit. If it’s on, you add one to the total. Then move on to the next digit. Since 12 equals one, you add another one if it’s lit. Then on to the third LED. 13 = 1, so if it’s lit, you add another one, and so on.

OK, we’re messing around. Calling this a “unary” clock is ridiculous. When it’s seven o’clock, there are seven LEDs lit. Nice and easy to read. Sixty minute LEDs is silly, so here each minute LED stands for five minutes. Good enough.

What we really like about this clock is the build. It’s intended as educational for school kids, so it has to be simple to build and easy to personalize. Building the body out of Lego bricks fits the specs nicely. Transparent Lego bricks are used to give the white LEDs some color. That was too bright, so [Shrimping It] added paper cutouts from a hole punch as diffusers.

Clock builds are a great intro to electronics because they offer so many possibilities. Whether you want to go geary, use the clock as an excuse to try out fabrication techniques, or showcase a neat display technology, your imagination has a lot of room to wander. Show us yours?

RetroFab: Machine Designed Control Of All The Things

On the Starship Enterprise, an engineer can simply tell the computer what he’d like it to do, and it will do the design work. Moments later, the replicator pops out the needed part (we assume to atomic precision). The work [Raf Ramakers] is doing seems like the Model T ford of that technology. Funded by Autodesk, and as part of his work as a PhD Researcher of Human Computer Interaction at Hasselt University it is the way of the future.

The technology is really cool. Let’s say we wanted to control a toaster from our phone. The first step is to take a 3D scan of the object. After that the user tells the computer which areas of the toaster are inputs and what kind of input they are. The user does this by painting a color on the area of the rendering, we think this technique is intuitive and has lots of applications.

The computer then looks in its library of pre-engineered modules for ones that will fit the applications. It automagically generates a casing for the modules, and fits it to the scanned surface of the toaster. It is then up to the user to follow the generated assembly instructions.

Once the case and modules are installed, the work is done! The toaster can now be controlled from an app. It’s as easy as that. It’s this kind of technology that will really bring technologies like 3D printing to mass use. It’s one thing to have a machine that can produce most geometries for practically no cost. It’s another thing to have the skills to generate those geometries. Video of it in action after the break.  Continue reading “RetroFab: Machine Designed Control Of All The Things”

Hackaday Prize Entry: A Low-Cost Robot Arm

Robot arms are cool, and to judge from the SCARA arms and old Heathkit robots tucked away in a cupboard of every computer science department in every university in the world, they’re still remarkably educational. You can learn a lot about control systems with a robot arm, or you could build a clone of the old Radio Shack Armatron; either way, you’re doing something very cool. Right now, there aren’t many educational robot arms available, and the ones you can get are tiny. For [Jonathan]’s Hackaday Prize project, he’s building a low-cost robot arm with a one meter reach.

There’s a reason you won’t find many large, low-cost robot arms: the square cube law. An ant can carry many times its own body weight, but if you scaled that ant up to the size of a human, its legs couldn’t support itself. Likewise, a small, handheld robot arm will work perfectly well with hobby servos, but scaling this up requires big heavy stepper motors.

Continue reading “Hackaday Prize Entry: A Low-Cost Robot Arm”

Chibiterm Is A Tiny Low-Cost VGA Terminal

A common sight in the days before cheap PCs conquered the world was the dumb terminal. A keyboard and a monitor with a serial port on the back that was usually hooked up to a minicomputer or even a mainframe, these were simple devices. Anything that came into the serial port was rendered on the screen, anything typed on the keyboard was sent out through the serial port. They didn’t need to contain a microprocessor. If you are old enough, you may remember electronics magazines of the 1970s and early 1980s publishing terminal designs based entirely on 74 series logic.

The serial terminal might seem like a redundant historical footnote when viewed from 2016, but they can still find a use among those working with systems such as small embedded microcontrollers that only possess a serial port. To address this application, Hackaday.io user [K.C.Lee] has created a low-cost terminal module for a VGA monitor and a PS/2 keyboard based around an inexpensive STM32F030F4 processor.

Continue reading “Chibiterm Is A Tiny Low-Cost VGA Terminal”

We’re Headed To Maker Faire, Will You Be There?

The Hackaday Crew will be descending on San Mateo next weekend for Bay Area Maker Faire. Will you be there? Gerrit and I will be looking in every booth and byway for amazing hacks, new hardware, and anything else that tickles the fancy of hackers everyone.

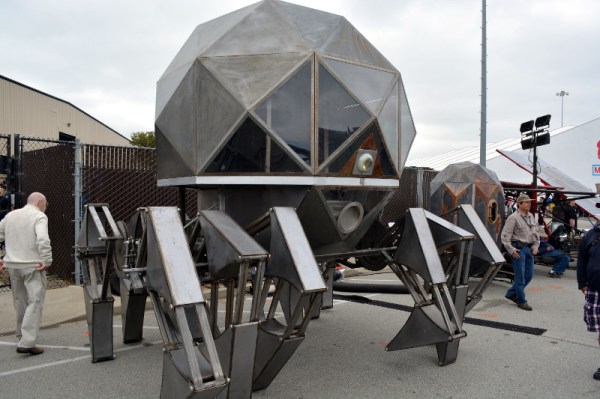
We certainly didn’t miss the massive tin spider seen above at last year’s event. But it’s a huge venue, and I’m always afraid we’re going to miss something epic. If you’re exhibiting and want us to stop by, leave a comment below. If you know of something awesome that we shouldn’t miss this year, we’d love to hear about that too.

I’d also like to invite you to hang out with Hackaday on Saturday night. When the Faire closes its gates, something amazing happens every year at O’Neil’s Irish Pub. Don’t miss it!

Need a Ticket?

Texas Instruments sent us 4 Friday passes, and 9 weekend passes which we want to give away. The fairest way of doing that is a drawing using Twitter.

To enter, simply Tweet something about your favorite 2016 Hackaday Prize entry, including @Hackaday @TXinstruments #FairePass in the message. Here’s what an example Tweet looks like (don’t worry, I’m not eligible to win).

On Sunday, 4pm PDT we’ll make a list of all the Twitter handles that sent out a Tweet, then use random.org to choose 6 random numbers from that list. The second giveaway will happen at 4pm PDT on Wednesday 5/18, using the same procedure to choose the remaining 7 winners.

All of the obvious contest stuff applies: employees and family of Hackaday, Supplyframe, and TI are not eligible. Results of the drawing are final. We can’t substitute other prizes (we’re just giving away extra tickets) and this giveaway has no bearing on any other contests or winner selection.