Die Photos Of A Runner’s RFID Chip

A mass participation sporting event such as a road race presents a significant problem for its record keepers. It would be impossible to have ten thousand timekeepers hovering over stopwatches at the finish line, so how do they record each runner’s time? The answer lies in an RFID chip attached to the inside of the bib each runner wears, which is read as the runner crosses the line to ensure that their time is recorded among the hundreds of other participants.

[Ken Shirriff] got his hands on a bib from San Francisco’s “Bay to Breakers” race, and set about a teardown to lay bare its secrets.

The foil antenna pattern.

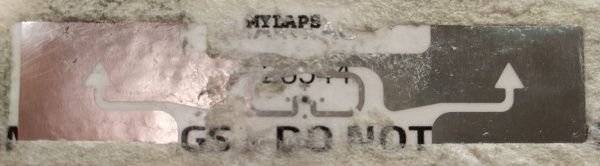
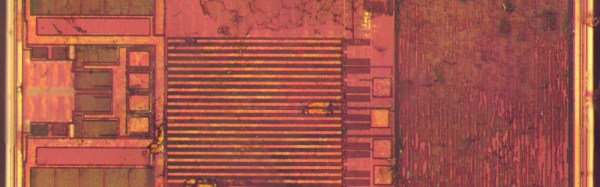
Stripping away the foam covering of the RFID assembly revealed a foil antenna for the 860-960MHz UHF band with the tiny RFID chip at its centre. The antenna is interesting, it’s a rather simple wideband dipole folded over with what looks like a matching stub arrangement and an arrow device incorporated into the fold that is probably for aesthetic rather than practical purposes. He identified the chip as an Impinj Monza 4, whose data sheet contains reference designs for antennas we’d expect to deliver a better performance.

After some trial-by-fire epoxy removal the tiny chip was revealed and photographed. It’s a device of three parts, the power scavenging and analog radio section, the non-volatile memory that carries the payload, and a finite-state logic machine to do the work. This isn’t a proper processor, instead it contains only the logic required to do the one task of returning the payload.

He finishes off with a comparison photograph of the chip — which is about the size of a grain of salt — atop a 1980s 8051-series microcontroller to show both its tiny size and the density advancements achieved over those intervening decades.

Since RFID devices are becoming a ubiquitous part of everyday life it is interesting to learn more about them through teardowns like this one. The chip here is a bit different to those you’ll find in more mundane applications in that it uses a much higher frequency, we’d be interested to know the RF field strength required at the finish line to activate it. It would also be interesting to know how the system handles collisions, with many runners passing the reader at once there must be a lot of RFID chatter on the airwaves.

We’ve featured [Ken]’s work before, among many others in his reverse engineering of Clive Sinclair’s 1974 scientific calculator, and his explanation of the inner workings of the TL431 voltage reference. Though we’ve had many RFID projects on these pages, this appears to be the first teardown of one we’ve covered.

A Hydra Of A 3D Printer

3D printers are great for producing one thing, but if you need multiple copies, the workflow quickly starts to go downhill. The solution? Build a 3D printer with multiple print heads, capable of printing four objects in the same amount of time it takes to print one.

This build is an experiment for [allted]’ Mostly Printed CNC / MultiTool. It’s a CNC machine that uses printed parts and 3/4″ electrical conduit for the frame and rails.  That last bit is the interesting part: electrical conduit is cheap, easy to acquire, available everywhere, and can be cut with a hacksaw. As far as desktop CNC machines go, it doesn’t get simpler or cheaper than this, and a few of these builds are milling wood with the same quality of a machine based on linear rails. It won the grand prize in the recent Boca Bearings contest, and is a great basis for a cheap and serviceable 2.5 or 3D CNC.

[allted] already has this cheap CNC mill cutting aluminum and engraving wood with a laser, showing off the capabilities of a remarkably cheap but highly expandable CNC machine. It’s a fantastic build, and we can’t wait to see more of these machines pop up in garages and workspaces.

Continue reading “A Hydra Of A 3D Printer”

Hackaday Prize Entry: Invisible

[Kate Reed] found a quote by a homeless person that said “No one sees us”, which led her to exploring what it actually means to be invisible — and if we actually choose to be invisible by hiding away our emotions, sexual preference, race or income. She realized that too often, we choose to only see what we want to see, rendering all the rest invisible by looking away. Her public art campaign and Hackaday Prize entry “Invisible” aims to increase social awareness and strengthening the community by making hidden thoughts, feelings and needs visible.

Continue reading “Hackaday Prize Entry: Invisible”

Puzzling Out An 80s Puzzle Toy

[Ido Gendel] looks back a time in the 80s when kids would learn by answering the questions to quizzes on their “TOMY Teacher,” or, “Sears Quiz-A-Tron”. There’s a bit of a conundrum with this toy. How did it know which answers were correct. Chip memory of any kind wasn’t the kind of thing you’d sweep into the dust bin if you had extras like it is now; it was expensive.

To use the toy, the child would place the notebook in the plastic frame on the device. They’d open the page with the quiz they would like to take. Printed in the upper left hand corner were three colored squares. There was a matching set of colored buttons on the device. They’d press the corresponding buttons in order from top to bottom and then the machine would magically know which answers on the quiz were correct.

[Ido] wondered how the machine handled this information. Was there an internal table for all 27 possible codes? Did it generate the answer table somehow? He sat down with a spreadsheet filled with the notebook code on the left and the corresponding correct answers on the right. Next he stared at the numbers.

He eventually determined that there was a pattern. The machine was using the colored squares as the input for a function that determined what the answers were. A table would have only taken up 68 bytes, but with one 80s chip on board, sounds to play, and lights to switch on and off, the machine needed all the free space it could get.

Wireless Robotic Gripper With Haptic Feedback

We’re not sure what kind of, “High School,” [Sam Baumgarten] and [Graham Hughes] go to that gave them the tools to execute their robotic gripper so well. We do know that it was not like ours. Apparently some high schools have SLS 3D printers and Solidworks. Rather than a grumpy shop teacher with three fingers who, despite that, kept taking the safety off the table saws and taught drafting on boards with so many phalluses and names carved into the linoleum, half the challenge was not transferring them to the line work.

Our bitterness aside, [Sam] and [Graham] built a pretty dang impressive robotic gripper. In fact, after stalking [Sam]’s linkedin to figure out if he was the teacher or the student, (student) we decided they’re bright enough they could probably have built it out of scraps in a cave. Just like [HomoFaciens], and Ironman.

The gripper itself is three large hobby servos joined to the fingers with a linkage, all 3D printed. The mechanical fingers have force sensors at the contact points and the control glove has tiny vibrating motors at the fingertips. When the force of the grip goes up the motors vibrate more strongly, providing useful feedback. In the video below you can see them performing quite a bunch of fairly fine motor skills with the gripper.

The gripper is mounted on a pole with some abrasive tape, the kind found on skateboard decks. At the back of the pole, the electronics and batteries live inside a project box. This provides a counterbalance to the weight of the hand.

The control glove has flexible resistors on the backs of the fingers. The signal from these are processed by an Arduino which transmits to its  partner arduino in the gipper via an Xbee module.

[Sam] and [Graham] did a great job. They worked through all the design stages seen in professional work today. Starting with a napkin sketch they moved onto digital prototyping and finally ended up with an assembly that worked as planned. A video after the break explaining how it works along with a demo video.

Continue reading “Wireless Robotic Gripper With Haptic Feedback”

Denver Mini Maker Faire Roundup

I had a great time at Denver’s 3rd annual Mini Maker Faire, which was held inside the Denver Museum of Nature and Science. The official theme this year was “Building the Future” and looking back, I can tell you that they pulled the theme off well. There was a strong turnout in two categories that are crucial to building the future: the growth that comes from education at all ages and the physical places where learning becomes immersive.

The Really Fun Stuff

poison arrow[Casey] from Caustic Creations were showing off Poison Arrow just in time for season 2 of the BattleBots reboot. Poison Arrow is 250-lb. drum spinner that destroys things at 9,000 RPM. Here’s a nice introductory video shot by their sponsor, Arrow Electronics. [Casey] told me that Poison Arrow will be on the June 30th episode, so set your DVR.

Who knew that Colorado had so many maker- and hackerspaces? Colorado Makerhub, that’s who. They provide a portal to everything maker-related in Colorado, and they were in attendance along with most of the ‘spaces within a 50-mile radius of the city. Denver’s own Denhac brought a huge multiplayer rig that they had built for Comic Con last year. It runs Artemis, a spaceship bridge simulator game that divides up the tasks necessary for successful intergalactic travel. Here’s a video of Denhac member [Radio Shack] describing the game and giving a tour of one of the consoles. The group landed a space in one of the darker areas of the museum, which made the blinkenlights irresistible, especially to boys of a certain age range.

Continue reading “Denver Mini Maker Faire Roundup”

3D Printed Zoetrope Sculpture Squashes 4 Dimensions Into 3

This fascinating project manages to be both something new and something old done in a new way. Artist [Akinori Goto] has used 3D printing to create a sort of frameless zoetrope. It consists of a short animation of a human figure, but the 3D movements of that figure through time are “smeared” across a circular zone – instead of the movements of the figure being captured as individual figures or frames, they are combined into a single object, in a way squashing 4 dimensions into 3.

zoetrope-1“Slices” of that object, when illuminated by a thin shaft of light, reveal the figure’s pose at a particular moment in time. When the object is spun while illuminated in this way, the figure appears to be animated in a manner very similar to a zoetrope.

There are two versions from [Akinori Goto] that we were able to find. The one shown above is a human figure walking, but there is a more recent and more ambitious version showing a dancer in motion, embedded below.

Since a thin ray of light is used to illuminate a single slice of the sculpture at a time, it’s also possible to use multiple points of illumination – or even move them – for different visual effects. Check out the videos below to see these in action.

Continue reading “3D Printed Zoetrope Sculpture Squashes 4 Dimensions Into 3”