Wooden Laptop Enclosure: New Life For Old Thinkpad

Technology is designed to serve us and make our lives better. When a device gets outdated, it is either disposed of or is buried in a pile of junk never to be seen again. However, some individuals tend to develop a certain respect for their mechanical servants and make an effort to preserve them long after they have become redundant.

My relationship with my first laptop is a shining example of how to hold onto beloved hardware way too long. I converted that laptop into a desktop with a number of serious modifications which helped me learn about woodworking along the way. Maybe it’s more pragmatic to just buy new equipment. But you spend so much time each day using your devices. It is incredibly satisfying to have a personal connection that comes from pouring your own craftsmanship into them.

Why the Effort?
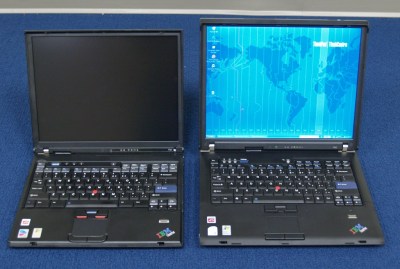
IBM Thinkpad R60 via Notebook Review

The laptop in question is an IBM R60 which I lugged around during the first three years after I graduated. It was my companion during some tough times and naturally, I developed a certain attachment to it. With time its peripherals failed including the keyboard which housed the power switch and it was decided that the cost of repair would outweigh its usefulness.

Then came the faithful day when I was inspired to make something with the scrap wood that had accumulated in my workshop. This would be my second woodworking project ever and I did not have the professional heavy machinery advertised in most YouTube videos. Yet I had two targets in mind with this project.

  1. Make the R60 useful again.
  2. Learn about woodworking for creating enclosures for future projects.

Armed with mostly hand tools, a drill and a grinder that was fitted with a saw blade, I started with the IBM R60 to all-in-one PC mod. Following is a log of things I did and those I regret not doing a.k.a. lessons learned. Read on.

Continue reading “Wooden Laptop Enclosure: New Life For Old Thinkpad”

Copper, Brass, Mahogany, And Glass Combine In Clock With A Vintage Look

No two words can turn off the average Hackaday reader faster than “Nixie” and “Steampunk.” But you’re not the average Hackaday reader, so if you’re interested in a lovely, handcrafted timepiece that melds modern electronics with vintage materials, read on. But just don’t think of it as a Nixie Steampunk clock.

No matter what you think of the Steampunk style, you have to admire the work that went into [Aeon Junophor]’s clock, as well as his sticktoitiveness –he started the timepiece in 2014 and only just finished it. We’d wager that a lot of that time was spent finding just the right materials. The body and legs are copper tube and some brass lamp parts, the dongles for the IN-12A Nixies are copper toilet tank parts and brass Edison bulb bases, and the base is a fine piece of mahogany. The whole thing has a nice George Pal’s Time Machine vibe to it, and the Instructables write-up is done in a pseudo-Victorian style that we find charming.

If you haven’t had enough of the Nixie Steampunk convergence yet, check out this Nixie solar power monitor, or this brass and Nixie clock. And don’t be bashful about sending us tips to builds in this genre — we don’t judge.

Continue reading “Copper, Brass, Mahogany, And Glass Combine In Clock With A Vintage Look”

New Ransomware Crippling Chernobyl Sensors

[The BBC] reports Companies all over the world are reporting a new ransomware variant of WannaCry. this time it has taken out sensors monitoring the Chernobyl nuclear disaster site.

We have all heard of the growing problem of ransomware and how Windows XP systems seem especially susceptible to WannaCry and it’s variants which were originally zero day vulnerabilities stored up by the NSA then leaked by WikiLeaks. Microsoft did release a patch. It’s been everywhere in the media but it still seems that some people didn’t get the memo.

Ukrainian state power plants and Kiev’s main airport, among others, have been affected. Probably most interesting and scary of all is that Chernobyl monitoring stations have been taken out, and monitors have to take radiation levels manually for the moment.

It seems that most reports are coming from old Soviet Bloc states (Ukraine, Russia, and Poland), which raises the question of where the attacker is based. Kaspersky Lab is reporting that it’s believed the ransomware was a “new malware that has not been seen before” with a close resemblance to Petya. So as a result, the firm has dubbed it NotPetya.

NotPetya is spreading rapidly affecting companies all over the world with no signs of slowing just yet. Will we see an end to WannaCry variants any time soon.

[Update Thanks to [getrekt] , It now seems that this is fake ransomware which just destroys your data whether you pay or not.]


An Enchanted Rose For A Beauty

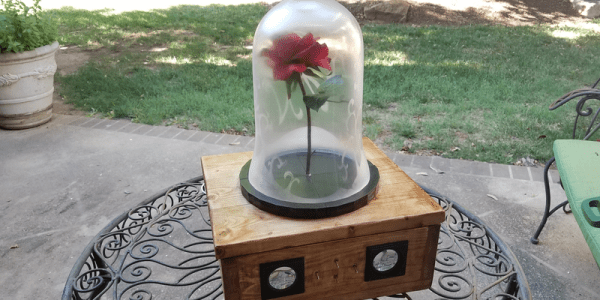
Being a maker opens up so many doors in terms of ways to romance one’s partner through passion projects. If their passion is Disney films, then you may handily make them the enchanted rose from Beauty and the Beast for their birthday. Easy-peasy.

In addition to the love and care that went into this build, redditor [Vonblackhawk2811] has included a set of LEDs, salvaged from cheap flashlights and electronic candles, which are controlled by four toggle switches and offer multiple lighting selections — candlelight, soft white, colour cycling, and bright white — to appropriately set the mood. As if that wasn’t enough to romance his sweetheart, he’s also included an aux cord input and a pair of speakers so they may be serenaded by a tune or two as they dance the night away.

Liberal use of hot glue and duct tape are keeping the electronics secured, preventing any shorts. After all — what would it say if this gift went up in flames? An inspired stencil design — hand drawn and cut out — was used to apply a spray-on frosted glass finish to the cloche, and a romantic phrase was burned into the base, completing this heartfelt gift. The only quibble we have is that now we all have to step up our game in the courtship department.

That is, unless one is sporting the Romance Pants.

[via /r/DIY]

Machine Learning IDE In Alpha

Machine is an IDE for building machine learning systems using TensorFlow. You can sign up for the alpha, but first, have a look at the video below to see what it is all about.

You’ll see in the video, that you can import data for a model and then do training (in this case, to find a mustache in an image). You’ll see the IDE invites an iterative approach to development since you can alter parameters, run experiments, and see the results.

The IDE syncs with “the cloud” so you can work on it from multiple computers and roll back to previous results easily. We don’t know when the IDE will leave alpha status (or beta, for that matter), but the team’s goal is to release a free version of Machine to encourage widespread adoption.

If you want to learn more about TensorFlow, you are in the right place. We’ve also covered a bare-bones project if you’d rather get started that way. You can also find some good background material going all the way back to the early perceptron-based neural networks.

Dual-Purpose DIY Spot Welder Built With Safety In Mind

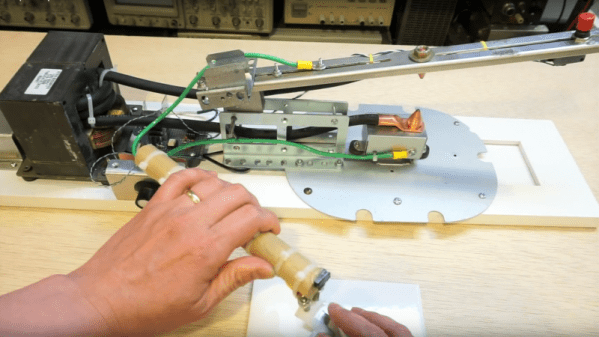
Ho-hum, another microwave oven transformer spot welder, right? Nope, not this one — [Kerry Wong]’s entry in the MOT spot welder arms race was built with safety in mind and has value-added features.

As [Kerry] points out, most MOT spot welder builds use a momentary switch of some sort to power the primary side of the transformer. Given that this means putting mains voltage dangerously close to your finger, [Kerry] chose to distance himself from the angry pixies and switch the primary with a triac. Not only that, he optically coupled the triac’s trigger to a small one-shot timer built around the venerable 555 chip. Pulse duration control results in the ability to weld different materials of varied thickness rather than burning out thin stock and getting weak welds on the thicker stuff. And a nice addition is a separate probe designed specifically for battery tab welding — bring on the 18650s.

Kudos to [Kerry] for building in some safety, but he may want to think about taking off or covering up that ring when working around high current sources. If you’re not quite so safety minded, this spot welder may or may not kill you.

Continue reading “Dual-Purpose DIY Spot Welder Built With Safety In Mind”

An Hour To Surface Mount

Most of us have made the transition from through hole parts to surface mount. There are lots of scattered tutorials, but if you want to learn some techniques or compare your technique to someone else’s, you might enjoy [Moto Geek’s] hour-long video on how he does surface mount with reflow soldering. You can see the video below.

What makes the video interesting is that it is an hour long and covers the gamut from where to get cheap PCBs, to a homebrew pick and place pencil. [Moto Geek] uses a stencil with solder paste, and he provides links to the materials he uses. Continue reading “An Hour To Surface Mount”