Discontinued Nintendo Consoles And Raspberry Pis

Nintendo has discontinued a Classic gaming console. It’s a pity, yes, but with the release of Nintendo’s new gaming console, they probably have bigger fish to fry. That doesn’t mean these discontinued Nintendo consoles will die a slow, miserable death locked away in a closet; at least one of them will live on with the heart of a Raspberry Pi.
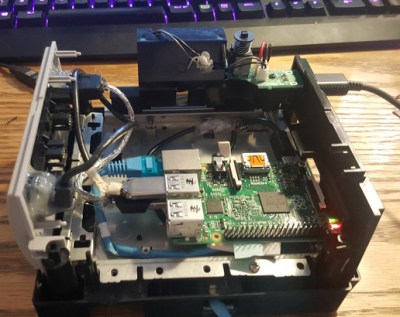
This is a project [Liam] has been working on since 2012, just after he got the first edition of the Raspberry Pi. While some people were figuring out how to stuff the Pi inside a Nintendo Entertainment System or a Super Nintendo Entertainment System, [Liam] decided to embed the Pi inside a console of a more recent vintage: the Nintendo GameCube.

The first phase of this project was simply to get the Pi running inside the enclosure of the non-working GameCube he picked up. The power supply in this console was well designed, and after a quick perusal through some online documentation, [Liam] found a stable 5V with enough amps to power the Pi. After ripping out the internals of this console with the help of a quickly hacked together ‘Nintendo screwdriver’, [Liam] had a perfectly functional Pi enclosed in a Nintendo chassis.

Time marches on, and after a while, the Raspberry Pi 2 was released. By this time, retro emulation was hitting the big time, and [Liam] decided it was time for an upgrade. He disassembled this Nintendo console again, routed new wires and inputs to the original controller ports, and used a Dremel to route a few holes for the HDMI and SD card slot.

With the addition of a few SNES-inspired USB controllers, RetroPi, and a few ROMs, [Liam] has a wonderful console full of classic emulation goodness, packaged in an enclosure Nintendo isn’t making any more.

Moving Forth With Mecrisp-Stellaris And Embello

In the last episode, I advocated a little bit for Forth on microcontrollers being a still-viable development platform, not just for industry where it’s usually seen these days, but also for hackers. I maybe even tricked you into buying a couple pieces of cheap hardware. This time around, we’re going to get the Forth system set up on that hardware, and run the compulsory “hello world” and LED blinky. But then we’ll also take a dip into one of the features that make Forth very neat on microcontrollers: easy multitasking.

To work!

Hardware

Mecrisp-Stellaris Forth runs on a great number of ARM microcontrollers, but I’ll focus here on the STM32F103 chips that are available for incredibly little money in the form of a generic copy of the Maple Mini, often called a “STM32F103 Minimum System Board” or “Blue Pill” because of the form-factor, and the fact that there used to be red ones for sale. The microcontroller on board can run at 72 MHz, has 20 kB of RAM and either 64 or 128 kB of flash. It has plenty of pins, the digital-only ones are 5 V tolerant, and it has all the usual microcontroller peripherals. It’s not the most power-efficient, and it doesn’t have a floating-point unit or a DAC, but it’s a rugged old design that’s available for much less money than it should be.

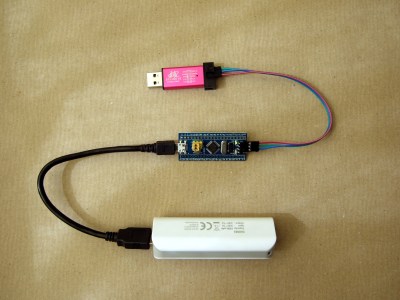
Programmer Connected, Power over USB

Similar wonders of mass production work for the programmer that you’ll need to initially flash the chip. Any of the clones of the ST-Link v2 will work just fine. (Ironically enough, the hardware inside the programmer is almost identical to the target.) Finally, since Forth runs as in interactive shell, you’re going to need a serial connection to the STM32 board. That probably means a USB/serial adapter.

This whole setup isn’t going to cost much more than a fast food meal, and the programmer and USB/serial adapter are things that you’ll want to have in your kit anyway, if you don’t already.

You can power the board directly through the various 3.3 and GND pins scattered around the board, or through the micro USB port or the 5V pins on the target board. The latter two options pass through a 3.3 V regulator before joining up with the 3.3 pins. All of the pins are interconnected, so it’s best if you only use one power supply at a time.

Continue reading “Moving Forth With Mecrisp-Stellaris And Embello”

Manhattan Marauder’s Map

If you solemnly swear that you are up to no good, and you happen to spend most of your time in Manhattan below the mid-90s, then you will appreciate this Raspberry Pi-based Manhattan Marauder’s Map.

Not that a Harry Potter-themed map was necessarily [GawkyFuse]’s intention when creating this interesting build; it’s just that the old-time print of Manhattan — it shows Welfare Island in the East River, which was renamed Roosevelt Island in 1971 — lends a nice vintage feel to the build. Printed on plain paper, the map overlays a 64×32-LED matrix, which is driven by a matrix HAT riding atop the Pi 3.

[GawkyFuse] uses the OwnTracks app on his and his wife’s iPhone to report their locations back to CloudMQTT. The Pi subscribes to the broker and updates his location in red and her location in blue as they move about the city; a romantic touch is showing a single purple dot when they’re together. There’s no word on what’s displayed when either leaves the map area, but the 2048-pixel display offers a lot of possibilities.

We’ve seen a Weasley clock or two around these parts before, but strangely no Marauder’s Maps like this one. Although this Austrian tram-tracking map comes pretty close to [GawkyFuse]’s nice design.

[via r/raspberry_pi]

Ethanol-Powered Arduinos

Following the time-honored YouTube tradition of ordering cheap stuff online and playing with it while the camera runs, [Monta Elkins] bought a Stirling engine that drives a DC motor used as a generator. How much electrical juice can this thing provide, running on just denatured alcohol? (Will it blend?)

The answer is probably not really a spoiler: it generates enough to run “Blink.ino” on a stock Arduino, at least when powered directly through the 5 V rail. [Monta] recorded an open-circuit voltage of around 5 V, and a short-circuit current of around 100 mA at a measured few hundred millivolts. While he didn’t log enough of the points in-between to make a real power curve, we’re guessing the generator might be a better match for 3.3 V electronics. The real question is whether or not it can handle the peaky demands of an ESP8266. Serious questions, indeed!

The video is a tad long, but it’s more than made up for by the sight of an open flame vibro-botting itself across his desk while [Monta] is trying to cool the cold side down with a melting ice cube. Which got us thinking, naturally. If you just had two of the Stirling enginesContinue reading “Ethanol-Powered Arduinos”

Robot Targets Eyeballs, Fires Lasers. OSHA’s Gonna Love This One

If you even think about hacking with lasers, you’re going to hear about eye safety. “Be careful” they’ll say. “Don’t look into laser with remaining eye” is a joke you’ll not be able to avoid. You’ll hear “Where are your goggles”, and about 1000 other warnings. Don’t get us wrong, laser/eye safety is important. However, the constant warnings can get a bit old — especially when you’re working with a “low power” class 3a laser — you know, the kind with a warning label that says “AVOID DIRECT EYE EXPOSURE” in big black letters on a yellow background.

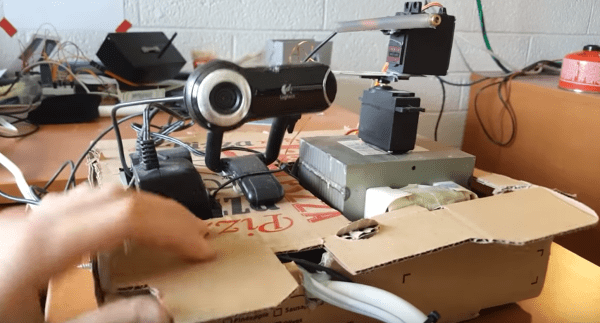
[Michael Reeves] got fed up, and went a bit nuts. He built a robot specifically to shine a laser into human eyes. No, not a medical robot. This ‘bot lives in a pizza box, is built from servos, duct tape, and [Michael’s] tears. It just shoots lasers at people’s eyes. Needless to say, please, don’t try this at home, or at all.

Designing such a diabolical beast was actually rather simple. The software is written in C#. Frames are captured from an old Logitech webcam, then passed into Emgu CV, which is a .NET wrapper for OpenCV. [Michael] runs a simple face detection algorithm, and uses the results to aim a laser. The laser is mounted on two R/C style servos. An Arduino forms the glue between the servos and the PC.

[Michael] has a great deadpan delivery and it all makes for a great video. Think of him of a younger [Medhi] over at Electroboom.  But we can’t condone this behavior. Properly labeled and characterized red laser pointers have never been shown to cause eye damage. Yet if the laser is out-of-spec or reflects of something that further focuses the beam it is certainly capable of damaging eyesight.

We want [Michael’s] eyesight to remain intact so he can make more videos — he’s entertaining, even if ignoring safety warnings isn’t.

Continue reading “Robot Targets Eyeballs, Fires Lasers. OSHA’s Gonna Love This One”

Upgrading RAM On A Nexus 5X

A screenshot of the status screen indicating the phone has detected the extended RAM.

A denizen of the venerable XDA forums reports that it is possible to upgrade the RAM of the Nexus 5X from 2GB to 4GB.  Having suffered the dreaded bootloop, [Cathair2906] decided to send their phone off to China for repair. The technician advised that since reflow of the CPU was necessary anyway, it makes sense to upgrade the RAM as well. This is due to the RAM actually being fitted directly on top of the CPU, a method amusingly known as Package on Package (SFW).

Upgrading RAM in the average computer is a relatively trivial task. Pop the case open, and you slide the new sticks into the extra slots. It’s not the same case for smartphones and tablets — in the endless quest for the slimmest form factor, all parts are permanently soldered. In addition, every device is essentially bespoke hardware; there’s no single overarching hardware standard for RAM in portable devices. You could find yourself searching high and low for the right chips, and if you do track them down, the minimum order quantity may very well be in the thousands.

Unless, of course, you had access to the Shenzhen markets where it’s possible to buy sample quantities of almost anything. Given access to the right parts, and the ability to solder BGA packages, it’s a simple enough job to swap a bigger RAM chip on top of the CPU during the repair.

It’s the sort of thing that’s trivial in Shenzhen, and almost mind-bogglingly impossible in the West. The price of the repair? About $60 USD. [Cathair2906] was even nice enough to share the address of the shop that did the work.

We’ve seen similar antics before – like this Nexus 5 storage upgrade to 64GB.

[via XDA Developers, thanks to Jack for the tip!]

Enabling Ethernet On The ESP32

The ESP32 is the latest and greatest wonderchip from Espressif. It’s a 32-bit, dual-core chip with WiFi, Bluetooth, and tons of peripherals such as CAN and Ethernet. For most of these peripherals, Espressif already has a few bits of example code, but [Frank Sautter] didn’t like the Ethernet implementation. The ‘stock’ code calls for a TLK110 Ethernet PHY, but that’s an expensive chip when bought in quantity one. A better chip would be the LAN8720, so [Frank] built a board to enable Ethernet on the ESP32 with this chip.

The ESP32 only needs a few components to wire it into an Ethernet network. Just a few resistors, capacitors, and an RJ45 jack will take care of most of the work, but because he’s taking the Ethernet ‘shield’ route, he needs to add his own Ethernet PHY. The Waveshare LAN8720 is the chip for this, but there’s an issue with the pin configuration of the ESP32. GPIO0 on the ESP32 has two functions — the first is pulling it low during startup for serial programming, and the second is the clock input for the EMAC function block. Some bit of circuitry must be devised to allow for both conditions to enable Ethernet on the ESP32.

[Frank]’s solution is to add a few pull-up and pull-down resistors to a breakout board, and use an unused GPIO pin to switch GPIO0 high during startup, but allows a crystal to grab it a bit later. It’s a hack, certainly, but it does allow for some much cheaper chips to be used to give the ESP32 Ethernet.