TI(ny) Is A New Take On The TI-99/4A

Way back in the 1980s, in the heyday of the personal computer revolution, Texas Instruments were one of the major players. The TI-99/4A was one of their more popular machines, selling 2.8 million units after an epic price war with the Commodore VIC-20. However once it had been discontinued, fans were left wanting more from the platform. Years later, that led [Fabrice] to produce the TI(ny), his take on an upgraded, more integrated TI-99/4A (Google Translate link).

Having spent many years working on these machines, [Fabrice] was very familiar with the official TI schematics – regarding both their proper use and their errors, omissions and inaccuracies. With a strong underlying knowledge of what makes a TI-99/4A tick, he set out to pen his own take on an extended model. [Fabrice] rolls in such features as Atari-compatible joystick ports, slot connectors for PeBOX expansion cards, and an RGB video output. It’s then all wrapped up in a very tidy looking case of somewhat unclear construction; it appears to be modified from an existing small computer case, and then refinished to look almost stock.

The best detail, though? It’s all made with components available in 1983! We see a lot of retro builds that are the equivalent of throwing a modern fuel-injected V8 into a vintage muscle car, and they are fantastic – but this is a project that shows us what was possible way back when.

Overall it’s a tidy build that shows what the TI-99/4A could have been if it was given a special edition model at the end of its life. If you’re looking to relive the glory days of the machine yourself, what better way then firing up the best demo on the platform? As the saying goes – Don’t Mess With Texas.

[Thanks to g_alen_e for the tip!]

Unphotogenic Lighting As A Feature

Have you ever taken a picture indoors and had unsightly black bars interrupt your otherwise gorgeous photo? They are caused by lighting which flickers in and out in its normal operation. Some people can sense it easier than others without a camera. The inconsistent light goes out so briefly that we usually cannot perceive it but run-of-the-mill camera phones scan rows of pixels in sequence, and if there are no photons to detect while some rows are scanned, those black bars are the result. Annoying, right?

What if someone dressed that bug of light up as a feature? Instead of ruining good photos, researchers at the University of California-San Diego and the University of Wisconsin-Madison have found out what different frequencies of flicker will do to a photograph. They have also experimented with cycling through red, green, and blue to give the effect of a poorly dubbed VHS.

There are ways an intelligent photographer could get around the photo-ruining effect with any smartphone. Meanwhile DSLR cameras are already immune and it won’t work in sunlight, so we are not talking about high security image protection. The neat thing is that this should be easy to replicate with some RGB strips and a controller. This exploits the row scanning of new cameras, so some older cameras are immune.

A 3D Printed Marble Clock

There are clocks with pendulums, gears, and circuits. How about one with marbles? Initially designed in the ’70s, rolling ball clocks came in many designs and materials, but this is the future, so [gocivici] has created an Instructable to show you how you can 3D print and build your own.

Three rows of marbles keep track of the time, one for one hour intervals, one for five-minute intervals and a third for one minute intervals. It makes reading the time a bit more difficult than a pair of hands, but more fun. The clock uses the weight of the marbles to know when a row needs resetting. When the fifth marble drops onto the minute row, its weight causes the row to tilt, sending all but one marble down to the bottom of the machine. The marble that caused the tilting is sent down to the row underneath, perhaps causing a cascade of marbles down to the bottom.

There is something quite satisfying about seeing the marbles moving around in [gocivici]’s mechanical marble clock. Sure, it’s probably too loud for the nightstand, but it keeps time and looks great. In this build a stepper motor drives the main wheel which acts as an elevator, grabbing a marble from the bottom and raising it to the top to tumble down and find its position among the rows.

Of course, at Hackaday we love clocks so there have been many clock builds showcased here; all you need do is a quick search for “clock” to find some incredible designs and builds. We’ve also featured similar marble clocks.

via BoingBoing

Continue reading “A 3D Printed Marble Clock”

Bixel, An Open Source 16×16 Interactive LED Array

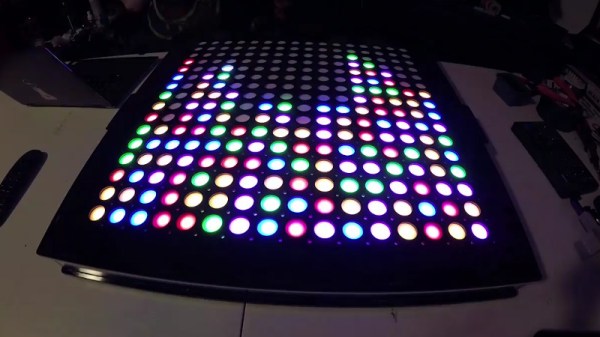
The phrase “Go big or go home” is clearly not lost on [Adam Haile] and [Dan Ternes] of Maniacal Labs. For years they’ve been thinking of creating a giant LED matrix where each “pixel” doubled as a physical push button. Now that they’ve built up experience working on other LED projects, they finally decided it was time to take the plunge and create their masterpiece: the Bixel.

Creating the Bixel (a portmanteau of button, and pixel) was no small feat. The epic build is documented in an exceptionally detailed write-up on the team’s site, in addition to the time-lapse video included after the break. [Adam] tells us the Bixel took around 100 hours of assembly, and we don’t doubt it. This is truly one of those labors of love which is unlikely to be duplicated, though all of the source files for both the hardware and software are available if you’re feeling brave enough.

The write-up contains a lot of fascinating detail about the design and construction of the Bixel, but perhaps the least surprising of all of them is that the final product ended up being very different from what they originally envisioned. The plan was to simply use lighted arcade buttons in a 16×16 grid, as they were purpose-built for exactly what the guys had in mind. But when they priced them out, the best they could do was $2 a pop. That’s $500 for just the buttons alone, before they even got into the enclosure or electronics. Like any good hackers, [Adam] and [Dan] decided to ditch the ready-made solution and come up with something of their own.

In the end, they cut the individual LEDs out of RGB strips, and soldered them down to their custom designed 500mmx500mm PCB. To the sides of each section of strip are two tactile switches, and above is a “sandwich” made of laser cut acrylic. The sheet closest to the LEDs has a 25mm hole, the top sheet has a 20mm hole, and between them is a circle of acrylic that acts as the “button”. Once it’s all screwed together, the button can’t fall out of the front or move from side to side, but it can be pushed down to contact the tactile switches.

To wire it all up they took a cue from the DIY keyboard scene and used a Teensy, some 595 shift registers, and 256 1N4148 diodes. A Raspberry Pi running their Python framework does the heavy computational lifting, leaving the Teensy to just handle talking to the hardware. Overall it’s a fantastic design to emulate if you’re looking to create large arrays of buttons on the cheap; such as whenever you get around to building that starship simulator.

Continue reading “Bixel, An Open Source 16×16 Interactive LED Array”

Video Quick Bit: The Best In Human Computer Interfaces

We’re neck deep in the Hackaday Prize, and we just wrapped up the Human Computer Interface Challenge. This is an incredible contest to go beyond traditional mice and keyboards to find new ways to transfer your desires directly into a computer. Majenta Strongheart is back at it again, giving us a look at some of the coolest Human Computer Interface builds in this year’s Hackaday Prize

The Hackaday Prize is all about hacking, really, and there’s no better project that demonstrates this than [Curt White]’s hacked fitness tracker. This is a tiny, $35 fitness tracker that’s loaded up with Bluetooth and an ECG front end. With a few slight modifications this cheap bit of consumer electronics can become a prototyping platform for ECG/EMG/EEG projects. Awesome work.

But when it comes to Human Computer Interfaces, what’s really cool is games. Remember the Power Glove? Of course, everyone does. How about the Sega Activator, the first full-body motion controller? Yeah, now we’re getting into the good stuff. [Arcadia Labs] build a Head Tracker for their favorite space flight sims, and the results are remarkable. Take a look at the videos and you can see the promise of this kind of tech.

The biggest advance in Human-Computer Interaction in the last few years is obviously VR. Once the domain of some early-90s not-quite cyberpunk, VR is now showing up in living rooms. The HiveTracker is an ingenious device that reverse engineers the technology behind the Vive Tracker from HTC. This is a tiny little device that allows for sub-millimeter 3D positioning, and also adds a 9DOF IMU to the mix. If you’ve ever wanted to know exactly where you are, this is the project for you.

Right now we’re plowing through the Musical Instrument Challenge where we’re asking you to build something that pushes the boundaries of instrumentation. If you’re building a synth, we want to see it. If you’re making music with vacuum tubes, we want to see it. Got one of those guitars that are like, double guitars? Yes, we want that too. Twenty of the Musical Instrument Challenge submissions will be selected to move on to the finals and win $1000 in the process. The top five entries of the 2018 Hackaday Prize will split $100,000! This is your chance, so enter now!

What’s A Couplate? The Stepping Stone To Integrated Circuits

We are spoiled these days because you can shop online and get all manner of inexpensive electronic goodies shipped to your door. This is due to the fantastic electronic fabrication workflow that has grown into a global powerhouse, facilitated by complex yet inexpensive integrated circuits! But it took a few intermediate steps to get here, and one of those is known as a couplate.

When I was a kid, the big deal was to find an old radio in the trash. You could spend a few hours stripping all sorts of parts from the thing and add it to your collection for a future project. Of course, old radios from the 1970s and earlier had a lot of the usual parts we use today, even though many of them were bigger — no surface mount parts yet. Since older radios were the usual find in a dumpster, tubes were common but you could find some transistor radios.

Once in a while something older. There would be a little box with some wires poking hiding in an old radio from the 1940s or 1950s (too early for ICs). In a way, though, these were predecessors to the Integrated Circuit and they went by a few names, depending on who sold them. PEC (Printed Electronic Circuit), a couplate, or a BulPlate, are all names for hardware that was a stepping stone between discrete circuitry and ICs.

Continue reading “What’s A Couplate? The Stepping Stone To Integrated Circuits”

Friday Hack Chat: Playing With Fire

We’re pretty sure all the hackers and tinkerers and makers out there were a tiny bit of a pyromaniac in their youth. That’s what makes this week’s Hack Chat so exciting: we’re talking about Hacking With Fire.

Our guest for this week’s Hack Chat will be [Brice Farrell], who, like most of us, has been interested in fire his entire life. He’s taken this interest and turned his amateur passion into something semi-professional. He’s a PGI certified pyrotechnician, an electrical engineer, and an ice carver. This year, he appeared on BattleBots where he built the flame system for Battle Royale with Cheese.

Given [Brice]’s extensive expertise, this Hack Chat is going to cover the relevant safety concerns of work with fire, how to keep yourself safe, and how to do everything legally. We’ll be talking about fireball shooters of all sizes, ignition techniques, and the use (and introduction) of fire in combat robotics. That last point is extremely interesting: is fire on a BattleBot actually useful, and what can you do to protect your bot from it?

Points of interest for this Hack Chat will include:

  • Fire safety
  • The difference between generating flames and fireballs
  • Ignition techniques
  • Fire safety
  • Fire in combat robotics
  • Fire safety

You are, of course, encouraged to add your own questions to the discussion. You can do that by leaving a comment on the Hacking with Fire event page and we’ll put that in the queue for the Hack Chat discussion.

join-hack-chat

Our Hack Chats are live community events on the Hackaday.io Hack Chat group messaging. This week is just like any other, and we’ll be gathering ’round our video terminals at noon, Pacific, on Friday, September 14th. That’s not the same in every time zone, but don’t worry, we have some amazing time conversion technology.

Click that speech bubble to the right, and you’ll be taken directly to the Hack Chat group on Hackaday.io.

You don’t have to wait until Friday; join whenever you want and you can see what the community is talking about.