A Pick-And-Place That Is A Work Of Art

It’s a Holy Grail among hackerspaces, the possession of a pick-and-place machine. These robotic helpers for placing surface-mount components on PCBs are something of a gateway to electronic production, but they can carry a fearsome cost. Happily for the cash-strapped would-be electronic manufacturer, it is possible to build a pick-and-place for yourself. [Mcuoneclipse] has demonstrated this with a rather impressive build that works with the freely available OpenPnP software.

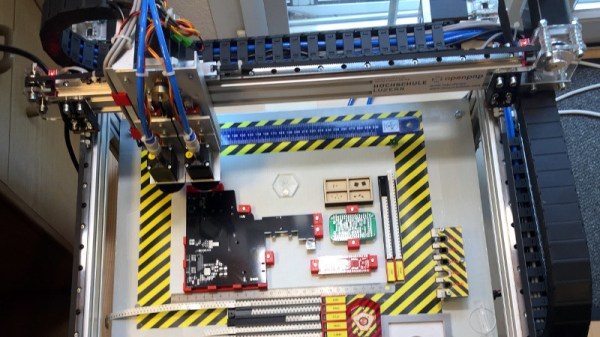
Superficially it shares much with what you might expect from a small CNC mill, in that it has a frame made from extruded aluminium that carries rails that trace an X and a Y axis supporting a tool head. But instead of a blade it has a box made from laser-cut ply that contains a camera and a vacuum pick-up tool that can collect a component from the tapes and deposit it in the correct point on the board. At the machine’s heart is a Smoothieboard, and the work is done by an assortment of solenoid valves and actuators. A huge amount of attention to detail has been paid to this build, with a holder for all the interchangeable nozzles for different component sizes, laser-cut mountings for all the motorised components, and automatic feeders for the SMD tapes all being carefully designed and built. Several iterations of the design are presented, in particular around the head itself which has passed through more than one form to remove as much vibration as possible. But don’t take it from us, have a look at the video we’ve pasted in below the break.

This isn’t the first pick-and-place machine we’ve brought you here at Hackaday. If you already have a 3D printer, would you consider this upgrade?

Continue reading “A Pick-And-Place That Is A Work Of Art”

The Electric Vehicles Of EMF Camp: A Sinclair C5, (Almost) As It Should Have Been

Most Hackaday readers will have heard of [Clive Sinclair], the British inventor and serial entrepreneur whose name appeared on some of the most fondly-recalled 8-bit home computers. If you aren’t either a Sinclair enthusiast or a Brit of a Certain Age though, you may not also be aware that he dabbled for a while in the world of electric vehicles. In early 1985 he launched the C5, a sleek three-wheeler designed to take advantage of new laws governing electrically assisted bicycles.

The C5 was a commercial failure because it placed the rider in a vulnerable position almost at road level, but in the decades since its launch it has become something of a cult item. [Rob] fell for the C5 when he had a ride in one belonging to a friend, and decided he had to have one of his own. The story of his upgrading it and the mishaps that befell it along the way are the subject of his most recent blog post, and it’s not a tale that’s over by any means.

The C5 was flawed not only in its riding position, the trademark Sinclair economy in manufacture manifested itself in a minimalist motor drive to one rear wheel only, and a front wheel braking system that saw bicycle calipers unleashed on a plastic wheel rim. The latter was sorted with an upgrade to a disc brake, but the former required a bit more work. A first-generation motor and gearbox had an unusual plywood housing, and the C5 even made it peripherally into our review of EMF Camp 2016, but it didn’t quite have the power to start the machine without pedaling. Something with more grunt was called for, and it came in the form of a better gearbox which once fitted allowed the machine to power its way to the Tindie Cambridge meetup back in April. Your scribe had a ride, but all was not well. After a hard manual pedal back across Cambridge to the Makespace it was revealed that the much-vaunted Lotus chassis had lived up to the Sinclair reputation for under-engineering, and bent. Repairs are under way for the upcoming EMF Camp 2018, where we hope we’ll even see it entering the Hacky Racers competition.

Tie-Dyed Filament Sings With Color

Manufacturers dye all sorts of 3D printer filaments on their factory lines; why can’t we? [Richard] takes this idea one step further by creating his own custom multicolored reels of nylon. Printing with these reels produces a vibrant pattern that simply demands our attention and  begs us to ask: how on earth..?

[Richard’s] tie-dye adventure is cleanly documented on the blog.  He simply spools a reel of nylon together and dyes subsections of the spool with a different color. With the filament “paletted” to taste, parts pop of the printer with an eye-catching rib pattern of color.

It’s worth mentioning that nylon is extremely hygroscopic, and dyeing filament in a bath full of colored liquid is sure to get it full of moisture. Then again, nylon’s capacity to absorb water might be why it dyes so well. Nevertheless, filament must be oven-dried (or equivalent) for a successful print. Post-drying, [Richard] doesn’t seem to be having any printing problems, and the results speak for themselves.

3D printers might be frequent fliers on these pages, but we still love seeing small modifications that enhance the visual appeal. What’s more, this trick delivers spectacular results with no modifications to the printer itself. Then again, if this job sounds like just too much work for you, we’d suggest using a sharpie.

Continue reading “Tie-Dyed Filament Sings With Color”

An E-Bike Battery Pack Without Spot Welding

In somewhat of a departure from their normal fare of heavy metal mods, [Make It Extreme] is working on a battery pack for an e-bike that has some interesting design features.

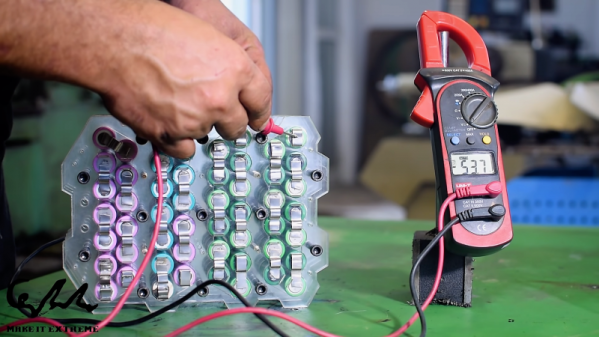
The guts of the pack are pretty much what you’d expect – recovered 18650 lithium-ion cells. They don’t go into details, but we assume the 52 cells were tested and any duds rejected. The arrangement is 13S4P, and the cells are held in place with laser-cut acrylic frames. Rather than spot weld the terminals, [Make It Extreme] used a series of strategically positioned slots to make contacts from folded bits of nickel strip. Solid contact is maintained by cap screws passing between the upper and lower contact frames. A forest of wires connects each cell to one of four BMS boards, and the whole thing is wrapped in a snappy acrylic frame. The build and a simple test are in the video below.

While we like the simplicity of a weld-less design, we wonder how the pack will stand up to vibration with just friction holding the cells in contact. Given their previous electric transportation builds, like this off-road hoverbike, we expect the pack will be put to the test soon, and in extreme fashion.

Continue reading “An E-Bike Battery Pack Without Spot Welding”

Launching Fireworks With Raspberry Pi This Fourth Of July

It’s that time of year again in the United States, and the skies will soon be alight with pyrotechnic displays, both professional and amateur. Amazing fireworks are freely available, sometimes legally, sometimes not. For the enthusiasts that put on homebrew displays, though, the choice between watching your handiwork or paying attention to what you’re doing while running the show is a tough one. This Raspberry Pi fireworks show controller aims to fix that problem.

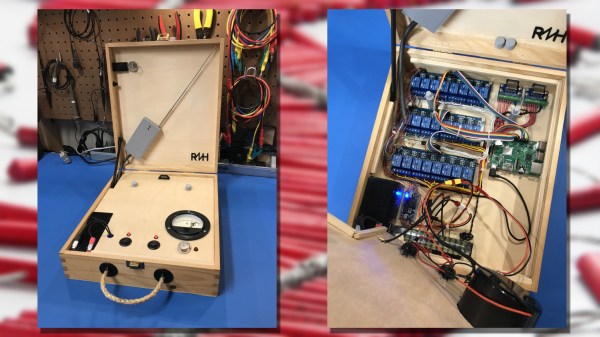
[netmagi] claims his yearly display is a modest affair, but this controller can address 24 channels, which would be a pretty big show in any neighborhood. Living inside an old wine box is a Raspberry Pi 3B+ and three 8-channel relay boards. Half of the relays are connected directly to breakouts on the end of a long wire that connect to the electric matches used to trigger the fireworks, while the rest of the contacts are connected to a wireless controller. The front panel sports a key switch for safety and a retro analog meter for keeping tabs on the sealed lead-acid battery that powers everything. [netmagi] even set the Pi up with WiFi so he can trigger the show from his phone, letting him watch the wonder unfold overhead. A few test shots are shown in the video below.
As much as we appreciate the DIY spirit, it goes without saying that some things are best left to the pros, and pyrotechnics is probably one of those things. Ever wonder how said pros pull it off? Here’s a behind-the-scenes look.

Continue reading “Launching Fireworks With Raspberry Pi This Fourth Of July”

Modular robot legs from Disney

Disney’s New Robot Limbs Trained Using Neural Networks

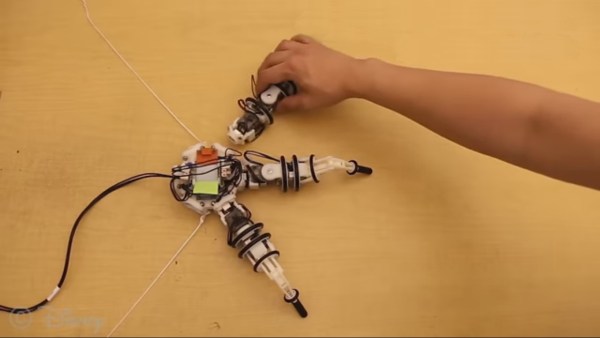
Disney is working on modular, intelligent robot limbs that snap into place with magnets. The intelligence comes from a reasonable sized neural network that also incorporates some modularity. The robot is their Snapbot whose base unit can fit up to eight of limbs, and so far they’ve trained with up to three together.

The modularity further extends to a choice of three types of limb. One with roll and pitch, another with yaw and pitch, and a third with roll, yaw, and pitch. Interestingly, of the three types, the yaw-pitch one seems most effective.

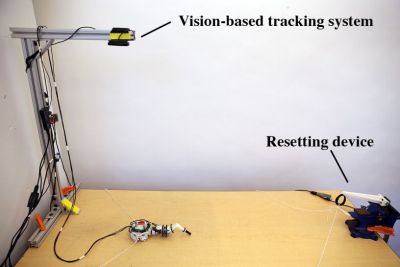
Learning environment for Disney's modular robot legsIn this age of massive, deep neural networks requiring GPUs or even online services for training in a reasonable amount of time, it’s refreshing to see that this one’s only two layers deep and can be trained in three hours on a single-core, 3.4 GHz Intel i7 processor. Three hours may still seem long, but remember, this isn’t a simulation in a silicon virtual world. This is real-life where the servo motors have to actually move. Of course, they didn’t want to sit around and reset it after each attempt to move across the table so they built in an automatic mechanism to pull the robot back to the starting position before trying to cross the table again. To further speed training, they found that once they’d trained for one limb, they could then copy the last of the network’s layers to get a head starting on the training for two limbs.

Why do training? Afterall, we’ve seen pretty awesome multi-limbed robots working with manual coding, an example being this hexapod tank based on one from the movie Ghost in the Shell. They did that too and then compared the results of the manual approach with those of the trained one and the trained one moved further in the same amount of time. At a minimum, we can learn a trick or two from this modular crawler.

Check out their article for the details and watch it in action in its learning environment below.

Continue reading “Disney’s New Robot Limbs Trained Using Neural Networks”

Roboshield Helps Your Robot Walk And Talk

The joy of building robots comes from being able to imbue them with as much or as little personality and functionality as you wish during the design and build process. While creative flair and originality is always a good thing, there’s a lot of basic needs many robots have in common with each other, so where possible it’s good to avoid reinventing the wheel so more time can be spent on more advanced features. Roboshield aims to help make the basics easy so you can let your robot freak flag fly!

At its core, it’s an Arduino shield that packs in a host of hardware to get your robot up and running. As far as motion is concerned, a PCA9685 module is used to allow the control of 8 servos, plus there’s a TB6621FNG dual motor speed controller that offers both speed control and forward/reverse. That’s enough to get your electronic buddy scooting about the floor and waving its arms in the air.

The party piece, however, is the Vstamp text-to-speech module. This device produces a beautiful cliche electronic voice, which your robot is legally required to use to recite Asimov’s Laws of Robotics. Overall, it’s a tidy project that can take the hassle out of getting your robot design up and running, leaving you to focus on the fun bits like death rays and tractor beams. We can’t wait to see it powering the next wave of sassy DIY robots.