Enjoy A Refreshing Beverage With The Chilled Drink Calculator

Hackers are quite often the price conscious type, unwilling to pay jacked up prices for cold beverages when they can be purchased warm and in bulk for much lower cost. However, when guests are on the way and time is running out, it’s crucial to chill the drinks down to the right temperature, and fast. To take the guessing out of the process, [Álvaro Díez] and [Tibor Pal] collaborated to create the Chilled Drink Calculator.

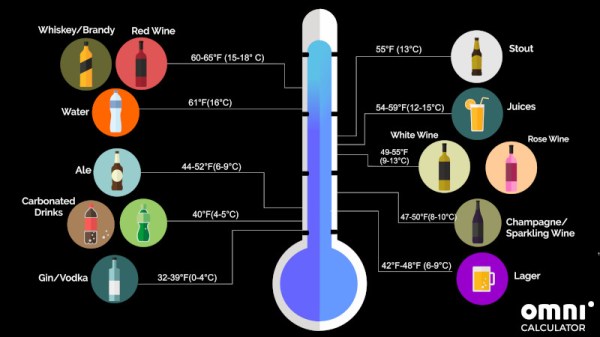
It’s a resource jam-packed full of everything you need to know to get your drinks cold, pronto. Based on heat transfer equations and data from empirical studies, the calculator is able to show you just how long it will take to cool practically any beverage to any temperature. There are presets for different types of container and cooling method, as well as information on the ideal serving temperatures for things like wine, beer and soft drinks. There’s even information on helpful hacks to help cool things down more quickly – with the salt and ice bath being devastatingly effective with minimal equipment requirements.

Keep the calculator in your bookmarks for the next time your pals show up with a case of beer that’s been sitting in the sun all day in the back of a pickup truck (Authors note: looking at you, Terry). Alternatively, consider building an advanced cooling apparatus.

Square Laser Harp Is Hip

You know, we hadn’t realized how tired we were of vertical laser harps until we saw [Jonathan Bumstead]’s entry into the 2019 Hackaday Prize. It’s all well and good to imitate the design of the inspiring instrument. But the neat thing about synths is that they aren’t confined to the physics of the acoustic instruments they mimic. This project elevates the laser harp into functional sculpture territory. It’s a piece of art that produces art.

And this art harp is entirely self-contained, with built-in MIDI, amplifier, and speakers. The brains of this beauty are an Arduino Mega and an Adafruit music maker shield, which give it twenty different instrument voices. Each of the six layers has two lasers, two mirrors, and two photo-resistors mounted in the corners of the plywood skeleton. The lasers and photo-resistors are mounted back to back in opposite corners, with mirrors in the other two corners to complete the paths. [Jonathan] cleverly diffused the laser light with milky slivers of film canister plastic.

This isn’t [Jonathan]’s first optical rodeo. Previous experience taught him the importance of being able to readjust the lasers on the fly, because every time he moved it, the laser modules would go out of alignment. This time, he built kinematic mounts that let him reposition the lasers using four screws that each push a corner.

There are a lot of nice touches here, especially the instrument selector wheel. [Jonathan] explains it and the rest of the harp in a fantastic demo/build video that’s just burning a hole in the space after the break.

Continue reading “Square Laser Harp Is Hip”

Sensor Lets Gestures And An Arduino Control The Tunes

Every time we watch Minority Report we want to make wild hand gestures at our computer — most of them polite. [Rootsaid] wanted to do the same and discovered that the PAJ7620 is an easy way to read hand gestures. The little sensor has a serial interface and can recognize quite a bit of hand waving. To be precise, the device can read nine different motions: up, down, left, right, forward, backward, clockwise, anticlockwise, and wave.

There are plenty of libraries to read it for common platforms. If you have an Arduino that can act as a keyboard for a PC, the code almost writes itself. [Rootsaid] uses a specific library for the PAJ7620 and another — Nicohood — for sending media keys.

Continue reading “Sensor Lets Gestures And An Arduino Control The Tunes”

NFC Business Cards To FPGA Cubes, Skull Badges To Bandoliers, Here’s The Hardware From Breakfast At DEF CON

We had our biggest Breakfast at DEF CON ever on Sunday. So big, in fact, that the carefully laid plans went awry immediately.

This is the fifth year we’ve hosted the event, which kicks off the final day of DEF CON with some hardware show-and-tell. We really thought we had it all figured out, since this time we actually booked a space in Paris hotel. For the first three years we were just banditing the space — asking everyone to show up at this place and it’ll become an event. Last year we planned to have it in the Hardware Hacking Village, but the casino stopped us from bringing in pastries that morning and we ended up camping out in a dining area that wasn’t open until the afternoon.

Last weekend we had a cafe booked, with pastries and coffee on order. The only problem is that you are all too awesome. We had a couple hundred people show up and the cafe didn’t want us standing, which limited our space to the number of booth seats available. No worries, as is the tradition we spilled out into a lounge area on the casino floor and enjoyed ourselves!

Here’s some of the hardware that showed up at this gathering.

Continue reading “NFC Business Cards To FPGA Cubes, Skull Badges To Bandoliers, Here’s The Hardware From Breakfast At DEF CON”

MIDI Harp Looks Pretty Sharp

[Julien] is one of those cool dads who shows his love with time invested rather than money spent. His daughter plays the harp, and you would not believe the price of concert harps. Even the cheap ones are several thousand USD. So naturally, he decided he would build her a MIDI concert harp from the ground up.

This plucky work in progress uses a strain gauge and an AD620 amplifier on every string to detect the tension when plucked. These amplifiers are connected to Arduinos, with an Arduino every nine strings. The Arduinos send MIDI events via USB to a Raspberry Pi, which is running the open synth platform Zynthian along with Pianoteq.

The harp is strung with guitar strings painted with silver, because he wanted capacitive touch support as well. But he scrapped that plan due to speed and reliability issues. Strain past the break to check out a brief demo video.

[Julien] used strings because he wanted to anchor the harpist in tactility. But you’re right; many if not most MIDI harps use lasers.

Continue reading “MIDI Harp Looks Pretty Sharp”

A Custom Milled Jig For Smart Bulb Programming

Who would have thought that some day we’d need programming jigs for our light bulbs? But progress marches on, and as there’s currently a number of affordable Internet-controlled bulbs powered by the ESP8266 on the market, we’re at the point where a tool to help update the firmware on the light over your kitchen sink might be something nice to have. Which is why [cperiod] created this programming jig for AiLight smart bulbs.

Flashing the AiLight bulbs is easy enough, there’s a series of test points right on the face of the PCB that you can hook up to. But if you’re updating more than one of them, you don’t want to have to solder your programmer up to each bulb individually. That’s where the jig comes in. [cperiod] says there are already some 3D printed designs out there, but they proved to be a bit finicky.

The design that [cperiod] came up with and eventually milled out on a 1610 CNC router is quite simple. It’s effectively just a holder to keep the five pogo pins where they need to be, and a jumper that lets you toggle the chip’s programming mode (useful for debugging).

The neat trick here are the “alignment pins”, which are actually two pieces of 14 gauge copper wire that have had their ends rounded off. It turns out these will slip perfectly into holes on the AliLight PCB, ensuring that the pogo pins end up on target. It works well enough that you can hold the bulb and jig in one hand while programming, it just needs a little downwards pressure to make good contact.

We’ve previously seen how easily you can replace the firmware on some of these ESP8266 bulbs. While there’s certainly a downside to these bulbs being so simple to modify, it’s hard to deny their hackability makes them very appealing for anyone looking to roll their own network-controlled lighting system.

Perfecting A Bluetooth N64 Controller

Love it or hate it, the Nintendo 64 controller doesn’t seem to be going anywhere. Dedicated fans are still looking for ways to use the unique trilobed controller with modern systems, and they won’t be satisfied until they perfectly replicate the original experience. [Shyri Villar] has been working on perfecting a blend of original and modern hardware that looks very promising.

The project started when [Shyri] found that you could take the internals from a modern third party Bluetooth N64 controller made by 8BitDo and put them into the original controller’s case. This would give you the original buttons back, and overall a more authentic weight and feel. Unfortunately, this usually means dumping the original N64 joystick for the 8BitDo’s.

What [Shyri] wanted to do was install the 8BitDo PCB into an original N64 controller, but adapt Nintendo’s joystick to communicate with it. Unfortunately, since the original joystick used optical encoders and the 8BitDo version uses potentiometers, there’s something of a language gap.

To bridge the divide, both the X and Y dimensions of the joystick get their own PIC12F675 microcontroller and X9C103S digital potentiometer. The microcontrollers read the X and Y values from the original joystick’s encoders, and use the digital potentiometers to provide the 8BitDo with the expected analog input. Right now the electronics are held on two scraps of perfboard tucked into the side “wings” of the controller, but hopefully we’ll see a custom PCB in the future.

If you’re more interested in going back in time with your trusty N64 controller, then you might be interested in learning more about how one hacker managed to hook it up to the MSX.