Storm Chasers Score Bullseye On Tornado With Instrument-Packed Rocket

Model rockets are a heck of a lot of fun, and not a few careers in science and engineering were jump-started by the thrilling woosh and rotten-egg stench of an Estes rocket launch. Adding simple instrumentation to the rocket doubles the fun by allowing telemetry to be sent back, or perhaps aiding in recovery of a lost rocket. Sending an instrument-laden rocket into a tornado is quite a few notches past either of those scenarios, and makes them look downright boring by comparison.

A first and hopefully obvious point: just don’t do this. [ChasinSpin] and [ReedTimmer] are experienced storm chasers, and have a small fleet of purpose-built armored vehicles at their disposal. One such vehicle, the Dominator, served as a mobile launch pad for their rocket as they along with [Sean Schofer] and [Aaron Jayjack] chased what developed into an EF4 monster tornado near Lawrence, Kansas on May 28. They managed to score a direct hit on the developing tornado, only 100 feet (30 meters) away at the time, and which took the rocket to 35,000 ft (10.6 km) and dragged it almost 30 miles (42 km) downrange. They lost touch with it but miraculously recovered it from a church parking lot.

They don’t offer a lot of detail on the rocket itself, but honestly it looks pretty much off-the-shelf, albeit launched from an aimable launchpad. [ChasinSpin] does offer a few details on the instrument package, though – a custom PCB with GPS, IMU, a temperature/humidity/barometric pressure sensor, and a LoRa link to send a data packet back every second. The card also supported an SD card for high-resolution measurements at 10 times per second. Check out the launch in the video below, and be sure to mouse around to get a look at the chaotic environment they were working in.

Even if this isn’t as cool as sending a sounding rocket into an aurora, it’s still really cool. We’re looking forward to seeing what kind of data this experiment collected, and what it reveals about the inner workings of these powerful storms.

Continue reading “Storm Chasers Score Bullseye On Tornado With Instrument-Packed Rocket”

Solder SMDs With A Pan O’ Sand

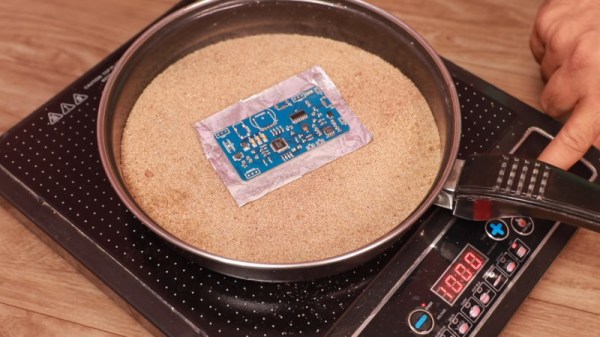
For those that grew up working with through-hole components, surface mount parts can be challenging to deal with. However, there are plenty of techniques out there that are more than accessible to the DIY set. With the right gear, soldering SMD boards is a snap – just get yourself a hot pan of sand (Youtube link, embedded below)!

The process starts with a professionally manufactured PCB, and accompanying stencil. All major PCB CAD packages are capable of generating stencil files these days, and many manufacturers will throw in a laser cut stencil for minimal extra cost with a PCB order. The board is first mounted on a stable surface, and has solder paste applied, before components are placed with tweezers. Perfect placement isn’t necessary, as the surface tension of the molten solder pulls components into their correct orientations. The populated board is then placed on a bed of sand in a frying pan, which is placed on an induction cooktop. The board is then heated until the solder melts, and all the components are neatly reflowed. Once allowed to cool, the board is done!

The trick is that the sand helps evenly heat the circuit board, while keeping it a safe distance away from the heat source. Results are good, and the process is far quicker than hand soldering. It’s easy to keep an eye on the process too. Of course, the traditional method is still to use the humble toaster oven, but new techniques are always useful. We’ve seen it done with a Bunsen burner, too. Video after the break.

Continue reading “Solder SMDs With A Pan O’ Sand”

Overengineering The Humble USB Power Bank

Back in the flip phone days, you could get through the whole weekend before you had to even think about plugging the thing in. But as the processing power of our mobile devices increased, so to did their energy consumption. Today you’re lucky if your phone doesn’t die before you make it home at the end of the day. To avoid the horrors of having to live without their mobile devices, many people have resorted to lugging around small “power banks” to keep their phones topped off.

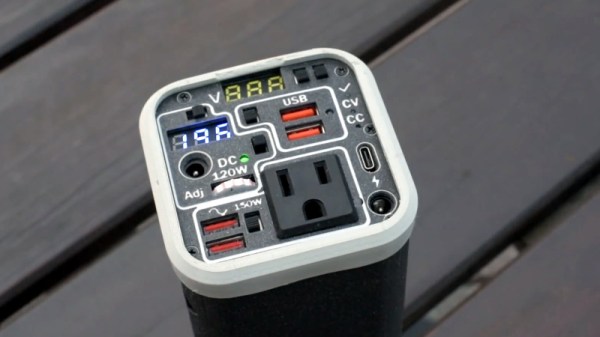
That said, the “Ultimate 18650 Power Bank” created by [Kennedy Liu] is on a whole new level. Only true Road Warriors need apply for this particular piece of kit. Inside the 3D printed enclosure is…well, pretty much everything. It’s got an internal inverter to power your AC devices, a Qi wireless charging coil, an adjustable DC output, displays for all relevant voltages, and naturally plenty of USB ports to charge your gadgets. Oh, and some RGB LEDs tossed in for good measure.

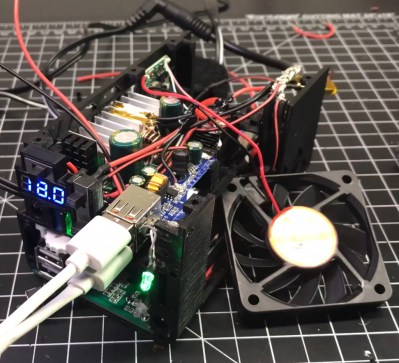
[Kennedy] packed a lot of hardware into this relatively small package, and in the video after the break, shows off exactly how everything is arranged inside of this power bank. A big part of getting the whole thing together is the 3D printed frame, which includes carefully designed insets for all of the key components. So if you want to build your own version, you’ll need to get the exact same hardware he used to make sure the puzzle fits together. Luckily, he’s provided links for all the relevant components for exactly that purpose.

Now, you might be wondering about the wisdom of packing all this electronic gear into a thermoplastic enclosure. But [Kennedy] has thought about that; in addition to tacking a heatsink onto pretty much everything, he’s added fans for active cooling and a fairly robust thermal overload protection scheme. By mounting thermally controlled switches to the heatsinks of the high-output components, the system can cut power to anything getting too hot before it has a chance to melt the plastic (or worse).

Most of the DIY power banks we’ve seen in the past have been little more than a simple collection of 18650 cells, so it’s interesting to see one with so much additional functionality packed in. Admittedly some elements of the construction are, to quote the great Dave Jones, “a bit how ya doin.” But with some refinements we think it would be a very handy device to have in your arsenal.

Continue reading “Overengineering The Humble USB Power Bank”

Protect Yourself — And Your Project — While Working With Mains Power

When debugging ordinary low-voltage circuitry, you’re pretty safe: unless you have some really power-hungry devices that need a ton of current, there aren’t that many truly bad things that can happen, so you can take a lot of liberties with electrical-safety rules. With mains-powered devices, you don’t have this luxury, and a lack of knowledge, sloppy work practices, or simple mistakes can cost you — and your project — dearly. While you still need to know what you’re doing and use the requisite caution, [Yann Guidon]’s latest project — and entry in the 2019 Hackaday Prize —  a mains protection box, might keep simple mistakes from becoming a disaster.

There are a number of precautions you can take when working with mains power. We’ve all used the simple in-line power strip so you can quickly switch off the current, but [Yann] has included a number of devices that can be configured in different ways to experiment with mains-powered devices safely. Built into a sturdy open-topped wooden box with carry handles, the project evokes the traditional breadboard in appearance and functionality. A number of different devices are included, which could be re-configured into different topologies if needed.

[Yann] included an isolation transformer, which can be useful not only for protection against shock in case of accidentally grounding, but also for noise suppression. There is also a variac, which allows the output voltage to be adjusted over a wide range for testing. Of course, circuit breakers are a must, and current and voltage meters keep you informed about what’s going on. A big, easy-to-access switch cuts the power quickly when needed.

The (maybe) final touch is an adjustable output current limit, which is still a work in progress. Built around a current-monitoring relay and a DPDT relay wired as a latch, this allows the output to be disconnected if it draws more than a specified current, equivalent to between 10 W and 100 W. This is the perfect thing for initial testing of new projects.

So, if you’re thinking of working on mains-powered projects, have a close look at what [Yann] has assembled, and learn proper safety procedures before you begin. One place to start is with a great series by our own Jenny List about mains safety: part one and part two. Stay safe out there!

Circuit VR: Resistance Measurement With Four Wires

If you want to measure resistance and you know Ohm’s law, it seems like you have an easy answer, right? Feed a known current through the thing you want to measure and read the voltage required. A little math, and that’s it. Or is it? If you are measuring reasonably large resistance and you don’t mind small inaccuracies, sure. But for tiny measurements or highly accurate measurements, you’d be better off using the four-wire method. What’s more is, understanding why you want to use the four-wire method is a great example of using an understanding of electronics to find solutions to problems.
Continue reading “Circuit VR: Resistance Measurement With Four Wires”

Gamifying Household Chores Helps Get The Kids To Pitch In

It’s rare to find anyone that gets excited about doing chores. This can lead to members of a household abrogating their duties. In these cases, enforcement is a common tactic. Tired of laminated chore grids and inconsistent results, [alastair-a] decided to tech up with an electronic chore tracking system.

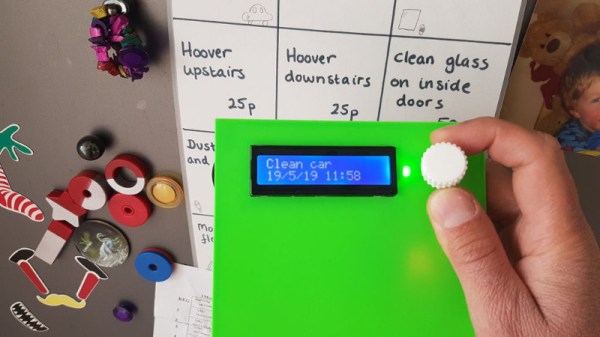
[alastair-a]’s Task Manager is based around an Arduino Nano, fitted with the ever-popular HD44780-compatible LCD screen. Interfacing with the unit is via rotary encoder and RFID tag, while a real-time clock module keeps track of the time.

A custom data structure is used to manage tasks. This allows varying frequencies to be set for different tasks, as well as keeping track of the time of completion by different users. Each user has their own personal RFID tag, which can be swiped across the reader to indicate when a chore has been done.

The initial intent was to have the device print reports each week in order to reward the best performing members of the household. However, [alastair-a] reports the device was so popular with the younger members of the household, that they seem to have forgotten about rewards entirely!

We’ve seen chore reminders before; it’s often popular to build them as IoT devices.

Life On Contract: Product Development Lessons Big And Small

Developing a product and getting it out there to build a business is really hard. Whether it’s a single person acting alone to push their passion to the public, or a giant corporation with vast resources, everyone has to go through the same basic steps, and everyone needs to screw those steps up in the same way.

The reality is that the whole process needs to involve lots of aspects in order to succeed; small teams fail by not considering or dedicating resources to all of those aspects, and large teams fail by not having enough communication between the teams working on those pieces. But in truth, it’s a balance of many aspects that unlock a chance at a successful product. It’s worth recognizing this balance and seeking it out in your own product development efforts, whether you’re a one-engineer juggernaut or a large, established company.

Continue reading “Life On Contract: Product Development Lessons Big And Small”