A Conference Badge Breathes Life Into A Rotary Phone

We have covered the astonishing diversity of conference badges to a great extent over the years, and we are always pleased and surprised at the creativity and ingenuity that goes into their creation. But the saddest thing about so many badges is that after the event they go into the drawer and are never touched again, such a missed opportunity!

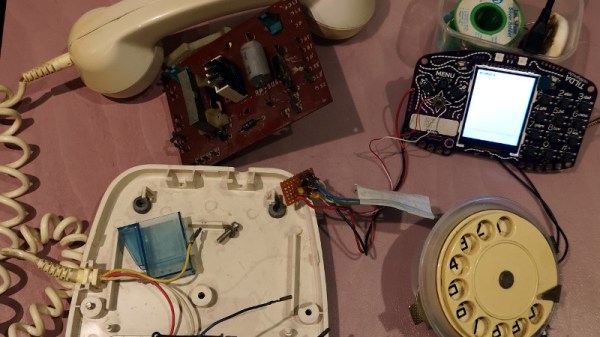
It’s a trend that [Dan] has reversed though, with his rotary dial phone brought to life with an EMF Tilda MkIV. This was the badge from last year’s EMF Camp 2018, and its defining feature was a built-in GSM mobile phone. We didn’t give it a full review at the time because it has problems with the GSM part at the event and it would have been unfair to display what was an amazing badge in a negative light, but once we got it home it was straightforward enough to put a commercial SIM in the slot and use the public networks with it.

[Dan]’s phone is an Eastern European model that came to him through his grandfather. Inside it’s a relatively conventional design, into which he’s patched a couple of the Tilda’s I/O lines from the dial through a debounce circuit. But simply selecting a couple of lines wasn’t enough, as most of those on its expansion port come via a port expander. He needed inputs that could generate an interrupt, so he hijacked a couple from the on-board joystick. He’s included Python code which you can see in action in the video below. It’s important to note that he’s yet to hook up the audio to the badge so this is a work in progress, but it’s an interesting project nevertheless.

Rotary phones hold a special place among hardware hackers, we’ve featured many projects including them. This isn’t the first GSM rotary phone we’ve brought you, and don’t forget they can also talk via Bluetooth.

Continue reading “A Conference Badge Breathes Life Into A Rotary Phone”

Teaching A Vintage Line Printer To Make Music, All Over Again

Sit next to any piece of machinery long enough and you get to know it by the sounds it makes. Think about the sounds coming from any 3D-printer or CNC machine; it’s easy to know without looking when the G code is working through the sines and cosines needed to trace out a circle, for instance.

It was the same back in the day, when bored and bright software engineers heard note-like sounds coming from their gear and wrote programs to turn them into crude music machines. And now, [Ken Shirriff] details his efforts to revive a vintage IBM 1403 line printer’s musical abilities. The massive 1960s-era beast is an irreplaceable museum piece now, but when [Ken] and his friends at the Computer History Museum unearthed stacks of punch cards labeled with song titles like “Blowin’ In the Wind” and “The Blue Danube Waltz,” they decided to give it a go.

The 1403 line printer has a unique chain-drive print head, the inner workings of which [Ken] details aptly in his post. Notes are played by figuring out which character sequences are needed to get a particular frequency given the fixed and precisely controlled speed of the rotating chain. The technique is quite similar to that used by musical instruments such as the Floppotron, or when coercing music from everyday items including electric toothbrushes.

Lacking the source code for the music program, [Ken] had to reverse engineer the compiled program to understand how it works and to see if playing music would damage the chain drive. The video below shows the printer safely going through a little [Debussy]; audio clips of songs originally recorded back in 1970 are available too.

Continue reading “Teaching A Vintage Line Printer To Make Music, All Over Again”

Peek Into The Compiler’s Code — Lots Of Compilers

We don’t know what normal people argue about, but we know we spend a lot of time arguing about the best microcontroller, which editor is the best, and what language or compiler does the best job. The problem with all those compilers is getting them loaded and digging into the generated code. If you too spend your time thinking about those things, you ought to have a look at [Matt Godbolt’s] Compiler Explorer. We know that hosting an IDE-like web page and compiling code is old hat — although [Matt’s] site has been around quite some time. But [Matt’s] doing it differently. The code you build on the left hand pane shows up as assembly language on the right hand side.

There are plenty of options, too. For example, here’s a bit of C code from the site’s example:

int square(int num) {
   return num * num;
}

Here’s the corresponding assembly from gcc 9.2 for x86-64:

square:
  push rbp
  mov rbp, rsp
  mov DWORD PTR [rbp-4], edi
  mov eax, DWORD PTR [rbp-4]
  imul eax, eax
  pop rbp
  ret

Continue reading “Peek Into The Compiler’s Code — Lots Of Compilers”

A Professional-Level Desk In A Dorm

Heading off to college comes with its own set of challenges. Harder course material, living away from home for the first time, and dealing with roommates are common hurdles to overcome, but an oft-overlooked issue is the poor quality dorm room desks. For a place that a student is expected to spend a majority of their study time, colleges and universities don’t often provide inspiring areas in the dorm rooms for this task. With a few tools and some time, though, anyone suffering in a dorm can have a much better place to work.

This desk build comes to us from reddit user [lucas_talbert] and is noteworthy for using simple tools and materials to transform the standard, boring desk in a way which won’t upset the facilities manager in charge of the dorm furniture. The backer is a piece of plywood which was covered in bamboo flooring. It was screwed into the back of the desk and secured with L-brackets. A piece of 1×4 was attached around the edges to help hide the LED lights and cables as well.

We like this build for its impressive transformation of an otherwise drab dorm room into a place that most of us wouldn’t mind having as our main workstation, even beyond college. It also uses common materials and is easily removable, both of which are perks when living as a student. The one thing it doesn’t have, though, is the ability to exercise when using it.

DJ Xiaomi Spins Beats And Brushes At The Same Time

Direct from the “Just Because I Can” department, this blog post by [Eddie Zhang] shows us how easy it is to get the Xiaomi robotic vacuum cleaner working as what might be the world’s most unnecessary Spotify Connect speaker. Will your home be the next to play host to an impromptu performance by DJ Xiaomi? Judging by the audio quality demonstrated in the video after the break, we doubt it. But this trick does give us a fascinating look at the current state of vacuum hacking.

For the first phase of this hack, [Eddie] makes use of Dustcloud, an ongoing project to document and reverse engineer various Xiaomi smart home gadgets. Using the information provided there you can get root-level SSH access to your vacuum cleaner and install your own software. There’s a sentence you never thought you’d read, right?

With the vacuum rooted, [Eddie] then installs a Spotify Connect client intended for the Raspberry Pi. As they’re both ARM devices, the software will run on the Xiaomi bot well enough, but the Linux environment needs a little tweaking. Namely, you need to manually create an Upstart .conf file for the service, as the vacuum doesn’t have systemd installed. There goes another one of those unexpected sentences.

We’re certainly no stranger to robotic vacuum hacking, though historically the iRobot Roomba has been the target platform for such mischief. Other players entering the field can only mean good things for those of us who get a kick out of seeing home appliances pushed outside of their comfort zones.

Continue reading “DJ Xiaomi Spins Beats And Brushes At The Same Time”

A Masterpiece, But Our Maestro Is A CNC Machine

Sometimes we manage to miss projects when they first appear, only to have the joy of discovering them a while later. So it is with [John Opsahl]’s Project Convert To Paint, a CNC painting ‘bot that takes a bitmap image and paints it on canvas as a fine artist would, with a real brush, and paints.

It was first created for the 2017 robotart.org competition, and takes the form of a fairly standard CNC gantry machine. It departs from the norm in its chuck however, as it has what is described as a universal artist chuck, capable of holding a variety of artistic implements. The images are converted from bitmap to vector format, and thence to gcode with the help of a bit of custom Python code.

He’s at pains to say that simply because an image can be converted to a paintable format does not mean that it will produce a good picture. But some of the results are rather impressive, delivering anything from a pointilist effect to a broader brush stroke. We can see that with a bit of experience in the processing it would be possible to create a veritable gallery of masterpieces.

We may have missed this one the first time, but we did catch another drawbot from the same competition.

Hands-On: BornHack’s Light Sabre Badge

A badge modelled after the handle of a light sabre? Yes Please! This Star Wars themed hardware is the work of hardware designer Thomas Flummer for the 2019 BornHack conference held in Denmark last month. (Check out my roundup of the event if this is the first you’ve heard of it.)

It's not a badge but a light sabre! The front of the BornHack 2019 badge.
It’s not a badge but a light sabre! The front of the BornHack 2019 badge.

It fits the hand nicely, and with clever side-on placement of the two AA battery holders (a trick we first saw with the 2016 Hackday Superconference badge) it also keeps any protruding solder joints away from clothing. In the centre of the badge is the 240×240 pixel colour display that also hides the Silicon Labs Happy Gecko processor and its surrounding components. Three buttons at the edge of the board to the left of the screen are a nice fit for your thumb when holding it in your left hand — a good choice if you happen to leave your right hand behind on a visit to the Cloud City of Bespin.

Between the battery holders lies a four-way joystick, two buttons, and a 6-pin add-on connector. Above it is a micro SD card socket and a micro USB socket, and above them are an IR emitter and receiver. All of the hardware is on the front of the PCB, with no components on the reverse (other than the solder joints for the batteries). But it is there you will find a set of exposed pads for serial and I2C interfaces. Continue reading “Hands-On: BornHack’s Light Sabre Badge”