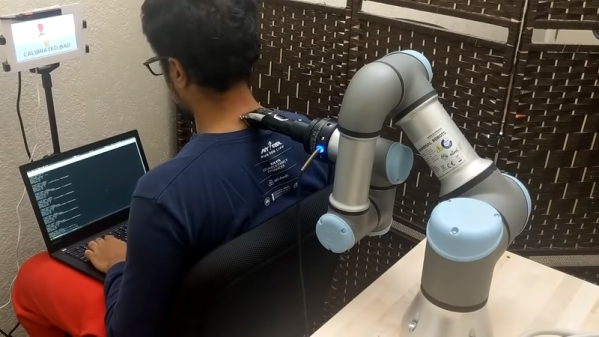
Although it is getting more common to have self-driving cars on the road, we have to admit we are still a bit uneasy. After all, we know first hand how hard it is to think of every case and how unreliable things can be. But what about having your hair cut by a robot? At least a car can have airbags and automatically stop at any sign of trouble. But letting a robot hold a sharp instrument up to your head? That’s what Buzz Robotics wants to do and they are starting with a neck trim that you can see in the video below.
Honestly, since the trimmers are probably not that dangerous, we feel a little better. But the fact that the screen says “Calibrated Bad” doesn’t install confidence. While the robobarber might not be able to cut your head off, it could certainly ruin your coiffure.
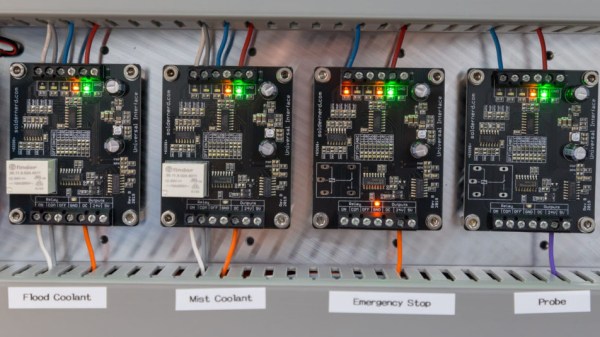
As soon as a project involves other assemblies, parts, or modules, things get more complicated. Devices like fans, cooling units, probes, pumps, or lighting might have simple electrical requirements, but they are rarely identical. As a result, one’s tidy project ends up having to deal with, for example, a pump that is controlled with 5 V active high logic, a sensor that outputs 5 V active low, lights that expect to be switched with 24 VDC, and a fan that needs a relay right now. But that might change in the future.
That’s exactly what led [Lukas Fässler] to design and build the Universal Interface, a board intended to be a kind of universal translator and interface for all such devices. The idea is to have one Universal Interface board for every external device. For each board, a wide variety of input combinations controls a single output. The boards are “hardware programmable” in the sense that jumpers (zero-ohm resistors) are used to spell out in black and white exactly what combinations of inputs result in which output state. In this way, some standardization and clarity of control can be enforced while still being flexible enough to accommodate changes.
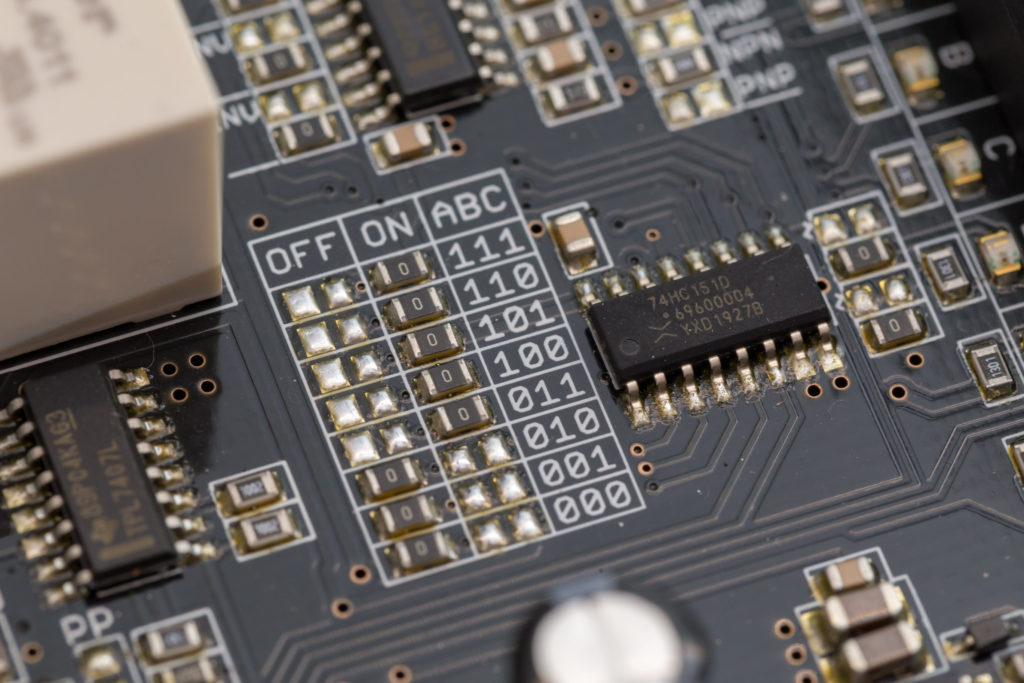
Jumper-configured logic table defining with utter clarity which combination of inputs results in an OFF or ON.
Each Universal Interface board has three inputs and an enable line, each with their own indicator LED visually confirming its state. The inputs are 24 V tolerant and each can be configured with a pull-up, a pull-down, and as an active high or active low. There is one output, but it takes several forms: a sturdy relay, a powerful open-collector output, a 5 V logic output, and a 24 V logic output. Configuring which output state corresponds to what combination of inputs is set by jumpers, so the board is very much WYSIWYG.
[Lukas] is currently using four of these devices with his CNC mill project, all in different configurations, and they’re working reliably. Interested? The GitHub repository for the project has all the board design files.
Want to do a bit of good this holiday season without leaving your couch or battle station? Well step right up and try your hand at Santa Claws, the charitable claw machine created by UK-based firm Liberty Games. For every toy you can maneuver to the chute, Liberty Games will donate money to Crisis, a national charity devoted to ending homelessness.
The machine is filled with special Christmas-themed stuffed animals that represent different cash values from £1 to £5. And these toys are doing double duty — after the holiday, they’ll all be donated to a good cause. In order to make this playable worldwide, Liberty used a Raspberry Pi, two Pi Face boards to interface the claw machine’s controls, and a Pi Face rack to everything together. They have the machine set on ‘generous’, so go have fun.
We’ve all been taught the scientific method: Form a hypothesis, do some experiments, gather some data, and prove or disprove the hypothesis. But we don’t always do it. We will tweak our 3D prints a little bit and think we see an improvement (or not) and draw some conclusions without a lot of data. Not [Josef Prusa], though. His team printed 856 different parts from four different materials to generate data about how parts behaved when annealed. There’s a video to watch, below.
Annealing is the process of heating a part to cause its structure to reorganize. Of course, heated plastic has an annoying habit of deforming. However, it can also make the parts firmer and with less inner tension. Printed parts tend to have an amorphous molecular structure. That is to say, they have no organization at all. The temperature where the plastic becomes soft and able to reorganize is the glass transition temperature.
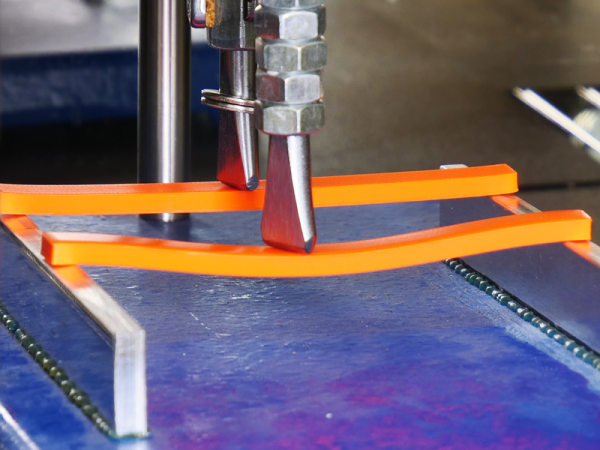
Sand-casting metal parts is a technique that has been around for a very long time, but it can be educational to see the process from start to finish. That’s exactly what [Frederico] shows us with his sand-cast slingshot of his own design, and it’s not bad for what he says is a first try!
First, [Frederico] makes a two-part green sand mold of the slingshot body. Green sand is a sand and clay mix, and is only green in the sense that it is wet or “raw” and not further processed. After the mold is made, it’s time to melt aluminum in the propane-powered furnace, and the molten aluminum is then poured into the mold.
After cooling, [Frederico] breaks up the sand to reveal the rough cast object. There is post-processing to do in the form of sprues to cut and some flashing around the seams to remove, but overall it looks to have turned out well. You can watch the whole process in the video, embedded below.
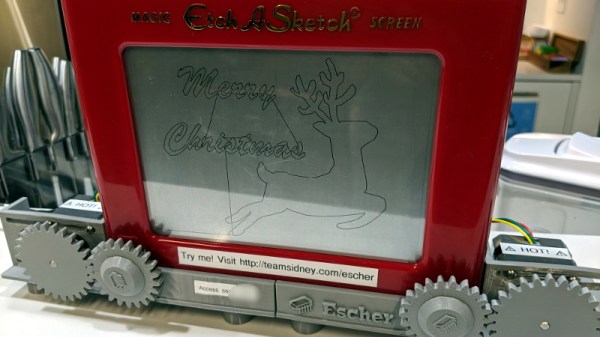
For better or for worse, the tech world has fully committed to pushing as many of their products into “The Cloud” as possible. Of course, readers of Hackaday see right through the corporate buzzwords. It’s all just a fancy way of saying you have to poke some server over the Internet every time you want to use the service. In a way, [Matt Welsh] has perfectly demonstrated this concept with Escher. It’s a normal Etch-a-Sketch, but since somebody else owns it and you’ve got to have an active Internet connection to use it, that makes it an honorary citizen of the Cloud.
Escher takes the form of a 3D printed mount and replacement knobs for the classic drawing toy that allow two NEMA 17 steppers to stand in for human hands. Thanks to the clever design, [Matt] can easily pull the Etch-a-Sketch out and use it the old fashioned way, though admittedly the ergonomics of holding onto the geared knobs might take a little getting used to. But who wants to use their hands, anyway?
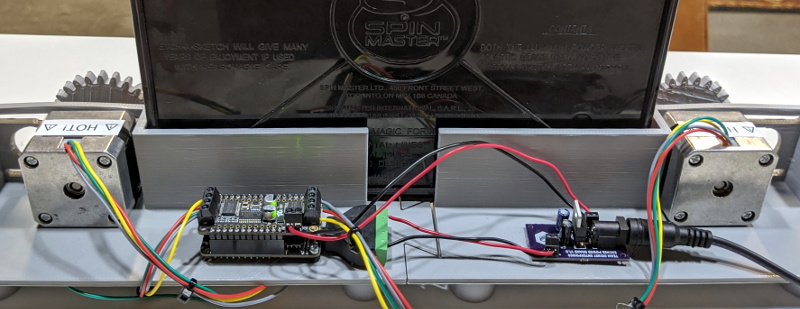
In terms of the electronics, the star of the show is the the Adafruit Feather HUZZAH32 development board, paired with a motor controller that can provide 12 V to the steppers. [Matt] even went through the trouble of making a custom voltage regulator PCB that steps down the stepper’s voltage to 5 V for the Feather. Totally unnecessary, just how we like it.
For the software folks in the audience, [Matt] goes into considerable detail about how he got his hardware talking to the web with Google Firebase. Even if the Internet of Sketches doesn’t quite tickle your fancy, we imagine his deep-dive on pushing G-Code files from the browser into the Feather will surely be of interest.
By now we are all used to the role of the printed circuit board in artwork, because of the burgeoning creativity in the conference and unofficial #BadgeLife electronic badge scenes. When the masters of electronic design tools turn their hand to producing for aesthetic rather than technical reasons, the results were always going to be something rather special.
Nick Poole is an ace wrangler of electrons working for SparkFun, and as such is someone with an impressive pedigree when it comes to PCB design. Coming on stage sporting a beret with an awesome cap badge, his talk at the recent Hackaday Superconference concerned his experience in pushing the boundaries of what is possible in PCB manufacture. It was a primer in the techniques required to create special work in the medium of printed circuit boards, and it should be essential viewing for anybody with an interest in this field.
Though he starts with the basics of importing graphics into a PCB design package, the meat of his talk lies in going beyond the mere two dimensions of a single PCB into the third dimension either by creating PCBs that interlock, or by stacking boards.