Fallout-Inspired Clock Radio Helps You Party Like It’s 2077

Since its first release seven years ago, Raspberry Pi single-board computers have become notoriously ubiquitous in compact and portable builds. They’re used in many different applications, but one of the most interesting has got to be how it can turn just about any old thing into a Linux computer. [xito666] writes in with his own build, a portable retro computer inspired by the retro-futuristic stylings of the Fallout games.

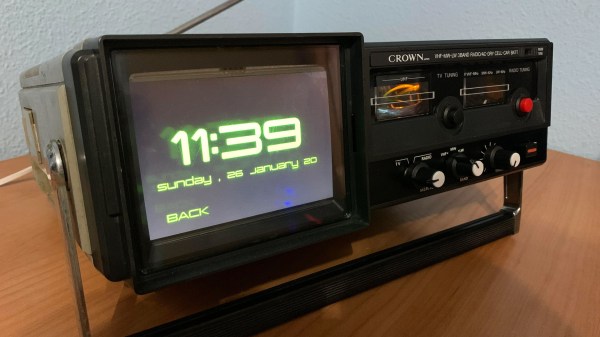
For true aesthetic accuracy, [xito666] used an old discarded Crown 5TV-65R portable TV and radio combo. The unit hails from the 1970s, so a bit newer than Vault technology, but it still gives off a great retro charm with its CRT screen and knobs. Sadly, the original components couldn’t be reused, and the shell was stripped empty so that the new hardware could take its place. This includes an off-the-shelf HDMI LCD screen with resistive touchscreen and new potentiometers and knobs that still fit in with the overall look of the machine.

What makes this build unique, however, is that it also includes custom software to turn it into a clock and music player, with the deliciously Pip Boy-like UI being controlled entirely with the front buttons and knobs. The whole project is well written up in the Reddit post, in it [xito666] explains some of their choices and planned improvements. One that we would suggest ourselves is replacing the menu scrolling selector dial with a rotary encoder rather than a potentiometer, for that added knob feel. We also think that with the addition of a keyboard, it would easily pass for one of those luggables from the 1980s, a style of project we’ve featured once or twice here before.

Troubleshooting A Symlink — A Whodunnit For The Git Record Books

While I normally sport the well-worn fedora of a hard-boiled sysadmin, Sunday mornings I swap that neo-noir accessory for the tech-noir: a pair of pro headphones. This is the tale of the collision of those two roles. An educational caper, dear reader. You see, my weekly gig is to run a Facebook Live Stream, and Facebook just recently began enforcing a new policy: all video streams are required to use encryption. We have Fedora installed on the media machine, and use Open Broadcaster Software (OBS) to stream. It should have been easy to update the stream settings. I made the necessary changes and tested it out — no luck. The error message was less than helpful: “Failed to connect to server”. With a sigh, I took off my headphones, put my sysadmin hat on, and walked out into the digital darkness. It was time to get back to work.

Continue reading “Troubleshooting A Symlink — A Whodunnit For The Git Record Books”

Arduino Handheld Game System Gets A Grip

With little more than an Arduino, an OLED display, and some buttons, it’s easy to build your own faux-retro game system. There’s even a growing library of titles out there that target this specific combination of hardware, thanks in no small part to the Arduboy project. But unless you’re content to play Circuit Dude on a breadboard, at some point you’ll probably want to wrap the build up in a more convenient form.

Like many that came before it, the OLED handheld created by [Alex Zidros] takes inspiration from a Nintendo product; but it’s not the Game Boy. Instead, his design is based on a 3D printed grip for the Switch Joy-Cons that he found on Thingiverse. After tacking on a holder for the PCB, he had the makings of a rather unique system.

We especially like the offset SSD1306 OLED display. Not because we think a game system with an asymmetrical layout is a particularly sound design decision, but because it gives the whole build a rather cyberpunk feel. When combined with the exposed electronics, the whole system looks like it could have been cobbled together from a futuristic dumpster. Which is high praise, as far as we’re concerned.

Opposite the display is a LiPo pouch battery that [Alex] says was liberated from a portable speaker, and down below is an Adafruit Feather 328P. There are two tactile switches mounted to the front of the Feather, and in something of a departure from these sort of builds, there are two more on the shoulders of the 3D printed case. Everything is held together with nothing more exotic than a scrap of perfboard, making it easy for anyone who might want to build their own version.

If you prefer your Arduino and OLED gaming to come in a slightly more familiar form factor, the build that was done inside of a Dreamcast Visual Memory Unit (VMU) has always been a favorite around these parts.

A Network Attached VFD Tube Clock

The elegance of Power over Ethernet (PoE) is that you can provide network connectivity and power over a single cable. Unfortunately not nearly enough hardware seems to support this capability, forcing intrepid hackers to take matters into their own hands. The latest in this line of single-cable creations is this beautiful Vacuum Fluorescent Display (VFD) clock from [Glen Akins].

Testing the VFD tube socket

One of the key advantages VFDs have over their Nixie predecessors is greatly reduced energy consumption, and after [Glen] ran the numbers, he saw that a display using six VFD tubes could easily be powered with standard PoE hardware. With this information, he started designing the PCB around the early 1990s era IV-12 tube, which has the advantage of being socketed so he could easily remove them later if necessary.

[Glen] first had to create a schematic and PCB footprint for the IV-12 tube that he could import into Eagle, which he was kind enough to share should anyone else be working with these particular tubes down the line. After a test of the newly designed socket was successful, he moved onto the rest of the electronics.

The clock is powered by a Microchip PIC18F67J60, which connects to the Ethernet network and pulls the current time down from NTP. After seeing so many clocks use an ESP to connect to the Internet over WiFi, there’s something refreshing about seeing a wired version. The tube segments are driven by a HV5812, also Microchip branded. Lastly, [Glen] used a number of DC/DC converters to generate the 1.5 V, 3.3 V, 5 V, and 25 V necessary to drive all the electronics and VFDs.

We absolutely love the simplicity of this clock, from its sleek aluminum enclosure to that single RJ45 jack on the back. But if you’re looking for something with a bit more flash, [Glen] also put together some PoE Christmas lights over the holidays which share a number of design elements with this project.

Continue reading “A Network Attached VFD Tube Clock”

Lighting Up Your Spectrespecs

In the ever-popular world of Harry Potter, a pair of Spectrespecs are useful if you’re hunting for wrackspurts and nargles. While we’ve never spotted either of these creatures ourselves, if you’d like to go out on a hunt, [Laveréna]’s build might be for you.

To start with, you’ll need the frames for the Spectrespecs. [Laveréna] elected to source hers commercially, but you can 3D print them or even craft them by hand if you so desire. Then, a TinyLily microcontroller board is installed, with its small size allowing it to be tucked neatly out of sight in the top of the sunglasses. Two NeoPixels are then installed, with the TinyLily programmed to flash the LEDs in the requisite blue and red colors for easy identification of supernatural creatures.

Tools such as cheap microcontrollers designed for wearables and low-cost addressable LEDs are making advanced cosplay designs easier than ever. Whipping up custom blinkables no longer requires knowledge of advanced multiplexing techniques and how to properly drive high-power LEDs. Of course, LED wearables do still get properly advanced – like this skin-based 7-segment display. If you’ve got a glowable project of your own that you’re dying to share, be sure to let us know!

Array Of Useless Machines Is Useless

What’s the collective noun for a group of useless machines? A passel of useless machines? A failure? A waste? A 404?  Whatever you want to call it, [Martin Raynsford] has produced one here with this collection of 24 useless machines arranged into a 5 by 6 array. He produced it for an event at a hackerspace to amuse visitors, and it certainly seems to do the job in the video after the break.

[Martin] built the case by modifying the design of his Useless Machine kit, stretching out the case to hold multiple mechanisms. The original plan was to use a 6 by 6 matrix, but that wouldn’t fit into the laser cutter, so it ended up with 24 mechanisms in a 5 by 6 array. All of those are driven by 2 AAA batteries, and the mechanisms are efficient enough that it survived a full day of button flipping before it began to run out of juice.

Continue reading “Array Of Useless Machines Is Useless”

Micro Macro Keyboard Makes A Major Difference

Media keyboards are nice in theory. But in practice they never have all the keys you want, and they almost always have a few you don’t. Sure, you could maybe reassign the ones you don’t use, but then the caps are wrong, and it’s a whole thing. So really, the only winning move is to make a micro macro keyboard as [littleSilvr] did to make all your shortcuts one-button accessible.

This lovely input has an Arduino Pro Micro for a brain, and Gateron browns for brawn. That knob there is a rotary encoder, not a potentiometer, because endless volume knob twiddling is just so much nicer. In case you’re wondering, those shortcuts open Fusion 360 and Cura, but we’re still not sure what the hyphen does.

Can we talk about those keycaps, though? [littleSilvr] used [Make Anything]’s process of of printing in multi-color with a single extruder. The technique involves building a vector for each color, each of which gets its own STL file. Then you add retraction as you go up through the layers, slow the print speed, change filament colors while the nozzle and bed are still warm, and voila, a vibrant canvas of colors.

If you don’t have a printer and you don’t mind a bit of compromise on the number of inputs, try basing your build on an existing input, like an old rotary telephone dialer.

Via r/duino