3D Printed GIFs For Stop Motion Memes

Lithophanes are nothing new, with examples going back to the 1800s. But they’ve become popular again thanks to the ease of which these pieces of artwork can be 3D printed. While the Internet would be more than happy to see somebody press a 3D image of their cat into a thin piece of translucent porcelain ready to have a light shone through it, that’s quite a bit harder than just firing up the Monoprice.

But since the machine is doing all the work for you, why stop at one? That’s precisely the sort of thinking that lead [The Mad Maker] to recreate animated GIFs with stop motion photography and a stack of printed lithophanes. Now all your favorite reaction memes can make the leap to the physical world…and then go right back into the computer.

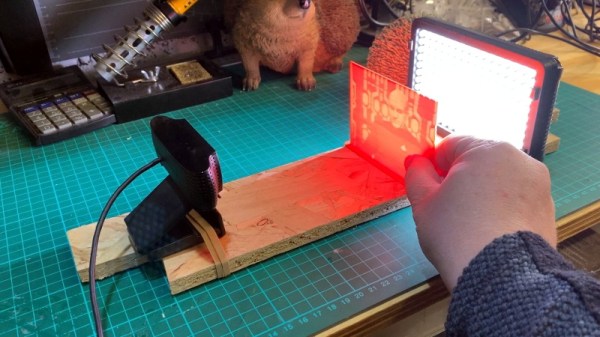
The method here is pretty simple: [The Mad Maker] disassembles his favorite GIF to get the individual frame images, converts each one of those into a lithophane STL via an online tool, prints it out, photographs it, and then stitches all those photographs back into a new GIF. Given the incredibly time consuming nature of this process you’ll want to limit it to short animations, and even then, probably do only every 2nd or 3rd frame to preserve your sanity.

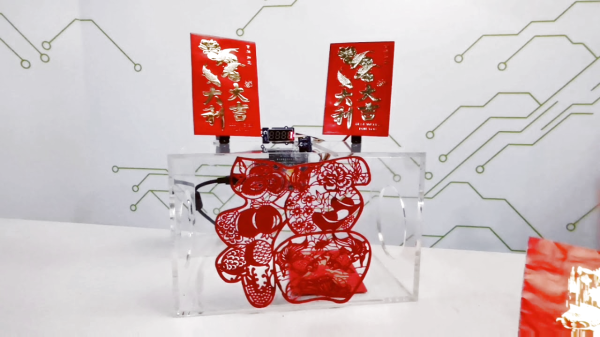
In the video after the break you can see the entire process, as well as check out the final result. While there weren’t really any technical hurdles to overcome in this project, we did like seeing how [The Mad Maker] experimented to find the ideal position for the backlight and camera. The wooden frame he came up with to hold everything in position should make subsequent meme conversions a lot easier, now he just needs to add a little color. Continue reading “3D Printed GIFs For Stop Motion Memes”

Debugging PCBs With Augmented Reality

Mihir Shah has designed many a PCB in his time. However, when working through the development process, he grew tired of the messy, antiquated methods of communicating design data with his team. Annotating photos is slow and cumbersome, while sending board design files requires everyone to use the same software and be up to speed. Mihir thinks he has a much better solution by the name of InspectAR, it’s an augmented reality platform that lets you see inside the circuit board and beyond which he demoed during the 2019 Hackaday Superconference.

The InspectAR package makes it easy to visualise signals on the board.

The idea of InspectAR is to use augmented reality to help work with and debug electronics. It’s a powerful suite of tools that enable the live overlay of graphics on a video feed of a circuit board, enabling the user to quickly and effectively trace signals, identify components, and get an idea of what’s what. Usable with a smartphone or a webcam, the aim is to improve collaboration and communication between engineers by giving everyone a tool that can easily show them what’s going on, without requiring everyone involved to run a fully-fledged and expensive electronics design package.

The Supercon talk served to demonstrate some of the capabilities of InspectAR with an Arduino Uno. With a few clicks, different pins and signals can be highlighted on the board as Mihir twirls it between his fingers. Using ground as an example, Mihir first highlights the entire signal. This looks a little messy, with the large ground plane making it difficult to see exactly what’s going on. Using an example of needing a point to attach to for an oscilloscope probe, [Mihir] instead switches to pad-only mode, clearly revealing places where the user can find the signal on bare pads on the PCB. This kind of attention to detail shows the strong usability ethos behind the development of InspectAR, and we can already imagine finding it invaluable when working with unfamiliar boards. There’s also the possibility to highlight different components and display metadata — which should make finding assembly errors a cinch. It could also be useful for quickly bringing up datasheets on relevant chips where necessary.

Obviously, the electronic design space is a fragmented one, with plenty of competing software in the market. Whether you’re an Eagle diehard, Altium fanatic, or a KiCad fan, it’s possible to get things working with InspectAR. Mihir and the team are currently operating out of office space courtesy of Autodesk, who saw the value in the project and have supported its early steps. The software is available free for users to try, with several popular boards available to test. As a party piece for Supercon, our very own Hackaday badge is available if you’d like to give it a spin, along with several Arduino boards, too. We can’t wait to see what comes next, and fully expect to end up using InspectAR ourselves when hacking away at a fresh run of boards!

The $50 Ham: Going Mobile

So far in this series, everything we’ve covered has been geared around the cheapest and easiest possible means of getting on the air: getting your Technician license, buying your first low-end portable transceiver, and checking in on the local repeater nets. That’s all good stuff, and chances are you can actually take all three of those steps and still have change left over from your $50 bill. Like I said, amateur radio doesn’t have to be expensive to be fun.

But at some point, every new ham is going to yearn for that first “real” rig, something with a little more oomph in terms of power, and perhaps with a few more features. For many Technicians, the obvious choice is a mobile rig, something that can be used to chat with fellow hams on the way to work, or to pass the time while on long road trips. Whatever your motivation is, once you buy a radio, you have to install it, and therein lie challenges galore, both electrical and mechanical.

I recently took the plunge on a mobile rig, and while the radio and antenna were an order of magnitude more expensive than $50, the process of installing it was pretty cheap. But it’s not the price of the thing that’s important in this series; rather, it’s to show that ham radio is all about doing it yourself, even when that means tearing your car apart from the inside out and rebuilding it around a radio.

Continue reading “The $50 Ham: Going Mobile”

This Box Counts Your Blessings For You

It’s that time of year again when production in Shenzhen grinds to a halt. Lunar New Year has kicked off the annual month-long Spring Festival, and the whole country has taken time off to be with family and celebrate. One tradition of Spring Festival is that everyone gives each other red envelopes with various amounts of money in them called hongbao. The point of this ‘lucky money’ is to spread good fortune in the new year, and it’s easy to amass a whole pile of hongbao by the end of the festival.

[Makerming] made this lovely counting box for anyone looking to keep track of their hongbao in style. It probably goes without saying that this would make an awesome mailbox for Valentines (or anything else that fits in the slot), but there you go. The circuit is pretty simple thanks to a Grove connector shield meant for Arduinos. An IR break-beam module detects the incoming envelope, and the Uno increments the count on the display. The wiggly, servo-driven example hongbao on top are there to add to the fun.

We love the laser-cut decoration on the front, which is an homage to the intricate paper cut decorations. If you don’t like that one, [Makerming] included design files for several other options. Watch it wiggle after the break!

If you won’t be looking to collect valentines because you’ve already found that special someone, give them something that lasts longer than chocolate or roses.

Continue reading “This Box Counts Your Blessings For You”

Tipping Points In The Climate System: The Worst Kind Of Positive Feedback

With global temperatures continuing to break records in recent years, it’s important to cast an eye towards the future. While efforts to reduce emissions remain in a political quagmire, time is running out to arrest the slide into catastrophe.

Further compounding the issue are a variety of positive feedback loops that promise to further compound the problem. In these cases, initial warming has flow-on effects that then serve to further increase global temperatures. Avoiding these feedback mechanisms is crucial if the Earth is to remain comfortably livable out to the end of the century.

A Multitude of Causes

The issue of climate change often appears as a simple one, with the goal being to reduce greenhouse gas emissions in order to prevent negative consequences for human civilization. Despite this, the effects of climate change are often diffuse and intermingled. The various climate systems of the Earth interact in incredibly complex ways, and there are many mechanisms at play in these feedback effects that could tip things over the edge.

Continue reading “Tipping Points In The Climate System: The Worst Kind Of Positive Feedback”

An EV Motor Controller Home Build

Many of us will have experimented with brushless motors, and some of us will have built our own controllers rather than using an off-the-shelf part. Doing so is a good way to understand their operation, and thus to design better brushless motor powered projects. Few of us will have gone as far as [etischer] though, and embarked upon building our own controller for a 300V 90kW traction motor.

The tricky part of a high power brushless motor controller lies not in the drive but in the high-power switching arrangements. He’s using a bank of IGBTs, and to drive them he’s using a smaller industrial variable frequency drive controller with its own output transistors removed. He takes us through some of the development of the system, including showing him blowing up a set of IGBTs through having too much inductance between transistors and reservoir capacitor, and then to his final design.

This is part of a project VW first converted ten years ago, and as part of a series of videos he’s produced one going through the whole project. It’s a fascinating breakdown of the parts required for an EV conversion, and the teething troubles he’s encountered along the way.

Continue reading “An EV Motor Controller Home Build”

Serious Repair Work On The Amiga 600

The Amiga will be forever loved for bringing serious multimedia capabilities to the home computer market. However, these machines are now showing their age, and keeping them running can take a bit of work. [Drygol] isn’t one to shy away from the task, however, and set about repairing a few Amiga 600s that came his way.

First up on the docket is replacing the many electrolytic capacitors that tend to leak over the years. They can cause corrosion, destroying traces and other components, as well as failing themselves. [Drygol] is an old hand at this now, whipping out the hot air station and some copper shielding to protect delicate connectors from melting. A simple recap was enough to get one machine up and running, but the other was more recalcitrant. When swapping a dud CPU out, a pad was destroyed on the PCB. This necessitated some careful tracing, followed by a drill hole through the PCB to allow a bodge wire to run the signal from the other side of the board.

There’s also plenty of upgrades to be done; S-Video outputs instead of the crummy old RF modulator, and special interrupt switches that help when cracking games and doing assembly programming. Thanks to a rich aftermarket and vivid community, researching and performing mods is easy thanks to writeups and parts available online.

It’s a great example of the basic techniques one must master to keep old hardware on the boil. Learn to recap, refit, and hunt for problems, and you’ll be well on your way to maintaining your retro fleet for years to come. We’ve seen [Drygol]’s work before too – this vampiric A500 is a particular treat!