Mini IMac G4 Made With NUC And 3D Printer

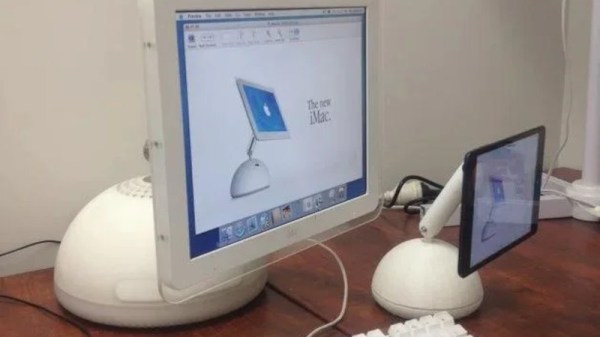
Apple’s computers have been well regarded over the years for their sharp design features. Of course, something that’s great can only be cuter and cooler if it’s made even smaller. In just that vein, [Gary Olson] whipped up a 54% scale iMac G4.

The iMac G4 was the futuristic-looking flatscreen model, and the direct successor to the original CRT-based iMac. Unlike other projects that run Raspberry Pis or simply fit iPads inside, [Gary] elected to go for a Hackintosh-based build. The system runs Mac OS X on a Intel NUC kitted out with a Core i3 CPU. While it’s not a genuine PowerPC, using OS X fits the proper G4 aesthetic. The build relies on 3D printed components, with the scale size largely chosen to suit the size of [Gary’s] printer and the Intel NUC motherboard. [Gary] goes into detail explaining what was required to get the paint finish right and how to make the hinges stiff but movable.

We’re always fans of a mini retro builds, even if the fact that iMacs are now retro means we’re showing our age. If you’ve got your own cute micro PC coming together in the ‘shop, be sure to drop us a line!

Sending 3D Printed Parts To Mars: A Look Inside JPL’s Additive Manufacturing Center

With the Mars 2020 mission now past the halfway point between Earth and its destination, NASA’s Jet Propulsion Lab recently released a couple of stories about the 3D-printed parts that made it aboard the Perseverance rover. Tucked into its aeroshell and ready for its high-stakes ride to the Martian surface, Perseverance sports eleven separate parts that we created with additive manufacturing. It’s not the first time a spacecraft has flown with parts made with additive manufacturing technique, but it is the first time JPL has created a vehicle with so many printed parts.

To take a closer look at what 3D-printing for spaceflight-qualified components looks like, and to probe a little into the rationale for additive versus traditional subtractive manufacturing techniques, I reached out to JPL and was put in touch with Andre Pate, Additive Manufacturing Group Lead, and Michael Schein, lead engineer on one of the mission’s main scientific instruments. They both graciously gave me time to ask questions and geek out on all the cool stuff going on at JPL in terms of additive manufacturing, and to find out what the future holds for 3D-printing and spaceflight.

Continue reading “Sending 3D Printed Parts To Mars: A Look Inside JPL’s Additive Manufacturing Center”

Binary Calculator For All 0b10 Types

You know the old joke: There are 10 types of people in the world — those who understand binary, and those who don’t. Most of us on Hackaday are firmly in the former camp, which is why projects like this circuit sculpture binary calculator really tickle our fancies.

Inspired by the brass framework and floating component builds of [Mohit Bhoite], [dennis1a4] decided to take the plunge into circuit sculpture in an appropriately nerdy way. He wisely decided on a starter build, which was a simple 555 timer circuit, before diving into the calculator. Based on an ATMega328P in a 28-pin DIP, the calculator is built on an interesting hybrid platform of brass wire and CNC-routed wood. The combination of materials looks great, and we especially love the wooden keycaps on the six switches that make up the keyboard. There’s also some nice work involved in adapting the TLC5928 driver to the display of 16 discrete LEDs; suspended as it is by fine magnet wires, the SSOP chip looks a bit like a bug trapped in a spider web.

Hats off to [dennis1a4] for a great entry into our soon-to-conclude Circuit Sculpture Contest. The entry deadline is (today!) November 10, so it might be a bit too late for this year. But rest assured we’ll be doing this again, so take a look at all this year’s entries and start thinking about your next circuit sculpture build.

Continue reading “Binary Calculator For All 0b10 Types”

Proper Cassettes For Your FPGA Retrocomputer

You can tell the age of someone in our community with a simple question: what were the first removable data storage media you used? Punched cards for the venerable, cassettes for the middle-aged, floppies for the thirtysomethings, Flash cards for the twentysomethings, and maybe even “What’s a removable storage medium?” for the kids brought up on cloud services.  Even with refreshed interest in retrocomputing the cassette hasn’t made a comeback, but maybe that owes something to the hardware. Createing a cassette interface for an FPGA is a task that’s often overlooked, and that’s a project [zpekic] has tackled.

Cassette data recordings are frequency shift keyed, with the 0 and 1 of the binary information represented by different tones. An expected solution to detect these might be to use a Fourier transform, but instead he opts for a simpler solution of counting zero crossings and timing their interval. The resulting stream of data is fed into a UART from which the data itself can be reconstructed. All this is implemented on a Mercury FPGA board which contains a Xilinx Spartan 3A FPGA, but it’s a technique that could be used on other devices too.

So your FPGA retrocomputer deserves an authentic cassette interface, and now it can have one. We’d be especially impressed if all this 2020s wizardry could produce a more stable chuntey field, but we guess that might take a bit more work.

As a final aside, the project is dedicated to the memory of the pioneering Yugoslavian broadcaster [Zoran Modli], whose innovative 1980s radio show featured broadcasts of tape software for the computers of the time including our Hackaday colleague [Voja Antonić]’s Galaksija. Broadcasting software over the radio? That’s a cool hack.