Flip-Dots Enter The Realm Of Fine Art

Flip-dot displays look and sound awesome. At least to all of us electronics geeks who dumpster dive for second-hand panels to add to our collections of esoteric display technology. But there are people thinking beyond the yellow/white dots on a black background. [BreakfastNY] have produced a new take on what a flip-dot display can be with color and a bit of theatrics.

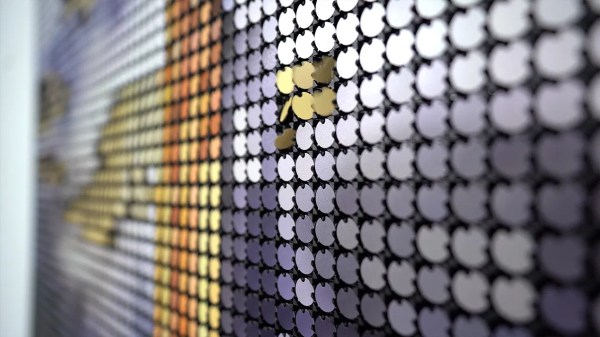
Mechanically these are standard pixels that use an electromagnetic coil to pivot a disc between two states. But immediately you’ll see the inert display has a mosaic printed right on the dots. It gets even more fun to realize the same image is present on the rear of the dots but in a different color palette. In the case of this piece, entitled Empire State, it looks like a sunny day on one side and an overcast day on the reverse.

We wondered what this art collective was up to when they began selling flip-dot modules they had designed back in 2016. Having those kinds of connections meant they were able to sweet-talk their manufacturing partners into custom printing colors on the discs during manufacture. The group continues to use their camera-based interactivity that represents silhouettes on the display. The innovative color palette still lets that work quite well, but one really interesting animation choice here is an indeterminate flutter of the pixels. It builds a Matrix-style waterfall animating into the image, beckoning the viewer to walk over with the ulterior motive that this brings them within camera range.

If you want to give the flutter effect a try for yourself, you might want to peek at the 30 FPS flip-dot driver we saw a few weeks back as a responsive option.

Continue reading “Flip-Dots Enter The Realm Of Fine Art”

The Long Journey Ahead For Linux On Apple Silicon

An old joke from the Linux community about its prevalence in computing quips that Linux will run on anything, including some animals. While the joke is a little dated, it is true that Linux can run on just about any computing platform with a certain amount of elbow grease. The current exception is the new Apple M1 silicon, although one group called Asahi Linux is currently working to get Linux running on this novel hardware as well.

While the Apple M1 is specifically built to run macOS, there’s no technical reason why Linux couldn’t run on it once all of the kinks are ironed out. This progress report from last month outlines some of the current areas of focus, especially around booting non-Mac kernels. The new Apple silicon runs on an ARM processor and because of this it functions more like an embedded device than a PC with standardized BIOS or UEFI. This means a lot of workarounds to the proprietary boot process have to be created to get a Linux kernel to boot. Luckily there are already versions of Linux that run on ARM so a lot of work has already been done, but there’s still much ahead.

While it’s probably best to buy an x86 machine for the time being if you need a Linux on your own personal machine, it seems like only a matter of time until all of the barriers to Linux are overcome on the M1 silicon. If Linux is able to take advantage of some of the efficiency and performance benefits of these chips, it could be a game-changer in the Linux world and at least give us all another option for hardware. Of course, we will still be needing software that can run on ARM, too.

Thanks to [Mark] for the tip!

Video Ram Transplant Doubles RTX 3070 Memory To 16 GB

Making unobtainium graphics cards even more unobtainable, [VIK-on] has swapped out the RAM chips on an Nvidia RTX 3070. This makes it the only 3070 the world to work with 16 GB.

If this sounds familiar, it’s because he tried the same trick with the RTX 2070 back in January but couldn’t get it working. When he first published the video showing the process of desoldering the 3070’s eight Hynix 1 GB memory chips and replacing them with eight Samsung 2 GB chips he hit the same wall — the card would boot and detect the increased RAM, but was unstable and would eventually crash. Helpful hints from his viewers led him to use an EVGA configuration GUI to lock the operating frequency which fixed the problem. Further troubleshooting (YouTube comment in Russian and machine translation of it) showed that the “max performance mode” setting in the Nvidia tool is also a solution to stabilize performance.

The new memory chips don’t self-report their specs to the configuration tool. Instead, a set of three resistors are used to electronically identify which hardware is present. The problem was that [VIK-on] had no idea which resistors and what the different configurations accomplished. It sounds like you can just start changing zero Ohm resistors around to see the effect in the GUI, as they configure both the brand of memory and the size available. The fact that this board is not currently sold with a 16 GB option, yet the configuration tool has settings for it when the resistors are correctly configured is kismet.

So did it make a huge difference? That’s difficult to say. He’s running some benchmarks in the video, both Unigine 2 SuperPosition and 3DMark Time Spy results are shown. However, we didn’t see any tests run prior to the chip swap. This would have been the key to characterizing the true impact of the hack. That said, reworking these with a handheld hot air station, and working your way through the resistor configuration is darn impressive no matter what the performance bump ends up being.

Continue reading “Video Ram Transplant Doubles RTX 3070 Memory To 16 GB”

Arduino Serial Vs SerialUSB

[Andrew] wonders why the SerialUSB() function on the Cortex M3-based Arduino Due is so much faster than Serial() on the Uno or Nano, and shares his observations in this short video. He sets up an experiment with a simple sketch on both boards and uses Wireshark to evaluate the results.

Data is sent in the USB packets in groups of four characters on the ATmega-based boards, but the entire string is put in a packet on the Due board. If you look under the hood, the answer is hiding in plain sight. While the Arduino family of boards connect to your computer using a USB virtual serial port, the ATmega ones have an actual serial connection on-board. For instance, on the Nano there is an FT232RL between the USB connector and the microprocessor (on an Arduino Uno board, a small ATMEGA8U2 is used instead of an FTDI chip, but the concept is the same). On the Arduino Due, the USB connects directly to the SAM3X8E processor.

This concept doesn’t apply only to Arduino boards, of course. On any serial connection between two computers, when a virtual USB device is used on both sides of the link (no actual serial signals involved), the serial baud rate is a fictional thing — data transfer speeds depends on USB alone. We are curious why the packets contain four characters in [Andrew]’s ATmega Wireshark captures — why not 1, 2, or 10? Is this something that can be controlled by the programmer, or is it fixed by the protocol and/or the FTDI chip? If you have the answer, let us know in the comments below. Continue reading “Arduino Serial Vs SerialUSB”

A Handy Reference For Display Drivers And LCD Controllers

Ever tried to find the data on a mysterious LCD controller that’s kicking around in your parts bin? Well check out this list of various LCD controllers that [Achim] has put together. He summarizes the basic specifications for each controller and includes data sheet links if available (note — the website is in German, although most of the data itself is in English). All in all, he has collected 72 controllers from five different manufacturers, and 46 of them have data sheets. For each controller, he tabulates maximum resolution, color depth, type of interface, and the targeted display technology. For example, here is the entry for the Ilitech ILI9341 TFT controller commonly found in embedded projects:

Furthermore, many of the controllers also have a short video clip showing them in operation posted over on [Achim]’s YouTube channel, where he also has a bunch of quick (less than one minute) videos of all sorts of embedded goodies. We do find this table of controllers to be a little dated — for example, another popular controller used on small color OLED displays, the Solomon Systech SDS1351, is not included. But it is certainly a good resource to bookmark.

We suspect that [Achim] made this table as a result of developing µGUI, a small (only three files) C-language graphics library (see the GitHub repository) he released back in 2015. Do you have any good resources for tracking down unknown LCD controllers? If so, share in the comments below. And thanks to [Dmitry] for sending in this tip.

Continue reading “A Handy Reference For Display Drivers And LCD Controllers”

Reproducing A Reproducer: Servicing A Cylinder Phonograph In The Year 2021

[Jan Derogee] pulled out his phonograph the other day to hear the 100+ year old wax cylinder warble of “It’s a Long Way to Tipperary”, but couldn’t locate the reproducer — this is the small circular bit that holds the stylus and transfers the groove-driven vibrations to the center of a thin diaphragm, which vibrates into the sound horn. It’s easily the most important part of a cylinder phonograph. What do you do when you lose your reproducer? You could search ebay for a replacement, but that wouldn’t be nearly as fun as reproducing your reproducer yourself.

Traditionally, diaphragms were made from mica or celluloid, and the Edison disk phonograph used seven layers of shellac-soaked rice paper. Reproducers typically have a Dagwood sandwich of gaskets surrounding the membrane, but they don’t have to be so convoluted to work — a single strong membrane will do just fine. Just ask [Jan], who made a new reproducer with a 3D-printed case, a hand-pulled glass stylus, and a disposable aluminum foil pan for the diaphragm.

It’s difficult for us to say which part looks more fun — stretching the glass shard over a gas kitchen stove with the flame focused by a stack of wrench sockets, or cutting up a bicycle inner tube and using a car jack to press the aluminum into shape against a 3D-printed mold. The whole video is awesome and you can check it out after the break.

As [Jan] notes in the video and on the project site, the glass stylus should really be made from borosilicate because it’s harder than regular soda lime glass (that’s why they often make vaccine vials out of it). Regular glass will work and takes much less time and gas to reach the pull-able stage, so that’s what [Jan] used in the video, but it will wear out much more quickly. Fortunately, this was a temporary solution, because as soon as [Jan] made a replacement, the missing reproducer showed up.

Continue reading “Reproducing A Reproducer: Servicing A Cylinder Phonograph In The Year 2021”

A Milky Way Photo Twelve Years In The Making

Starting projects is easy. It’s the finishing part that many of us have trouble with. We can hardly imagine completing a project after more than a decade, but seeing the breathtaking results of [J-P Metsavainio]’s gigapixel composite image of our galaxy might just make us reconsider. The photograph, which we highly suggest you go check out in its full glory, has been in progress since 2009, features 1250 total hours of exposure time, and spans across 125 degrees of sky. It is simply spectacular.

Of course, it wasn’t an absolutely continuous effort to make this one image over those twelve years. Part of the reason for the extended time span is many frames of the mosaic were shot, processed, and released as their own individual pieces; each of the many astronomical features impressive in its own right. But, over the years, he’s filled in the gaps between and has been able to release a more and more complete picture of our galactic home.

A project this long, somewhat predictably, eventually outlives the technology used to create it. Up until 2014, [Metsavainio]’s setup included a Meade 12-inch telescope and some modified Canon optics. Since then, he’s used a dedicated equatorial mount, astrocamera, and a Tokina lens (again, modified) with an 11-inch Celestron for longer focal lengths. He processes the frames in Photoshop, accounting for small exposure and color differences and aligning the images based on background stars. He’s had plenty of time to get his process down, though, so the necessary tweaking is relatively minor.

Amateur astronomy is an awesome hobby, and the barrier to entry is lower than it might seem. You can get started on a budget with the ubiquitous Raspberry Pi or with the slightly less practical Game Boy Camera. And if you’re just interested in viewing the cosmos, there are options for building your own telescope as well.

[via PetaPixel]