Hacking An IoT Camera Reveals Hard-Coded Root Password

Hacking — at least the kind where you’re breaking into stuff — is very much a learn-by-doing skill. There’s simply no substitute for getting your hands dirty and just trying something. But that doesn’t mean you can’t learn something by watching, with this root password exploit on a cheap IP video camera being a good look at the basics.

By way of background on this project, [Matt Brown] had previously torn into a VStarcam CB73 security camera, a more or less generic IP camera that he picked up on the cheap, and identified a flash memory chip from which he extracted the firmware. His initial goal was to see if the camera was contacting sketchy servers, and while searching the strings for the expected unsavory items, he found hard-coded IP addresses plus confirmation that the camera was running some Linux variant.

With evidence of sloppy coding practices, [Matt] set off on a search for a hard-coded root password. The second video covers this effort, which started with finding UART pins and getting a console session. Luckily, the bootloader wasn’t locked, which allowed [Matt] to force the camera to boot into a shell session and find the root password hash. With no luck brute-forcing the hash, he turned to Ghidra to understand the structure of a suspicious program in the firmware called encoder. After a little bit of poking and some endian twiddling, he was able to identify the hard-coded root password for every camera made by this outfit, and likely others as well.

Granted, the camera manufacturer made this a lot easier than it should have been, but with a lot of IoT stuff similarly afflicted by security as an afterthought, the skills on display here are probably broadly applicable. Kudos to [Matt] for the effort and the clear, concise presentation that makes us want to dig into the junk bin and get hacking.

Continue reading “Hacking An IoT Camera Reveals Hard-Coded Root Password”

Google Drive Now Bootable

USB drives are incredibly useful, both storing files for transport between different computers and for creating bootable drives that let us use or install other operating systems on our computers. While online file storage systems like Dropbox and Google Drive have taken over a large percentage of the former task from USB drives, they have not been able to act as bootable media, ensuring that each of us have a few jump drives lying around. That might not be the case anymore, though, as this guide is the first we know of to be able to use Google Drive to boot to a Linux system.

Unlike the tried-and-true jump drive methods, however, this process is not straightforward at all. It relies on two keys, the first of which is FUSE which allows a filesystem to be created in userspace. The second is exploiting a step in boot process of Linux systems where the kernel unpacks a temporary filesystem, called initramfs, in order to load the real filesystem. Normally a user doesn’t interact much with this step, but that doesn’t mean it’s impossible. A tool called dracut allows using an existing Linux installation to build a custom initramfs and in this case, the custom initramfs is built to include the proper support for both networking and FUSE.

The proof of concept in this demonstration originally ran in a container, using an existing project called google-drive-ocamlfuse to interact with Google Drive itself. From there, after sorting out some issues with root access, networking, malfunctioning symlinks, and various timeouts on the (perhaps predictably) slow system, the whole contraption was moved over to a laptop so it could be tested on real hardware. Everything runs, and although the original creator of this behemoth admits it is a bit “silly” they note that there may be some real-world use cases for something like this. We still won’t expect everyone to throw out their jump drives anytime soon, though. If you’re not feeling like your Linux skills are up to the challenge of something like this, we’d recommend you start with our own [Al Williams]’s Linux Fu series.

An Old Netbook Spills Its Secrets

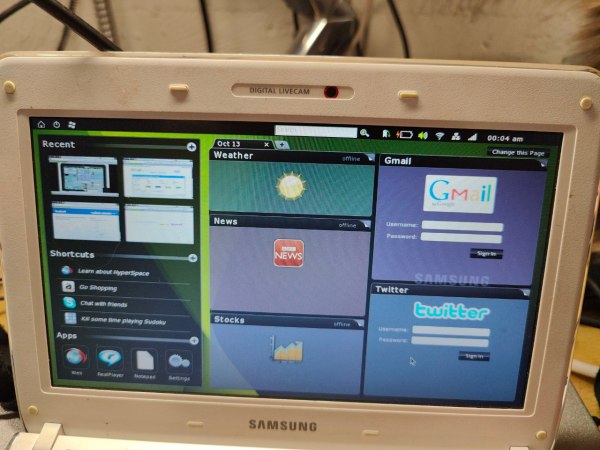
For a brief moment in the late ’00s, netbooks dominated the low-cost mobile computing market. These were small, low-cost, low-power laptops, some tiny enough to only have a seven-inch display, and usually with extremely limiting hardware even for the time. There aren’t very many reasons to own a machine of this era today, since even the cheapest of tablets or Chromebooks are typically far more capable than the Atom-based devices from over a decade ago. There is one set of these netbooks from that time with a secret up its sleeve, though: Phoenix Hyperspace.

Hyperspace was envisioned as a way for these slow, low-power computers to instantly boot or switch between operating systems. [cathoderaydude] wanted to figure out what made this piece of software tick, so he grabbed one of the only netbooks that it was ever installed on, a Samsung N210. The machine has both Windows 7 and a custom Linux distribution installed on it, and with Hyperspace it’s possible to switch almost seamlessly between them in about six seconds; effectively instantly for the time. Continue reading “An Old Netbook Spills Its Secrets”

The Long Journey Ahead For Linux On Apple Silicon

An old joke from the Linux community about its prevalence in computing quips that Linux will run on anything, including some animals. While the joke is a little dated, it is true that Linux can run on just about any computing platform with a certain amount of elbow grease. The current exception is the new Apple M1 silicon, although one group called Asahi Linux is currently working to get Linux running on this novel hardware as well.

While the Apple M1 is specifically built to run macOS, there’s no technical reason why Linux couldn’t run on it once all of the kinks are ironed out. This progress report from last month outlines some of the current areas of focus, especially around booting non-Mac kernels. The new Apple silicon runs on an ARM processor and because of this it functions more like an embedded device than a PC with standardized BIOS or UEFI. This means a lot of workarounds to the proprietary boot process have to be created to get a Linux kernel to boot. Luckily there are already versions of Linux that run on ARM so a lot of work has already been done, but there’s still much ahead.

While it’s probably best to buy an x86 machine for the time being if you need a Linux on your own personal machine, it seems like only a matter of time until all of the barriers to Linux are overcome on the M1 silicon. If Linux is able to take advantage of some of the efficiency and performance benefits of these chips, it could be a game-changer in the Linux world and at least give us all another option for hardware. Of course, we will still be needing software that can run on ARM, too.

Thanks to [Mark] for the tip!

Dry Your Boots With The Internet Of Things

If you live somewhere cold, where the rain, snow and slush don’t abate for weeks at a time, you’ve probably dealt with wet boots. On top of the obvious discomfort, this can lead to problems with mold and cause blisters during extended wear. For this reason, boot dryers exist. [mark] had a MaxxDry model that had a timer, but it wasn’t quite working the way he desired. Naturally, it was begging to be hooked up to the Internet of Things.

The brains of the dryer is an ESP32, a solid choice for such a project. With WiFi on board, connecting the device to the internet is a snap. Relays are used to control the fan and heater inside the boot dryer, while MQTT helps make the device controllable remotely. It can be manually switched on and off, or controlled to always switch on at a certain time of the day.

It’s a simple project that shows how easily a device can be Internet controlled with modern hardware. For the price of a cheap devboard and a couple of relays, [mark] now has a more functional dryer, and toasty feet to boot.

We don’t see a lot of boot hacks here, but this magnet-equipped footwear is quite impressive.

How To Add More Games To The NES Classic

The hype around the NES Classic in 2016 was huge, and as expected, units are already selling for excessively high prices on eBay. The console shipped with 30 games pre-installed, primarily first-party releases from Nintendo. But worry not — there’s now a way to add more games to your NES Classic!

Like many a good hack, this one spawned from a forum community. [madmonkey] posted on GBX.ru about their attempts to load extra games into the console. The first step is using the FEL subroutine of the Allwinner SOC’s boot ROM to dump the unit’s flash memory. From there, it’s a matter of using custom tools to inject extra game ROMs before reburning the modified image to the console. The original tool used, named hakchi, requires a Super Mario savegame placed into a particular slot to work properly, though new versions have already surfaced eliminating this requirement.

While this is only a software modification, it does come with several risks. In addition to bricking your console, virus scanners are reporting the tools as potentially dangerous. There is confusion in the community as to whether these are false positives or not. As with anything you find lurking on a forum, your mileage may vary. But if you just have to beat Battletoads for the umpteenth time, load up a VM for the install process and have at it. This Reddit thread (an expansion from the original pastebin instructions) acts as a good starting point for the brave.

Only months after release, the NES Classic is already a fertile breeding ground for hacks — last year we reported on this controller mod and how to install Linux. Video of this ROM injection hack after the break.

Continue reading “How To Add More Games To The NES Classic”

Motorcycle Sound Effects

[Winfred] was thinking one day, of how the world would be a different place if everything we owned had little start up and shut down sounds like our computers. Historically computers would just beep after passing their power on self test, and many PC’s still do, but in the 1980’s as machines became more powerful and home users wanted more flexibility in their hardware, startup chimes started to creep into our lives. And why not extend that little moment of joy to other objects, like adding Windows XP startup and shutdown sounds to your motorcycle.

Electronically the bill of materials looks like hobby shop catalog, featuring a Freeduino (Arduino variant), Adafruit wave shield, marine speakers, and a cheap-o mp3 amplifier from ebay. While admittedly not the cheapest way to play an audio clip [Winfred] offers a few suggestions to help drop the 100$ price tag, including just skipping it all together and mimicking the sounds with your voice.

Its a fun idea, its sure to earn some odd looks from his neighbors, and it will probably make you chuckle a little too.