Making Silicone Molds – Big Ones!

If you’ve got one of something and you want more, duplicating it with a silicone mold can be a great way to go. This is applicable to 3D printing something you need many copies of, and a whole variety of other usecases. [Eric Strebel] prides himself on his abilities in this area, and has put out a guide to producing very large silicone molds in a simple and reliable manner.

The overarching process is simple, but followed properly, it produces great results. [Eric] starts by building a mold box out of wood, coated in shellac to ensure it doesn’t stick to the silicone. The master part is then stuck to the base, surrounded by a lasercut cardboard strip which acts as a seal and key. Once properly degassed silicone is poured in and cured, the second half can be made. The mold is flipped in the mold box, the seal key removed,  and release agent applied to the silicone surfaces. With another pour and cure, the mold is ready for casting new parts.

While simple, if the correct equipment isn’t used or steps skipped, you’ll end up with a useless mold full of air bubbles or surface irregularities. It’s useful to see just what it takes to get a mold of such scale (13″ x 19″!) completed without flaws. We’ve featured [Eric]’s work before, such as his fine detail improvements on the Apple Pencil. Video after the break.

Continue reading “Making Silicone Molds – Big Ones!”

Inflatable Hospital Isolation Wards

The continued spread of Covid-19 has resulted in a worldwide shortage of hospital beds. A temporary hospital isolation ward (translated) was co-developed by the Korea Advanced Institute of Science and Technology (KAIST) and the Korea Institute of Radiological and Medical Sciences (KIRAMS) to help alleviate this problem. We’re not familiar with the logistics and expense of installing traditional temporary hospital facilities, but the figures provided for this inflatable building approach to the problem seem impressive. It takes 14 days to produce one module, a process which presumably could be pipelined. Being 70% lighter and smaller than their rigidly-constructed counterparts, they can be more easily stored and shipped where needed, even by air.

Once on-site, it takes one day to inflate and outfit it with utilities such as electricity, water, and communications. One of these modules, which look like really big inflatable Quonset huts, contains an intensive care unit, four negative-pressure rooms, a nursing station, staff area, changing and bathrooms, and storage. All this in a 450 m2 building 30 m long and 15 m wide. That works out to be almost 2-stories tall, which is confirmed by the photo above.

Now that the design is finished and a functional unit constructed, the goal is to put it into production as soon as possible. Of course, physical hospital facilities are not the only thing in short supply these days — doctors, nursing and support staff, medical supplies, not to mention the vaccinations themselves, are all needed. But hopefully the success of this project can contribute to the global effort of saving lives and getting control of the virus sooner rather than later. The video below is in Korean, but the automatic English subtitles aren’t too bad.

Continue reading “Inflatable Hospital Isolation Wards”

A Few Of My Favorite Things: Amateur Radio

Hackaday has among its staff a significant number of writers who also hold amateur radio licenses. We’re hardware folks at heart, so we like our radios homebrew, and we’re never happier than when we’re working at high frequencies.

Amateur radio is a multi-faceted hobby, there’s just so much that’s incredibly interesting about it. It’s a shame then that as a community we sometimes get bogged down with negativity when debating the minutia. So today let’s talk about a few of my favourite things about the hobby of amateur radio. I hope that you’ll find them interesting and entertaining, and in turn share your own favorite things in the comments below.

Continue reading “A Few Of My Favorite Things: Amateur Radio”

Third Time’s The Charm For This Capable Cyberdeck

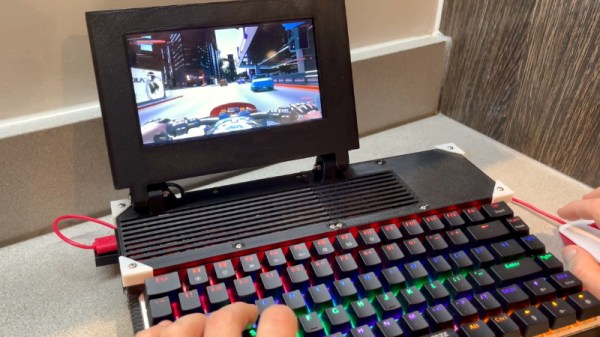
For those who decide to build their own personal cyberdeck, it’s often as much about the journey as it is the final product. The recent write-up that [Sophie Wheeler] put together about the process that lead her to build her own bespoke mobile computer is a perfect example. She went through three distinct design phases to create something that had what she describes as a “retro-futuristic, hand-built, utilitarian aesthetic”, and we think you’ll agree the final product is right on target.

At Hackaday, we’re strong believers that you can learn just as much from a failed attempt as you will from a rousing success, which is why we especially appreciate the way [Sophie] has documented this project. The basic layout and general bill of materials for his hypothetical cyberdeck had been sorted out in her head for about a year, but it took a few attempts until everything came together in a way she was happy with. Rather than pretend those early missteps never happened, she’s decided to present each one and explain why it didn’t quite work out.

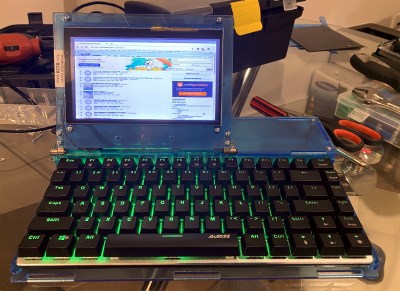
This laser-cut acrylic design was difficult to assemble.

Frankly both earlier attempts look pretty slick to us, but of course the only person who’s opinion really counts when it comes to a good cyberdeck is the one who’s building it. The original acrylic design was a bit too fiddly, and while the first attempt at 3D printing the computer’s frame and enclosure went much better, it still left something to be desired.

The final result is a clean and straightforward design that has plenty of room inside for a Raspberry Pi 4, UPSPack V3 power management board, 10,000 mAh battery, internal USB hub, and a AK33 mechanical keyboard. Topside there’s a 7” 1024×600 IPS LCD with touch overlay that’s naturally been offset in the traditional cyberdeck style, and on the right side of the enclosure there’s a bay that holds a KKMoon RTL-SDR. Though that could certainly be swapped out for something else should you decide to print out your own version of this Creative Commons licensed design.

In our 2020 review we noted the incredible influx of cyberdeck builds we’d seen over the last 12 months, and judging by just what we’ve seen in just these last few weeks, 2021 should be another bumper year for these unique computers.

Getting Closer To Metal 3D Printing

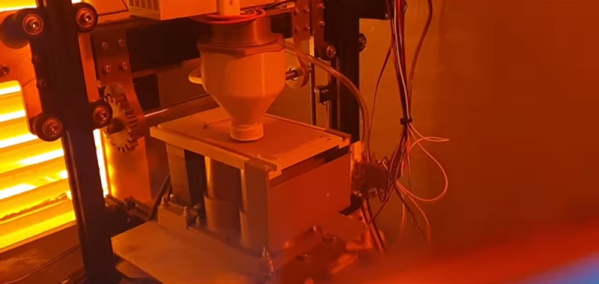
Most of our 3D printers lay down molten plastic or use photosensitive resin. But professional printers often use metal powder, laying out a pattern and then sintering it with a laser. [Metal Matters] is trying to homebrew a similar system (video, embedded below). And while not entirely successful, the handful of detailed progress videos are interesting to watch. We particularly enjoyed the latest installment (the second video, below) which showed solutions to some of the problems.

Because of the complexity of the system, there are small tidbits of interest even if you don’t want to build a metal printer. For example, in the most recent video, a CCD camera gives up its sensor to detect the laser’s focus.

Continue reading “Getting Closer To Metal 3D Printing”

The Sony ScopeMan, Possibly The Best Product They Never Made

From the perspective of a later decade it’s sometimes quaint and amusing to look back at the technological objects of desire from times past. In the 1980s for example a handheld television was the pinnacle of achievement, in a decade during which the Walkman had edged out the transistor radio as the pocket gadget of choice it seemed that visual entertainment would surely follow. Multiple manufacturers joined the range of pocket TVs on offer, and Sony’s take on the format used a flattened CRT with an angled phosphor screen viewed from behind through its glass envelope. [Niklas Fauth] took one of these Sony Watchman devices and replaced its TV circuit board with one that turned it into a vector display. The Sony Scopeman was born!

The schematic is deceptively simple, with an ESP32 receiving audio via Bluetooth and driving the deflection coils through a pair of op-amps and a set of driver transistors. These circuits are tricky to get right though, and in this he acknowledged his inspiration. Meanwhile the software has two selectable functions: a fairly traditional X-Y vector ‘scope display and a Lorenz attractor algorithm. And of course, it can also display a vector version of our Wrencher logo.

We like the Scopeman, in fact we like it a lot. There may be some discomfort for the retro tech purist in that it relies on butchering a vintage Watchman for its operation, but we’d temper that with the observation that the demise of analogue broadcast TV has rendered a Watchman useless, and also with the prospect that a dead one could be used for a conversion project.

[Niklas] has had more than one project appear on these pages, a memorable example being his PCB Tesla coil.

Raspberry Pi Enters Microcontroller Game With $4 Pico

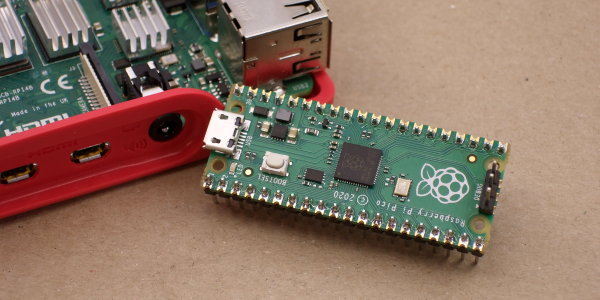
Raspberry Pi was synonymous with single-board Linux computers. No longer. The $4 Raspberry Pi Pico board is their attempt to break into the crowded microcontroller module market.

The microcontroller in question, the RP2040, is also Raspberry Pi’s first foray into custom silicon, and it’s got a dual-core Cortex M0+ with luxurious amounts of SRAM and some very interesting custom I/O peripheral hardware that will likely mean that you never have to bit-bang again. But a bare microcontroller is no fun without a dev board, and the Raspberry Pi Pico adds 2 MB of flash, USB connectivity, and nice power management.

As with the Raspberry Pi Linux machines, the emphasis is on getting you up and running quickly, and there is copious documentation: from “Getting Started” type guides for both the C/C++ and MicroPython SDKs with code examples, to serious datasheets for the Pico and the RP2040 itself, to hardware design notes and KiCAD breakout boards, and even the contents of the on-board Boot ROM. The Pico seems designed to make a friendly introduction to microcontrollers using MicroPython, but there’s enough guidance available for you to go as deep down the rabbit hole as you’d like.

Our quick take: the RP2040 is a very well thought-out microcontroller, with myriad nice design touches throughout, enough power to get most jobs done, and an innovative and very hacker-friendly software-defined hardware I/O peripheral. It’s backed by good documentation and many working examples, and at the end of the day it runs a pair of familiar ARM MO+ CPU cores. If this hits the shelves at the proposed $4 price, we can see it becoming the go-to board for many projects that don’t require wireless connectivity.

But you want more detail, right? Read on.

Continue reading “Raspberry Pi Enters Microcontroller Game With $4 Pico”