An Op-Amp From The Ground Up

If we had to pick one part to crown as the universal component in the world of analogue electronics, it would have to be the operational amplifier. The humble op-amp can be configured into so many circuit building blocks that it has become an indispensable tool for designers. It’s tempting to treat an op-amp as a triangular black box in a circuit diagram, but understanding its operation gives an insight into analogue electronics that’s worth having. [Mitsuru Yamada]’s homemade op-amp using discrete components is thus a project of interest, implementing as it does a complete simple op-amp with five transistors.
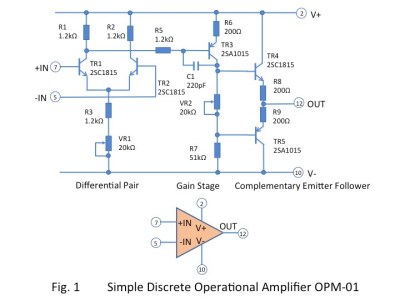
Looking at the circuit diagram it follows the classic op-amp with a long-tailed pair of NPN transistors driving a PNP gain stage and finally a complimentary emitter follower as an output buffer. It incorporates the feedback capacitor that would have been an external component on early op-amp chips, and it has a couple of variable resistors to adjust the bias. Keen eyed readers will notice its flaws such as inevitably mismatched transistors and the lack of a current mirror in the long-tailed pair, but using those to find fault in a circuit built for learning is beside the point. He demonstrated it in use, and even goes as far as to show it running an audio power amplifier driving a small speaker.

For the dedicated student of op-amps, may we suggest further reading as we examine the first integrated circuit op-amp?

USB-C Charging On Your ThinkPad, One Step At A Time

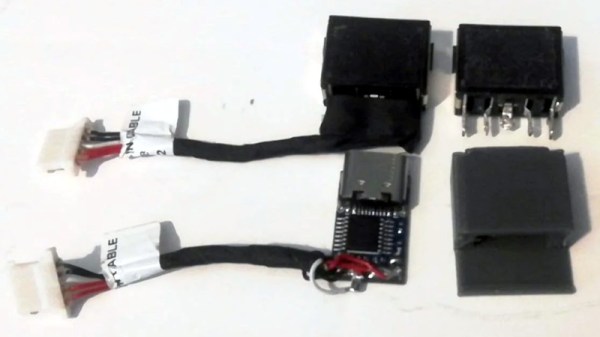
Hackers love their ThinkPads. They’re easy to work on, well documented, and offer plenty of potential for upgrades. For the more daring, there’s also a wide array of community-developed modifications available. For example, [Berry Berry Sneaky] has recently put together a step-by-step guide on swapping the common ThinkPad rectangular charging port (also used on ThinkBooks and other Lenovo machines) for USB-C Power Delivery.

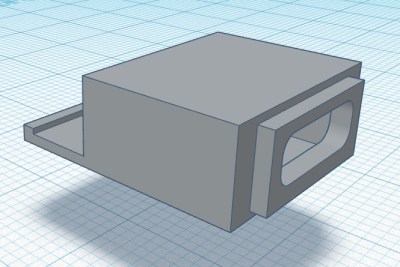
Now to be clear, this is not a new concept. But between freely sharing the STL for the 3D printed adapter, providing a full parts list, and providing clear instructions on how to put it all together, [Berry Berry Sneaky] has done a fantastic job of making this particular modification as approachable as possible. For the cost of a common PDC004 Power Delivery “trigger” module and a bit of PETG filament, you can add yet another device to the list of things that work with your shiny new USB-C charger.

While not strictly necessary, [Berry Berry Sneaky] recommends getting yourself a replacement DC input cable for your particular machine before you crack open the case. That will let you assemble everything ahead of time, making the installation a lot quicker. It will also let you keep the original rectangular power jack intact so you can swap it back in if something goes wrong or you decide this whole unified charging thing isn’t quite what you hoped for.

Not a member of the ThinkPad Army? No worries. We’ve seen a lot of interest in using these configurable USB-C trigger modules to upgrade all manner of devices to the new Power Delivery standard or sometimes put together custom battery chargers for their older mobile gadgets.

Giant DIY Mouse Sets The Ball Free

Make the move to a split keyboard and the first thing you’ll notice is that you have all this real estate between the two halves. (Well, as long as you’re doing it right). This is the perfect place to keep your cat, your coffee cup, or in [Jacek]’s case, your fantastic DIY trackball mouse.

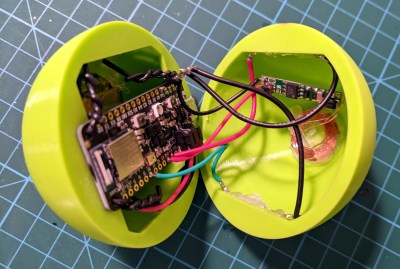
Don’t be fooled by the orange plastic base — all the electronics are rolled up inside that big sexy ball, which [Jacek] printed in two halves and glued together. Inside the ball there’s an Adafruit Feather nRF52840 Sense, which has an onboard accelerometer, gyroscope, and magnetometer. As you’ll see in the video after the break, the Feather takes readings from these and applies a sensor-fusing algorithm to determine the ball’s orientation in 3D space before sending its position to the computer. To send the click events, [Jacek] baked some mouse buttons into the keyboard’s firmware. Among the other Feather sensors is a PDM MEMS microphone, so detecting taps on the ball and translating them to clicks is not out of the question for a future version.

Here comes the really clever part: there are two reed switches inside the ball. One is used as a power switch, and the other is for setting the ‘up’ direction of the trackball. The ball charges wirelessly in a 3D printed base, which also has a small neodymium magnet for activating the reed switches. Check out the demo after the break, which shows [Jacek] putting the trackball through its paces on a mouse accuracy testing program.

If you prefer your DIY trackballs to be more standard looking, click on over to the Ploopy project.

Continue reading “Giant DIY Mouse Sets The Ball Free”

SOUL Wants To Process Your Audio

Abstraction is the core of nearly all progress in computing. Unless you are fabricating your own semiconductors and drawing wire, we all create with building blocks ranging from components like CPUs, to operating system functions, to specialized libraries. Just as you wouldn’t want to spend your time deblocking disk records or rendering fonts for output devices, you probably shouldn’t have to think too much about audio data. While there are some powerful audio processing libraries out there, a new embeddable language called SOUL (SOUnd Language) is now in version 1.0 and wants to help you create efficient code for processing audio.

The goal of SOUL is to target a runtime that can run on CPUs, but is better on DSPs. The code aims to be secure and real time with no pointers, garbage collection, and other things that typically interfere with audio processing or security.

Continue reading “SOUL Wants To Process Your Audio”

Add An Extra 8GB Of VRAM To Your 2070

Most of us make do with the VRAM that came with our graphics cards. We can just wait until the next one comes out and get a little more memory. After all, it’d be madness to try and delicately solder on new components of something so timing-sensitive as RAM chips, right?

[VIK-on] took it upon himself to do just that. The inspiration came when a leaked diagram suggested that the RTX 2000 line could support 16 GB of RAM by using 2GB chips. NVIDIA never did release a 16GB version of the 2070, so this card is truly one of a kind. After some careful scouring of the internet, the GDDR6 chips were procured and carefully soldered on with a hot air gun. A few resistors had to be moved to accommodate the new RAM chips. During power-on, [VIK-on] saw all 16 GB enumerate and was able to run some stress tests. Unfortunately, the card wasn’t stable and started having black screen issues and wonky clocks. Whether it was a bad solder joint or firmware issues, it’s hard to say but he is pretty convinced it is a BIOS error. Switching the resistors back to the 8GB configuration yielded a stable system.

While a little more recent, this isn’t the only RAM upgrade we’ve covered in the last few months. Video after the break (it’s not in English but captions are available).
Continue reading “Add An Extra 8GB Of VRAM To Your 2070”

Adding Remote Control To An Old Stereo

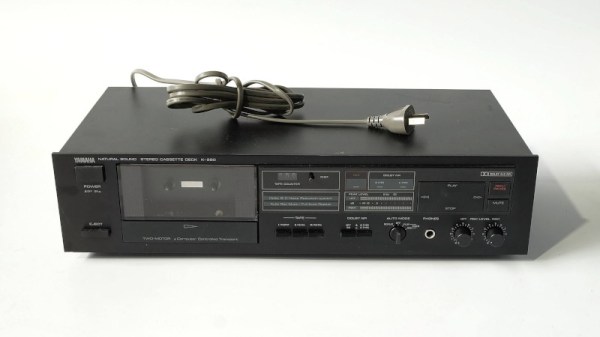
Sometimes, the best hifi gear is the gear you’ve already got. This is particularly the case in the cassette world, as high quality decks are long out of production. [Nick] liked his current rig, but wanted to be able to use it with a remote from across the room. Naturally, he set to hacking the feature in.

The cassette deck in question, a Yamaha K-220, was old enough to lack a remote, but thankfully new enough to use a computer-controlled tape transport. This meant that the basic features of play, stop, rewind and fast forward can all be controlled with simple digital buttons rather than mechanical ones. This made it easy to interface an ATmega328P to the stereo’s original circuitry. Digital IO pins are hooked up to the buttons, held as high-impedance inputs most of the time, only toggling to ground when necessary to trigger a button press. It was then a simple job to hook up an IR receiver to the chip and program it with some Arduino libraries to work with a typical stereo remote control [Nick] had laying around.

It’s a tidy build, and with more cool cassette releases coming out every year, we’re sure [Nick]’s going to put some miles on the setup. If you find IR too cumbersome though, you can go a step further and replace it with a web app instead. If you’ve been tinkering with similar things in your own workshop, be sure to drop us a line!

Proofing Press Proves DIY Is A-OK

Back in the day when most people read the news on wood pulp, newspaper outfits would run off a test print on a small proofing press. This gave them a chance to check for typos before printing off thousands of newspapers on the real press.

These presses can be used for more than letterpress proofing, as [Paul] proves with this DIY version (YouTube, embedded below). They are simple machines that use a heavy roller on bearings to provide uniform pressure, so they’ll work for lino-cut printmaking and aquatint etchings, too.

The roller is the most important bit and is easily the most expensive part of a build like this one. [Paul]’s was fashioned by a UK machinist that he found through ebay. The total cost was £220 (~$300 USD), which is well below the thousand-pound mark where commercial machine prices start.

[Paul] made the base and handle out of plywood and CNC’d the side panels out of aluminium. These side panels contain bearings that hold the roller’s ends in place. As the roller moves back and forth, it slides along on another set of bearings the underside of the press. These bearings ride thin metal rails on the underside of the press so they don’t wear grooves into the wood over time.

[Paul]’s press looks fantastic and looks like it does a great job with everything he throws at it. Some uses require raising up the surface to be printed on to get a good transfer, so [Paul] might make it adjustable in the z-direction at some point in the future. Check out the build and walk-through video after the break.

If [Paul] looks familiar, it’s because we featured his equally impressive large-format book press last spring.

Continue reading “Proofing Press Proves DIY Is A-OK”