PCB Metro Maps Are A Gorgeous Labor Of Love

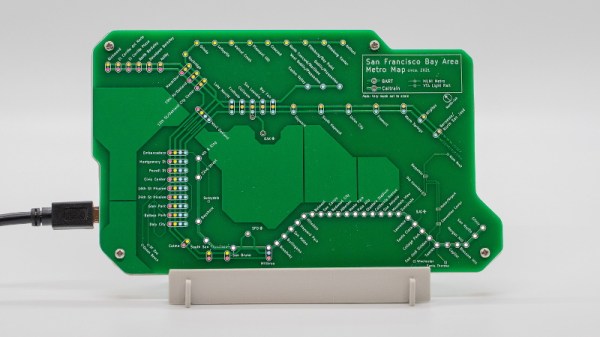
Is your love of public transportation matched only by your passion for designing custom PCBs? If so, then you’re going to love these phenomenal transit maps created by [Chai Jia Xun]. Using the painstakingly refined principles outlined in his detailed write-up, he’s created versions for Tokyo, Singapore, and the comparatively spartan San Francisco Bay Area. All you need to make one up for your home town is an incredible amount of patience and dedication. No problem, right?

As [Xun] explains, the first part of creating one of these maps isn’t unlike generating a normal PCB. Just make a footprint for the stations, consult with Google Maps as to where they should be placed on the board, and then connect them all up with traces to stand in for the rail lines. A little silkscreen work, and you’re done.

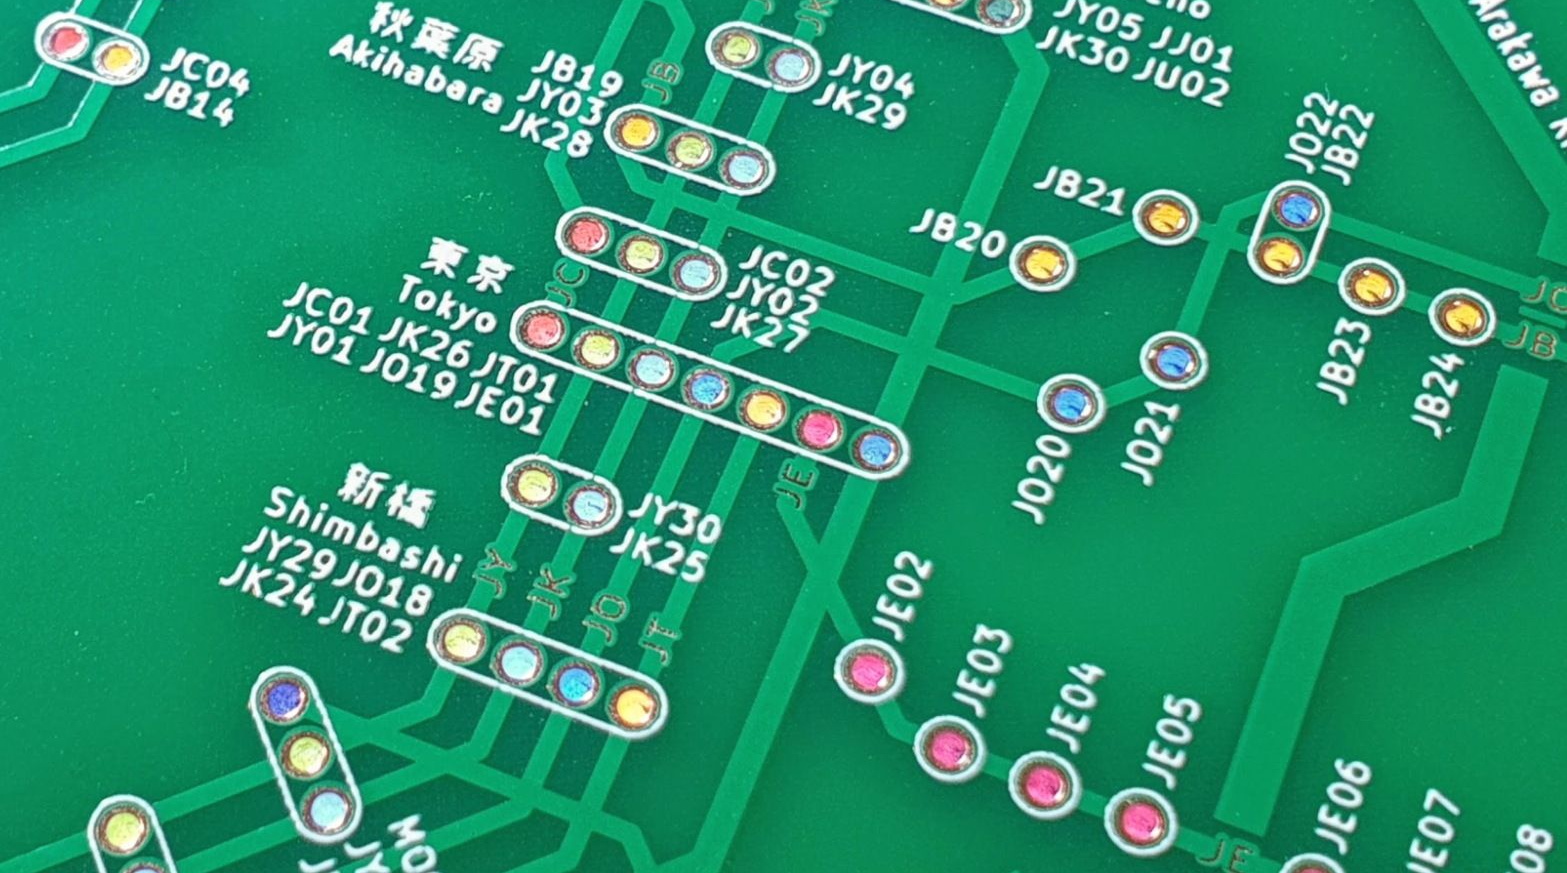
Well…unless you want them to light up, anyway. To pull that off, [Xun] created a second PCB that places an LED behind each station hole drilled in the previous board. With a microcontroller and shift register, he’s able to selectively illuminate individual lines and run through different patterns. To combat light bleeding through the PCB, a CNC-cut piece of 3 mm MDF sits between the two boards to make sure each LED is only visible through the respective hole in the top surface.

You could call the map finished here as well, assuming you don’t mind all the stations lighting up white. If you want them to be different colors, you’ll need to insert some colored diffusers. [Xun] went through several different approaches here, but in the end, the idea that seemed to work best was to simply print out all the colored dots on a piece of transparency paper and use a second sheet of tracing paper to soften the light. Alignment here is critical, but once everything is dialed in, the results are quite impressive.

It’s quite a bit of work, and we haven’t even mentioned the fact that [Xun] had to modify the circuit when it came time to do the Tokyo map, as some MOSFETs had to be added into the mix for the microcontroller to reliably control 350+ LEDs. So there’s certainly no shame in simply buying one of them when they go on sale instead of trying to recreate it from scratch. Assuming you live in one of the cities he’s offering, anyway. Otherwise, you might want to take a look at our HackadayU class on KiCad and get yourself a comfortable chair.

Recharged Dehumidifier Put Back Into Service

For the average consumer, repairing relatively low-cost home devices such as microwaves and TVs just isn’t economically viable. You can hardly blame them when the repair bill could easily be higher than the cost of just buying a new model. Luckily for folks like us, that means you can often find cheap or even free appliances on the second hand market that can be brought back online with a bit of troubleshooting and some spare parts.

Take for example the non-functional dehumidifier [HowToLou] recently came across. You probably couldn’t find a professional repair shop that would be willing to bother with one of these things if you tried, but as he shows in the video below, that doesn’t mean the DIY’er can’t run through some probable failure modes and get the unit back up and running. As a bonus, he also walks viewers through how your typical compressor-based dehumidifier operates.

The failed thermal switch.

Beyond the lack of water in the collection compartment, the first sign that something was wrong with this dehumidifier was that the compressor wasn’t running. Upon closer inspection, [HowToLou] determined that the thermal cut-off switch had failed and was stuck open. Luckily it had a visible part number so he could order a replacement, and in the meantime, all he had to do was cut the switch out of the circuit and wire up the compressor’s power directly.

Unfortunately, even with the compressor running, no water was being collected. Noticing that the evaporator coils weren’t getting very cold, [HowToLou] thought the unit might be low on refrigerant. Usually these systems aren’t meant to be recharged, but with a clever piercing tap valve, you can add a quick-connect port to the low pressure side. This particular dehumidifier happened to be filled with the same R134a used in automotive A/C systems, so a quick trip to the auto parts store got him a can of refrigerant complete with a handy pressure gauge.

After getting juiced up, [HowToLou] shows ice forming on the coils and plenty of water getting dumped into the tank. Automotive A/C refill cans usually include some substance to stop or reduce leaks in the system, so hopefully this will end up being a long-term fix. It might not be the most elaborate dehumidifier repair we’ve ever seen, but it’s certainly the most approachable. If you ever see one of these things laying on the side of the road, maybe you should pick it up and see what ails it.

Continue reading “Recharged Dehumidifier Put Back Into Service”

Lego Submarine Gets Balloon Ballast System

Lego is a fun building block which vast numbers of the world’s children play with every day. However, the mechanical Technic line of Lego building blocks has long offered greater options to the budding engineer. [Brick Experiment Channel] is one such soul, working hard on their latest Lego submarine.

The sub is built inside of a glass food container, chosen for its removable plastic lid with a watertight seal. This keeps all the mechanics dry, as well as the custom electronics built to allow a 27MHz RC controller to send signals to the Lego electronics. This is key as higher frequency radios such as Bluetooth or WiFi can’t penetrate water nearly as well.

A magnetic coupling fitted to a Lego motor is used to drive the propeller in the water without the leaks common when trying to seal a rotating shaft. A second coupling on a Lego servo along with a creative steering arrangement allows the propeller to be turned to steer the craft.

The ballast system is simple. A balloon is filled by a Lego motor running an air pump, capable of 3.0 mL a second and capable of creating a maximum pressure of 2.0 bar. When the balloon is inflated, the buoyancy goes up and the sub rises. Run the motor the other way and the balloon is emptied by a clever clutch and valve arrangement, reducing buoyancy and causing the sub to sink.

The sub isn’t perfect. Maintaining a set depth underwater can be difficult with the rudimentary ballast system, perhaps as the balloon changes shape with varying water pressure. Sometimes, Lego axles slip out of their gears, too, and the radio only works for a few meters under water.

However, simply building a Lego sub of any sort is a remarkable feat. It’s interesting to see the variances in the design compared to earlier projects from [Brick Experiment Channel], too, as we’ve featured their earlier subs before. Video after the break.

Continue reading “Lego Submarine Gets Balloon Ballast System”

Optical Theremin Makes Eerie Audio With Few Parts

[Fearless Night]’s optical theremin project takes advantage of the kind of highly-integrated parts that are available to the modern hacker and hobbyist in all the right ways. The result is a compact instrument with software that can be modified using the Arduino IDE to take it places the original Theremin design could never go.

The design is based on a ‘Blue Pill’ STM32 MCU development board and two Avago APDS-9960 gesture sensor breakout boards, along with a few other supporting components. Where the original Theremin sensed hand proximity using two antenna-like capacitive sensors to control note frequency and volume, this design relies on two optical sensors to do the same job.

[Fearless Night] provides downloads for the schematic, code, parts list, and even 3D models for the enclosure. PCB files are also included for a convenient assembly, but since the component count is fairly low, a patient hacker should be able to get away with soldering it up by hand without much trouble.

This project creates the audio using the STM32’s Direct Digital Synthesis (DDS) capability and a simple low-pass filter, and has several ways to fine-tune the output. What’s DDS? Our own Elliot Williams explains it in terms of audio output for microcontrollers, and if you’d like a more comprehensive overview, Bil Herd will happily tell you all about it.

Electric “Radial” RC Aircraft Motor

For a long time radial aircraft engines, with their distinctive cylinder housings arranged in a circle, were a common sight on aircraft. As an experiment, [KendinYap], wanted to see if he could combine 3 small DC motors into a usable RC aircraft motor, effectively creating an electric radial engine.

The assembly consists of three “180” type brushed DC motors, mounted radially in a 3D printed casing. A 3D printed conical gear is attached to each motor shaft, which drives a single output gear and shaft mounted in the center with two bearings. The gear ratio is 3:1. A variety of propellers can be mounted using 3D printed adaptors. As a baseline, [KendinYap] tested a single motor on a scale with a 4.25-inch propeller on a scale, which produced 170 g of thrust at 21500 RPM. Once integrated into the engine housing, the three motors produced 490 g of thrust at 5700 RPM, with a larger propeller. Three independent motors and propellers should theoretically provide 510 g of thrust, so there are some mechanical losses when combining 3 of them in a single assembly. However, it should still be capable of powering a small RC plane. It’s also not impossible that a different propeller could yield better results.

While there is no doubt that it’s no match for a brushless RC motor, testing random ideas just to see if it’s possible is usually fun and an excellent learning experience. We’ve seen some crazy flyable RC power plants, including a cordless drill, a squirrel-cage blower, and a leaf blower.

Continue reading “Electric “Radial” RC Aircraft Motor”

We’d Like, Totally Carry This Retro Boombox Cyberdeck On Our Shoulder

Cyberdeck. For those of a certain age, the ‘deck’ part conjures visions of tape decks, be they cassette, 8-track, or quarter-inch, and we seriously have to wonder why haven’t seen this type of build before. But here we are, thanks to [bongoplayingmonkey]’s Sanyo Cyberdeck, a truly retro machine built into a cool old boombox.

According to [bongoplayingmonkey], this was a unicorn of a build wherein everything more or less came together, soup to nuts. Right now, [bongoplayingmonkey] is cracking the nuts of a few remaining issues, like calibrating the analog VU meter that inspired the build in the first place. The plan is to use that to indicate various analog things such as battery power and the WiFi signal.

Luckily, everything survived the teardown, parts-wise. That huge knob has a new life has a rotary encoder for scrolling and middle click. And the VU meter made it too, thank Zod. This baby has full mouse controls thanks to a PS/2 joystick and a pair of vintage momentary buttons are likely chrome and bakelite to round out the look.

So apparently [bongoplayingmonkey]’s personal jury is still out on whether this is a blasphemous build or a divine ‘deck, but we say one thing is for sure: this is definitely art.

Unfortunately, the cassette deck didn’t survive. Otherwise, we might have to question its categorization — is it still a boombox if the tape deck works? This, however, is definitely a laptop that grew up to be a cyberdeck.

Thanks for the tip, [Blasto]!

Dynamicland Makes The Whole Building The Computer

Every once is a while a research project comes along that has the potential to totally shake up computing and what it even means to interact with a system. The project Dynamicland.org, is a result of [Bret Victor]’s research journey over the years, looking into various aspects of human computer interaction and what it even means to think like a human.

One of the overhead projectors tied to a realbox
In Realtalk, paper is your programming medium

Dynamicland is an instantiation of a Realtalk ecosystem, deployed into a whole building. Tables are used as computing surfaces, with physical objects such as pieces of paper, notebooks, anything which can be read by one of the overhead cameras, becoming the program listing, as well as the user interface. The camera is associated with a projector, with the actual hardware hooked into so-called ‘Realboxes’ which are Linux machines running the Realtalk software. Separate Realboxes (and other hardware such as a Raspberry Pi, running Realtalk) are all federated together using the Realtalk protocol, which allows communication from hardware in the ceiling, to any on the desk, and also to other desks and computing surfaces.

Realtalk itself is described as an environment for authoring and using computation media. The Realtalk system provides a language extension to Lua. Together these form a domain-specific language. Realtalk is also a kind of reactive database, which means that the emphasis is on the flow of data and connections between data producing things, and data consuming things. For a bit more explanation of how reactive programming can be used with modern relational databases, check out this article on the subject.

For a good overview of how this works in practice, from a programming perspective, checkout [Omar Rizwan]’s article about his ‘Geokit’ project. Another interesting read is the work by [Andrés Cuervo.]

Continue reading “Dynamicland Makes The Whole Building The Computer”