An Interview With Reinhard Keil

Over on the Embedded FM podcast, [Chris] and [Elecia] just released their interview with [Reinhard Keil] of compiler fame. [Reinhard] recounts the story of Keil’s growth and how it eventually became absorbed into Arm back in 2005. Along with his brother Günter, the two founded the company as Keil Software in the Americas, and Keil Elektronik in Europe. They initially made hardware products, but as the company grew, they became dissatisfied with the quality and even existence of professional firmware development tools of the day. Their focus gradually shifted to making a CP/M- and a PC-based development environment, and in 1988, they introduced the first C-compiler designed for the 8051 from the ground up.

Love it or hate it, the Arm Keil suite of µVision IDE and the MDK/Cx51 compiler have been around a long time and used by embedded developers in many industries. Although a free and restricted-use version is available, the license fees prevent most folks from getting very enthusiastic about it. Pricing aside, the µVision IDE has its critics: [Jay Carlson], who used every IDE under the sun a few years ago in his review of sub-one-dollar microcontrollers, opined that it was nothing more than a free editor you get with C51 or MDK-ARM. On the other hand, even [Jay] concedes is that every chip he tested was officially supported by Keil and worked out of the box. Another thing that is important to some users is being able to produce consistent binaries from old projects. This isn’t important for your one-off MQTT hot tub thermometer. But if you need to recompile firmware for a fifteen-year-old railroad signaling system that has multiple certifications and regulatory approvals, using the original compiler and library versions is a huge help.

[Reinhard] goes on to discuss various tools and systems being developed at Arm by his team, such as improvements and additions to the CMSIS suite, the transition of the online Mbed compiler to the new Keil Studio Cloud, and an Arm hardware virtualization tool for cloud-based CI verification. Lest you think everything at Arm is proprietary and expensive, he points out that Arm is a major contributor to the GCC project and the CMSIS components are open source. Even if you aren’t interested in Arm/Keil tools, do check out the interview — it’s quite interesting and touches on several topics of general interest to all firmware developers. Or if you prefer, read the interview when the transcript is completed.

Nintendo Switch Runs Vita Software With Vita2hos

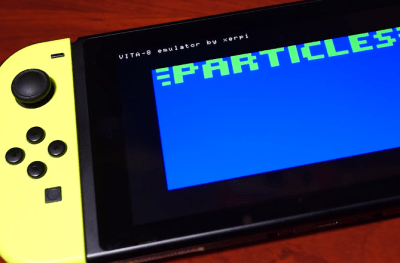
Good news for fans of PlayStation Vita — a new project from [Sergi “xerpi” Granell] allows users to run software written for Sony’s erstwhile handheld system on Nintendo’s latest money printing machine, the Switch. To be clear, there’s a very long road ahead before the vita2hos project is able to run commercial games (if ever). But it’s already able to run simple CPU-rendered Vita homebrew binaries on the Switch, demonstrating the concept is sound.

Running a Vita CHIP-8 emulator on the Switch. Credit: Modern Vintage Gamer

On a technical level, vita2hos is not unlike WINE, which enables POSIX-compliant operating systems such as Linux, Mac OS, and BSD to run Windows programs so long as they use the same processor architecture. Since the Switch’s ARM v8 processor is capable of executing code compiled for the Vita’s ARM v7 while running in 32-bit compatibility mode, there’s no emulation necessary. The project simply needs to provide the running program with work-alike routines fast enough, and nobody is the wiser. Of course, that’s a lot easier said than done.

According to the project page, the big hurdle right now is 3D graphics support. As you could imagine, many Vita games would have been pushing the system’s graphical hardware to the limit, making it exceptionally difficult to catch all the little edge cases that will undoubtedly come up when and if the project expands to support commercial titles. But for homebrew Vita games and utilities that may not even utilize the system’s 3D hardware, adding compatibility will be much easier. For instance, it’s already able to run [xerpi]’s own CHIP-8 emulator.

[xerpi] provides instructions on how to install vita2hos and the Vita executable to be tested onto an already hacked Nintendo Switch should you want to give it a shot. But unless you’ve got experience developing for the Vita or Switch and are willing to lend a hand, you might want to sit this one out until things mature a bit.

Thanks to [NeoTechni] for the tip.

Hackaday Links Column Banner

Hackaday Links: March 6, 2022

As if the war in Ukraine weren’t bad enough right here on Earth, it threatens knock-on effects that could be felt as far away as Mars. One victim of the deteriorating relationships between nations is the next phase of the ExoMars project, a joint ESA-Roscosmos mission that includes the Rosalind Franklin rover. The long-delayed mission was most recently set for launch in October 2022, but the ESA says that hitting the narrow launch window is now “very unlikely.” That’s a shame, since the orbital dynamics of Earth and Mars will mean that it’ll be 2024 before another Hohmann Transfer window opens. There are also going to be repercussions throughout the launch industry due to Russia pulling the Soyuz launch team out of the ESA’s spaceport in Guiana. And things have to be mighty tense aboard the ISS right about now, since the station requires periodic orbital boosting with Russian Progress rockets.

Continue reading “Hackaday Links: March 6, 2022”

Retro Serial Terminal Uses Modern Chips To Get CP/M Machine Talking

The hobbyists of the early days of the home computer era worked wonders with the comparatively primitive chips of the day, and what couldn’t be accomplished with a Z80 or a 6502 was often relegated to complex designs based on logic chips and discrete components. One wonders what these hackers could have accomplished with the modern components we take for granted.

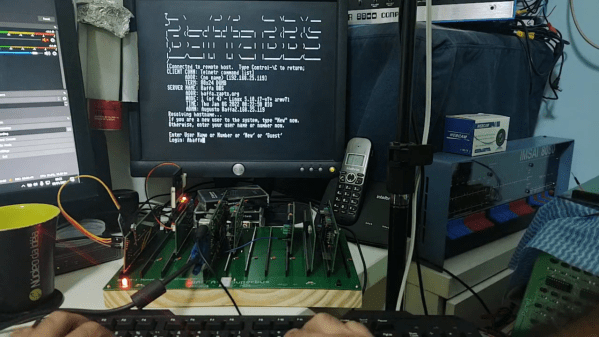
Perhaps it would be something like this minimal serial terminal for the current crop of homebrew retrocomputers. The board is by [Augusto Baffa] and is used in his Baffa-2 homebrew microcomputer, an RC2014-esque Z80 machine that runs CP/M. This terminal board is one of many peripheral boards that plug into the Baffa-2’s backplane, but it’s one of the few that seems to have taken the shortcut of using modern microcontrollers to get its job done. The board sports a pair of ATmega328s; one handles serial communication with the Baffa-2 backplane, while the other takes care of running the VGA interface. The card also has a PS/2 keyboard interface, and supports VT-100 ANSI escapes. The video below shows it in action with a 17″ LCD monitor in the old 4:3 aspect ratio.

We like the way this terminal card gets the job done simply and easily, and we really like the look of the Baffa-2 itself. We also spied an IMSAI 8080 and an Altair 8800 in the background of the video. We’d love to know more about those.

Continue reading “Retro Serial Terminal Uses Modern Chips To Get CP/M Machine Talking”

Putting The ‘Go’ In Frisbee Golf With A Robot Launcher

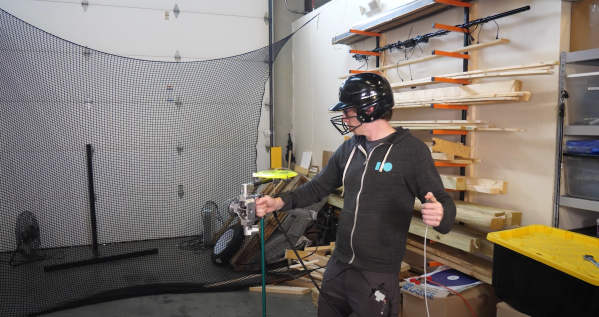
If you’ve gone to a local city park lately, you might have noticed strange metal baskets on poles with chains dangling free. These baskets are spread out throughout the park seemingly at random. For the uninitiated, Frisbee golf (sometimes known as disc golf) is a confusing concept. You might not think it, but Frisbee golf can be a very big deal to some people. [Stuff Made Here] is back with a disc launcher that he hopes will put all the disc golfers to shame.

It’s no secret that we here at Hackaday are big fans of [Stuff Made Here], or [Shane] (he has his own tag after all), and for obvious reasons — the CAD design process, the careful machining and testing, and the extremely high bar that [Shane] sets for his projects. This one is no different, and it is a tale of iteration and scaling. He started out with a simple goal: break the speed record for a thrown Frisbee.

An initial design was decided upon based on high-pressure air pushing a piston to throw the Frisbee off of an arm. Initially, the arm was way too slow as the airflow was severely restricted due to air solenoids and pressure regulators. After fixing all those problems by fabricating his own solenoid and adding a secondary tank with no regulator, the arm started really moving. However, [Shane] wanted it to be able to be arm-mounted, so making sure the torque wouldn’t melt his arm bones was an important priority.

A counterbalance was added to cancel it out, but that ended up causing additional problems down the road, so the throwing arm had to be made as light as possible. The gripper mechanism had to be redesigned again and again as each time the speed was increased, a new problem arose. Turns out that small plastic discs being accelerated at many G’s tend to deform and slip out of their holders, no matter how well engineered. So [Shane] switched to a clever new design to pull the Frisbee along rather than push. It was too dangerous to really be handheld, and the only tests while he was wearing it were at very low amounts of pressure and power.

Testing it in a wide-open field at full power showed promise and while he had plenty of speed, he wasn’t able to beat the distance record. Breaking the distance record is much harder as Frisbees aren’t really designed with the sheer acceleration that [Shane] is subjecting them to, and they want to flip. Additionally, the Frisbees are lacking the spin that would keep them more stable, and what we do as humans is quite difficult to reproduce. Maybe a larger-scale version of this disc launcher could be made that accepts Frisbees?

It’s incredible to watch this contraption come together as each part needs to be designed and machined first by [Shane]. Video after the break.

Continue reading “Putting The ‘Go’ In Frisbee Golf With A Robot Launcher”

Vintage Meter Repair? It’s Easier With X-Rays

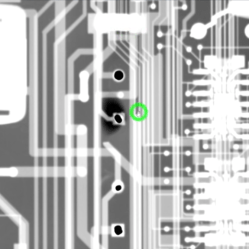
Here’s an interesting and detailed teardown and repair of a Keithley 2001 7.5 Digit multimeter that is positively dripping with detail. It’s also not every day that we get to see someone using x-ray imaging to evaluate the extent of PCB damage caused by failed electrolytic capacitors.

Dark area is evidence of damage in the multi-layer PCB.

Sadly, this particular model is especially subject to that exact vintage electronics issue: electrolytic capacitor failure and leakage. These failures can lead to destroyed traces, and this particular unit had a number of them (in addition to a few destroyed diodes, just for good measure.) That’s where the x-ray machine comes in handy, because some of the damage is hidden inside the multi-layer PCBs.

[Shahriar], perhaps best known as [The Signal Path], narrates the entire process of fixing up the high-quality benchtop multimeter in a video, embedded below (or you can skip directly to the x-ray machine being broken out.) [Shahriar] was able to repair the device, thanks in part to it being in relatively good shape, and having the right tools available. Older electronics are not always so cooperative; the older a device is, the more likely one is to run into physical and logical standards that no longer exist.

Continue reading “Vintage Meter Repair? It’s Easier With X-Rays”

How To Solder To Aluminum, Easily

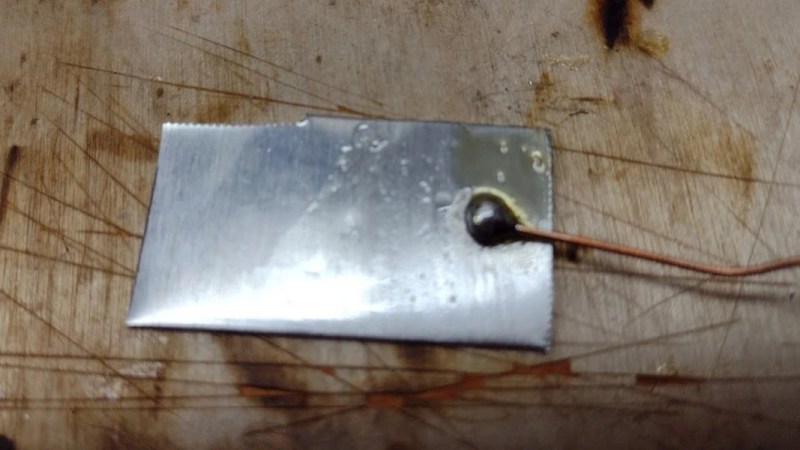
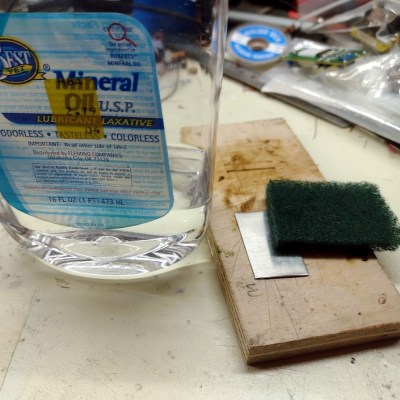
[Ted Yapo] shared a method of easily and conveniently soldering to aluminum, which depends on a little prep work to end up only slightly more complex than soldering to copper. A typical way to make a reliable electrical connection to aluminum is to use a screw and a wire, but [Ted] shows that it can also be done with the help of an abrasive and mineral oil.

Aluminum doesn’t solder well, and that’s because of the oxide layer that rapidly forms on the surface. [Ted]’s solution is to scour the aluminum with some mineral oil. The goal is to scrape away the oxide layer on the aluminum’s surface, while the mineral oil’s coating action prevents a new oxide layer from immediately re-forming.

After this prep, [Ted] uses a hot soldering iron and a blob of solder, heating it until it sticks. A fair bit of heat is usually needed, because aluminum is a great heat conductor and tends to be lot thicker than a typical copper ground plane. But once the aluminum is successfully tinned, just about anything can be soldered to it in a familiar way.

[Ted] does caution that mineral oil can ignite around 260 °C (500 °F), so a plan should be in place when using this method, just in case the small amount of oil catches fire.

This looks like a simple technique worth remembering, and it seems easier than soldering by chemically depositing copper onto aluminum.