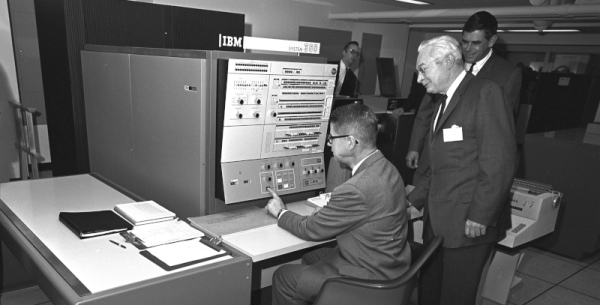
If you want the classic experience of working with an IBM mainframe or another classic computer like a DEC VAX, you have a few choices. You could spend a lot of money trying to find one, transport it, and refurbish it. But, of course, most of us will settle for an emulator. While there are great emulators out there, most of the time you aren’t interested in running just the bare machine — you want the operating systems, the compilers, and the other software that made these machines so interesting. Running your three lines of machine code isn’t as much fun as playing hunt the wumpus or compiling some Fortran IV code. Unfortunately, finding copies of all this old software can be daunting. But thanks to the efforts of [Rattydave], you can do it with no problems at all. The secret? Pre-built docker images that have everything you need in one place.
The James Webb Space Telescope has had a long and sometimes painful journey from its earliest conception to its ultimate arrival at Lagrange point L2 and subsequent commissioning. Except for the buttery-smooth launch and deployment sequence, things rarely went well for the telescope, which suffered just about every imaginable bureaucratic, scientific, and engineering indignity during its development. But now it’s time to see what this thing can do — almost. NASA has announced that July 12 will be “Image Release Day,” which will serve as Webb’s public debut. The relative radio silence from NASA on Webb since the mirror alignment was completed — apart from the recent micrometeoroid collision, of course — suggests the space agency has been busy with “first light” projects. So there’s good reason to hope that the first released images from Webb will be pretty spectacular. The images will drop at 10:30 AM EDT, so mark your calendars and prepare to be wowed. Hopefully.
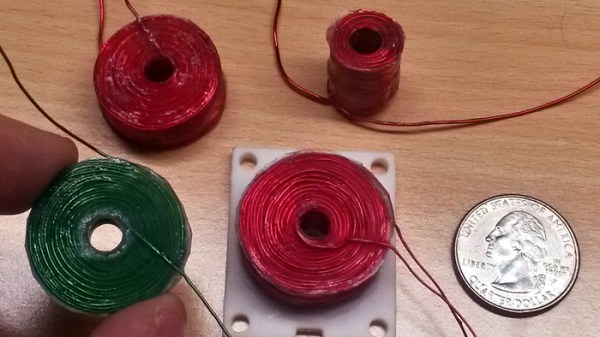
[Drew Pilcher] needed durable, custom-wound coils with no core, and perfectly flat sides. Coils can be wound by hand, of course, but reliably creating perfect coils with thin wire and lots of layers requires some additional help. Happily, [Drew] shares his method for doing exactly that. Perhaps coming as no surprise, the key to repeatable, high-quality coils is good preparation and tools.
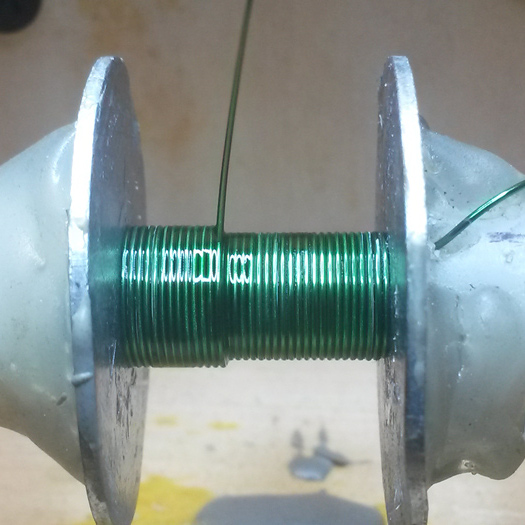
The most important part is the ability to rotate a spool for winding without having to take one’s hands off the workpiece. To accomplish this, a cheap, no-name power drill and foot pedal (made from the harvested trigger unit of the drill) forms the basis of [Drew]’s DIY winder. To make coils with precision, one must also count the number of turns. Thankfully, there is a simple solution for this; [Drew] used a cheap digital turn counter from Amazon. This economical device uses a magnet and sensor, so [Drew] simply stuck the magnet on the side of the drill’s chuck.
Careful winding and a liberal application of CA glue helps ensure good results.
The spool is what the wire gets wound around to form the coil, and it will need to be removed from the coil afterwards. To accomplish this, [Drew] uses a brass shaft, metal washers, and some plastic spacers. A light coating of grease on the spool surfaces helps ensure things come apart properly in the end.
To actually make the coil, [Drew] recommends some means of magnification, and a supply of CA glue. Wind the wire as cleanly and closely as possible, and apply CA glue during the process to secure things. It takes some practice, but really clean windings are possible if done correctly.
For thick coils with a lot of layers, the CA glue will hold things together well enough, but for smaller coils [Drew] likes to give them a final coating of two-part epoxy. After things are completely set, the spool is disassembled and the inner core is pushed out as gently as possible.
The result? A tightly-wound, durable coil with perfectly flat sides. It’s exactly the thing [Drew] needs for his upcoming coil gun project. How’s that work, you wonder? You can see the basics covered right here.
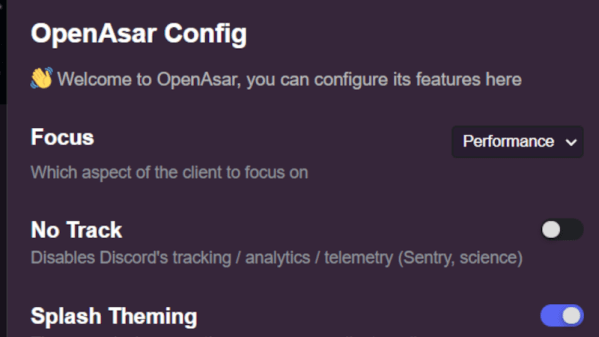
Not all hacking happens on hardware — every now and then, we ought to hack our software-based tools, too. [Ducko] tells us about a partially open-source rewrite of Discord’s Electron-based frontend. Web apps can be hard to tinker with, which is why such projects are to be appreciated. Now, this isn’t a reverse-engineering of Discord’s API or an alternative client per se, but it does offer a hopeful perspective on what the Discord client ought to do for us.
First of all, the client loads noticeably faster, not unlike the famous GTA Online speedup (which was also a user-driven improvement), with channel and server switching made less laggy — and the Linux updater was de-cruft-ified as well. [Ducko] tells us how she got rid of the numerous NPM dependencies of the original code – it turned out that most of the dependencies could be easily replaced with Node.JS native APIs or Linux binaries like unzip. Apart from much-appreciated performance improvements, there are also options like telemetry bypass, and customization mechanisms for your own theming. You won’t get Discord on your Apple ][ just yet, but the native client will be a bit friendlier towards you.
It sounds like a rhetorical question that a Midwestern engineer might ask, something on the order of ‘can you fix this bad PCB spin?’ [Tom Stanton] sets out to answer the title question and ends up building a working e-bike with a drone motor.
You might be thinking, a motor is a motor; what’s the big deal? But a drone motor and a regular e-bike motor are made for very different purposes. Drone motors spin at 30,000 RPM, and an e-bike hub motor typically does around 200-300 RPM while being much larger. Additionally, a drone motor goes in short spurts with a large fan blowing right on it, and an e-bike motor can run almost continuously.
The first step was to use gears and pulleys to reduce the RPM on the motor to provide more torque. A little bit of CAD and 3D printing later, [Tom] had a setup ready to try. However, the motor quickly burned out. With a slightly bigger motor and more gear reduction, version 2 performed remarkably well. After the race between a proper e-bike and the drone bike, the coils were almost melted.
If you’re thinking about making your bike electric, we have some advice. We’ll throw in a second piece of advice for free: use a larger motor than the drone motor, even though it technically works. Video after the break.
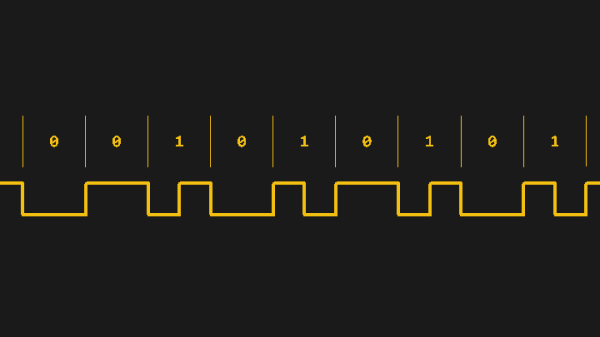
We often take our “SoftwareSerial” libraries for granted, and don’t investigate what goes on under the hood — until they fail us, at least. Would you like to learn how to harness the power of interrupt-driven bitbanging? [Jim Mack] teaches us how to make our protocol implementations fly using the LTC protocol as a springboard.
LTC (Linear/[Longitudinal] TimeCode) is a widely-used and beautifully-crafted protocol that tends to fly under our radar, and is one that hackers could learn plenty from. It’s used for synchronization of audio/video devices during media production and playback. LTC’s signal is almost digital but not quite: it doesn’t need a clock, and it has no polarity. Additionally, it mimics an audio signal really well, you can decode it at any playback speed, and many other benefits and quirks that [Jim] outlines. You do need to maintain the timings, though, and [Jim]’s article shows us how to keep them right while not inconveniencing your primary tasks.
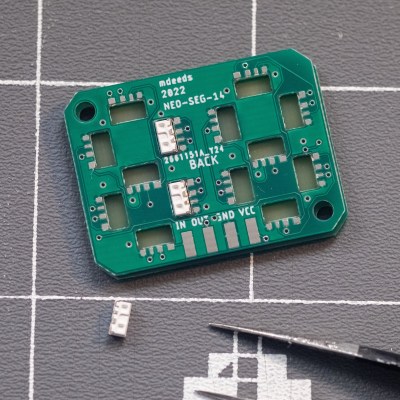
While 7-segment displays are all well and good, they’re considered a bit old hat these days. This project from [Matt Deeds] brings them screaming into the future, though, sporting every color under the rainbow.
[Matt’s] build consists of a PCB filled with SK6812 side-mount LEDs, laid out in a typical 7-segment pattern. Each PCB features two 7-segment digits. The SK6812 LEDs can be driven in the same way as the famous WS2812B addressable LEDs, though they have the benefit of being more stable in color and brightness over a range of supply voltages.
With the LEDs installed, and a second PCB used solely as a diffuser by leaving out sections of solder mask, it’s a compact 7-segment solution at just 2.7 mm thick. The bonus is that each segment can be set to a different color thanks to the nature of the addressable RGB LEDs. Going too ham in this regard will make the displays difficult to read, but it can be used to easily display green, red, or yellow numbers, for example, to create a visual guide to a numerical range.
It’s a great build, and we love to see 7-segment displays re-imagined in different ways – even mechanically! It also takes fewer pins to drive compared to the old way of doing things in the non-addressable LED era. If you’ve got your own neat 7-segment projects under development, please do let us know!


 [Matt’s] build consists of a PCB filled with SK6812 side-mount LEDs, laid out in a typical 7-segment pattern. Each PCB features two 7-segment digits. The SK6812 LEDs can be driven in the same way as the famous WS2812B addressable LEDs, though they have the benefit of being more stable in color and brightness over a range of supply voltages.


