Taking Apart IKEA’s Latest Air Quality Sensor

Whether it’s because they’re concerned about worsening pollution or the now endemic variants of COVID-19, a whole lot of people have found themselves in the market for a home air quality monitor thee last couple of years. IKEA noted this trend awhile back, and released the VINDRIKTNING sensor to capitalize on the trend.

The device must have sold pretty well, because last month the Swedish flat-packer unveiled the considerably more capable (and more expensive) VINDSTYRKA. Now thanks to the efforts of [Oleksii Kutuzov] we’ve got a fantastic teardown of the new gadget, and some more information on the improvements IKEA made over its predecessor.
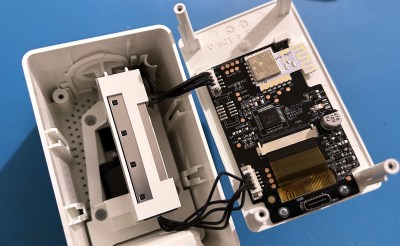
Certainly the most obvious upgrade is the addition of an LCD readout that displays temperature, humidity, and how many particulates the device detected in the air. There’s even a “traffic light” colored indicator to show at a glance how bad your air supply is. The other big change is the addition of wireless, though unlike the WiFi hacks we saw for the VINDRIKTNING, this built-in capability uses Zigbee and is designed to plug into IKEA’s own home automation ecosystem.

Speaking of those hacks, a GitHub user by the name of [MaartenL] chimes in to say they’ve managed to hook an ESP32 up to test pads on the VINDSTYRKA motherboard, allowing the parasitic microcontroller to read the device’s sensors and report their data on the network over a service like MQTT, without impacting the sensor’s normal operations. This is how the first hacks on the older VINDRIKTNING were pulled off, so sounds like a promising start.

But even if you aren’t looking to modify the device from its original configuration (how did you find this website?), it seems pretty clear the VINDSTYRKA is a well-built piece of kit that will serve you and your family well. Which is more than what could be said for some of the cheapo environmental sensors flooding the market.

Thanks to [killergeek] for the tip.

Robot Hand Looks And Acts Like The Real Thing

Throughout history, visions of the future included human-looking robots. These days we have plenty of robots, but they don’t look like people. They look like disembodied arms, cars, and over-sized hockey pucks concealing a vacuum cleaner. Of course there’s still demand for humanoid robots like Commander Data, but there are many challenges: eyes, legs, skin, and hands. A company known as Clone may have the solution for that last item. The Clone Hand is “the most human-level musculoskeletal hand in the world,” according to the company’s website.

The 0.75 kg hand and forearm offer 24 degrees of freedom and two hours of battery life. It sports 37 muscles and carbon fiber bones. The muscle fibers can cycle over 650,000 times. You can watch the hand in action in the video below.

There is a hydraulic pump that the company likens in size to a human heart. The hand can also sense for feedback purposes. If you want to build your own, you’ll have to figure it out yourself. The Clone Hand is proprietary, but it does show what is in the art of the possible. The company claims they cost under $3,000, but it isn’t clear if that’s their cost or a projected future retail price.

Of course, human hands aren’t always the perfect robot manipulator. But when you need a realistic hand, you really need it. We see a lot of attempts at realistic hands, and we have to say they are getting better.

Continue reading “Robot Hand Looks And Acts Like The Real Thing”

Hackaday Berlin: Final Schedule, Last Call For Tickets, And More

Hackaday Berlin is just about a week away, and we’ve just put the finishing touches on our preparations. And that includes a snazzy landing page, the full schedule, details on the Friday night meetup, and more.

We’ll be meeting up Friday the 24th at 19:00 at DogTap / Brew Dog, Im Marienpark 23 for an ice breaker. This is a great time to unwind from your travels, catch up with old friends, and start getting into gear for the days ahead.

Saturday the 25th starts off at 9:30, you’ll get your badge and schwag bag, and have some breakfast. Then it’s talks, workshops, lightning talks, badge hacking, food and music until the wee hours.

Sunday morning starts up again at 11:00, but it’ll feel like 10:00 due to Daylight Savings time. We’ll have brunch, show off whatever cool hacks you’ve brought along, and just generally chill out into the afternoon. Some people are planning to go sightseeing around Berlin afterwards, so if that’s your thing, you’re in good company.

For any chat related to Hackaday Berlin, we have a not-so-cryptically named #Berlin channel over on the Hackaday Discord server.

There are still a few tickets left, so you procrastinators, now’s your time to snap them up. All the rest of you, put those finishing touches on whatever you’re bringing with you, and we’ll see you next week!

(Oh, and press the play button on the landing page.)

Dobsonian Telescope Adds Plate Solver

The amateur astronomy world got a tremendous boost during the 1960s when John Dobson invented what is now called the Dobsonian telescope. Made from commonly-sourced materials and mechanically much simpler than what was otherwise available at the time, the telescope dramatically reduced the barrier to entry for larger telescopes and also made them much more portable and inexpensive.

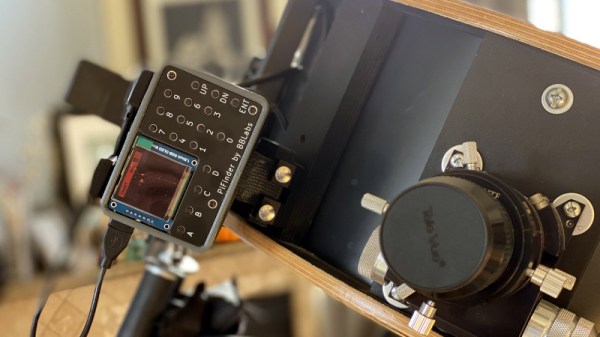
For all their perks, though, a major downside is increased complexity when building automatic tracking systems. [brickbots] went a different way when solving this problem, though: a plate solver.

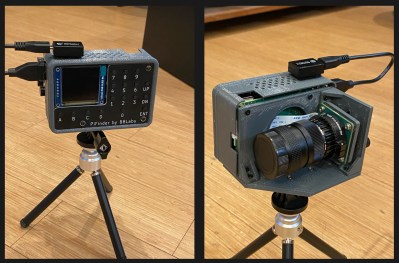
Plate solving is a method by which the telescope’s field of view is compared to known star charts to determine what it’s currently looking at. Using a Raspberry Pi at the center of the build, the camera module pointed at the sky lets the small computer know exactly what it’s looking at, and the GPS system adds precise location data as well for a quick plate solving solution. A red-tinted screen finishes out the build and lets [brickbots] know exactly what the telescope is pointed towards at all times.

While this doesn’t fully automate or control the telescope like a tracking system would do, it’s much simpler to build a plate solver in this situation. That doesn’t mean it’s impossible to star hop with a telescope like this, though; alt-azimuth mounted telescopes like Dobsonians just need some extra equipment to get this job done. Here’s an example which controls a similar alt-azimuth telescope using an ESP32 and a few rotary encoders.

The X Macro: A Historic Preprocessor Hack

If we told you that a C preprocessor hack dated back to 1968, you’d be within your rights to remind us that C didn’t exist in 1968. However, assemblers with preprocessors did, and where there is a preprocessor, there is an opportunity to do clever things. One of those things is the so-called X macro, which saw a lot of use in DEC System 10 code but probably dates back even earlier. You can still use it today if you like, even though there are, of course, other arguably better ways to get the same result. However, the X macro can be very efficient, and you may well run into it in some code, too.

Background

Preprocessing used to be a staple of programming. The idea is that code is manipulated purely at the text level before it is compiled. These days, languages with a preprocessor usually handle it as part of the compiler, but you can also use an external preprocessor like m4 for more sophisticated uses.

Modern languages tend to provide other ways to accomplish many of the tasks handled by the preprocessor. For example, if you have a constant you want to set at compile time, you could say:

int X = 32;
y = X;

But then you’ve created a real variable along with the overhead that might entail. A smart compiler might optimize it away for you, but you can be sure by writing:

#define X 32
y = X;

A modern compiler would prefer you to write:

const int X=32;
y = X;

But there are still some common uses for macros, like including header files. You can also make more sophisticated macros with arguments so you don’t incur a function call penalty, although modern usage would be to mark those functions as inline.

The Problem

Which brings us to the X macro. With all great hacks, there is first a problem to solve. Imagine you have a bunch of electronic parts you want to deal with in your code. You don’t want a database, and you don’t want to carry a bunch of strings around, so you define an enumerated type:

Continue reading “The X Macro: A Historic Preprocessor Hack”

Laser And Webcam Team Up For Micron-Resolution Flatness Measurements

When you want to measure the length, breadth, or depth of an object, there are plenty of instruments for the job. You can start with a tape measure, move up to calipers if you need more precision, or maybe even a micrometer if it’s a really critical dimension. But what if you want to know how flat something is? Is there something other than a straightedge and an eyeball for assessing the flatness of a surface?

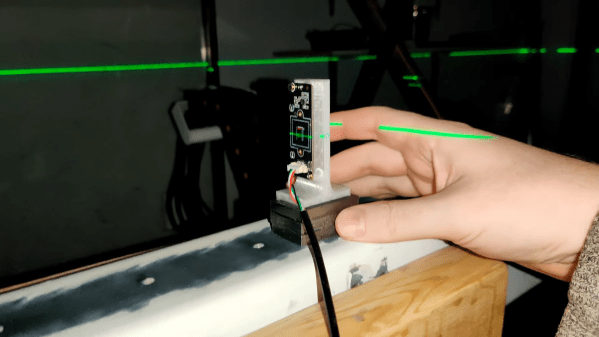
As it turns out, there is: a $15 webcam and a cheap laser level will do the job, along with some homebrew software and a little bit of patience. At least that’s what [Bryan Howard] came up with to help him assess the flatness of the gantry he fabricated for a large CNC machine he’s working on.

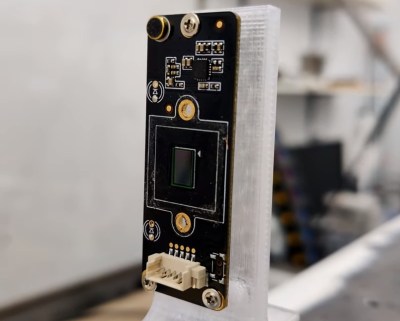
The gantry arm is built from steel tubing, a commodity product with plenty of dimensional variability. To measure the microscopic hills and valleys over the length of the beam, [Bryan] mounted a lens-less webcam to a block of metal. A cheap laser level is set up to skim over the top of the beam and shine across the camera’s image sensor.

On a laptop, images of the beam are converted into an intensity profile whose peak is located by a Gaussian curve fit. The location of the peak on the sensor is recorded at various points along the surface, leading to a map of the microscopic hills and valleys along the beam.

As seen in the video after the break, [Bryan]’s results from such a quick-and-dirty setup are impressive. Despite some wobblies in the laser beam thanks to its auto-leveling mechanism, he was able to scan the entire length of the beam, which looks like it’s more than a meter long, and measure the flatness with a resolution of a couple of microns. Spoiler alert: the beam needs some work. But now [Bryan] knows just where to scrape and shim the surface and by how much, which is a whole lot better than guessing.   Continue reading “Laser And Webcam Team Up For Micron-Resolution Flatness Measurements”

Wooden ITX PC Case Smacks Of Sophistication

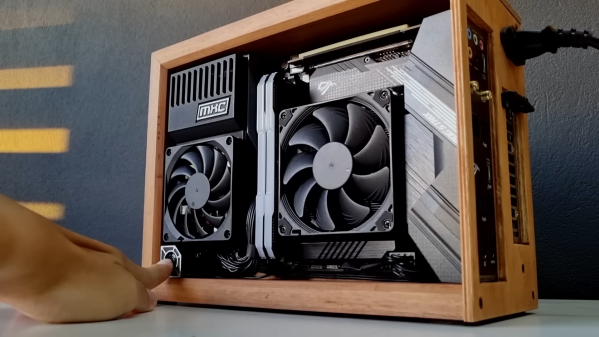
Computer cases have come a long way from the ugly beige boxes of the early 2000s. Still, if it was going to sit on his desk, [MXC Builds] wanted something with a little more class. His custom Ironbark ITX PC seems to fit the aesthetic nicely.

The case’s outer shell is ironbark wood cut at 45 degrees and joined for a beautiful waterfall edge (the wood grain seems to flow uninterrupted). The power supply was heavily modified to take a thinner but larger fan, and a new cover and intake grill were 3D printed. As there were no mounting holes on the bottom of the power supply, he printed a bracket with spring clips to hold the PSU securely. Next, he routed a PCI riser cable to the other side of the internal panel so the GPU could mount on the back. He cut custom cables to match up the lengths needed for every run. Finally, rather than placing the power button on the front or top, it was on the side in a custom bracket.

It’s an absolutely gorgeous build that packs some respectable hardware in a tiny space (7.9 L or ~482 in3). The use of 3D printed parts and careful planning results in an incredibly tidy computer that most would proudly display on their desk. It is an open-air case, and if you’re looking for something a little more enclosed, perhaps this mid-century PC might whet your appetite.

Continue reading “Wooden ITX PC Case Smacks Of Sophistication”