Ham Almost Cooks ‘Dog

For those of us licensed in other countries it comes as something of a surprise to find that American radio amateurs now have to run RF exposure calculations as part of their licence requirements. [Ham Radio Crash Course] as approached this in a unique fashion, by running around 800 watts of 6-metre power into a vertical antenna festooned with hotdogs. That’s right, this ham is trying to cook some ‘dawgs! Is his station producing dangerous levels of power that might cook passers-by?

Of course, aside from a barely-warmed line along where the ‘dogs were attached to the antenna there’s no heating to be found. But we think he’s trying to make the point in the video below the break about the relative pointlessness of applying RF field limits which are definitely relevant at much higher frequencies, to hams at low frequencies.

It leaves us curious as to how that 800 watts could be efficiently transferred into the sausages and really cook them. Strapping them to a vertical is we think the equivalent of strapping anything resistive to a conductor, they do not form a significant  enough part of the circuit. We think that even six metres could cook a sausage if it could be efficiently coupled into it, so we’d suggest putting a grounded sausage up the middle of a close-wound helix.

If you have any thoughts on the RF exposure calculations, or on the best way to cook a ‘dog with 6m, we’d love to hear the, in the comments. Meanwhile, this isn’t the first piece of ‘dog-based shenanigans we’ve brought you.

Continue reading “Ham Almost Cooks ‘Dog”

Diagram of the Sun. (Credit: Kelvinsong)

Parker Solar Probe’s Confirmation Of Interchange Reconnection Being The Source Of Fast Solar Wind

Although experimental verification is at the heart of the scientific method, there is quite a difficulty range when it comes to setting up such an experiment. Testing what underlies the formation of the fast solar winds that are ejected from coronal holes in the Sun’s corona is one of these tricky experimental setups. Yet it would seem that we now have our answer, with a newly published paper in Nature by S. D. Bale and colleagues detailing what we learned courtesy of the Parker Solar Probe (PSP), which has been on its way to the Sun since it was launched in August of 2018 from Earth.

Artist rendition of the Parker Solar Probe. (Credit: NASA)

The Sun’s solar wind is the name for a stream of charged particles which are ejected from the Sun’s corona, with generally two types being distinguished: slow and fast solar winds. The former type appears to originate from the Sun’s equatorial belt and gently saunters away from the Sun at a mere 300 – 500 km/s with a balmy temperature of 100 MK.

The fast solar wind originates from coronal holes, which are temporary regions of cooler, less dense plasma within the corona. These coronal holes are notable for being regions where the Sun’s magnetic field extends into interplanetary space as an open field, along which the charged particles of the corona can escape the Sun’s gravitational field.

These properties of coronal holes allow the resulting stream to travel at speeds around 750 km/s and a blistering 800 MK. What was unclear up till this point was exactly what powers the acceleration of the plasma. It was postulated that the source could be wave heating, as well as interchange reconnection, but with the PSP now close enough to perform the relevant measurements, the evidence points to the latter.

Essentially, interchange reconnection is the reestablishing of a coronal hole’s field lines after interaction with convection cells on the Sun’s photosphere. These convection cells draw the magnetic field into a kind of funnel after which the field lines reestablish themselves, which results in the ejection of hotter plasma than with the slow solar wind. Courtesy of the PSP’s measurements, measured fast solar winds could be matched with coronal holes, along with the magnetic fields. This gives us the clearest picture yet of how this phenomenon works, and how we might be able to predict it.

(Heading image: Diagram of the Sun. (Credit: Kelvinsong) )

Google Home Scripting

It is always controversial to have home assistants like the ones from Google or Amazon. There are privacy concerns, of course. Plus they maddeningly don’t always do what you intend for them to do. However, if you do have one, you’ve probably thought about something you wanted to do that would require programming. Sure, you can usually do a simple list, but really writing code wasn’t on the menu. But now, Google Home will allow you to write code. Well, at least script using a YAML file.

The script language is available in the web app and if you opt in on the mobile app as well. There’s a variety of ways you can trigger scripts and many examples you can start with.

Continue reading “Google Home Scripting”

It’s Never Too Late To Upgrade Your ZX81 Keyboard

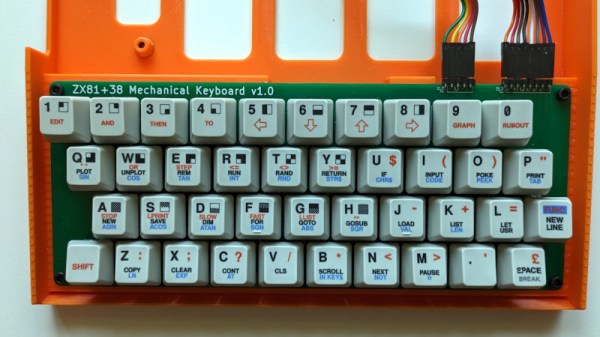
Sir Clive Sinclair’s ZX81 was a phenomenal sales success as one of the cheapest machines available in the early 1980s, but even its most fervent admirers will admit that it suffered heavily from the Sinclair economy drive. In particular that membrane keyboard was notorious for its lack of feedback, and a popular upgrade back in the day was a replacement keyboard. Now we can bring you what might be the ultimate in ZX replacement keyboards, in the form of [Brian Swetland]’s mechanical ZX81 keyboard.

The familiar 40-key layout is all there, using Cherry MX key switches and a beautiful set of custom-printed keycaps. There’s little more to a ZX keyboard than the matrix wiring, and in this case it’s all incorporated on a PCB. None of these techniques were readily available to individuals back in the ’80s, so a large piece of perfboard, key switches from an old terminal keyboard, and Letraset would have had to suffice.

We have to admit liking this project a lot, in fact we’re even tempted by a set of these keycaps for a regular keyboard just for old time’s sake. If you’re interested in the ZX81 then take a look at how we used one to help us through the pandemic.

Updated OSHW Flash Drive Keeps Data Safe, Fingers Dry

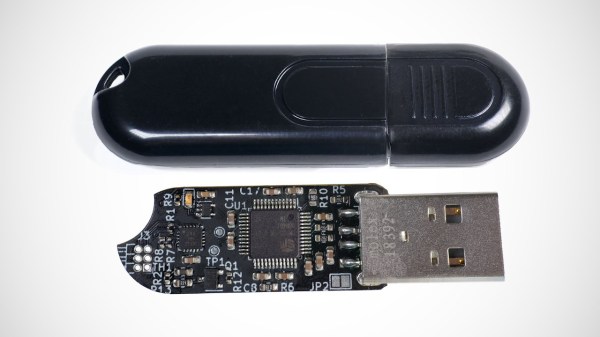
For almost a year now, we’ve been following the progress [Walker] has been making with Ovrdrive — a completely open source USB flash drive that features the ability to destroy itself should it fall into the wrong hands. It’s an interesting enough project on those merits alone, but what really made this idea stand out was that the user was expected to lick their fingers before handling the drive as a form of covert authentication.

Well, we’ve got some good news and some bad news. The good news is that [Walker] is just about ready to release the Ovrdrive officially on Crowd Supply. But it’s with a heavy heart that we must report that the device’s cutting edge spit-detection capabilities have been removed. Now if you want to preserve the drive’s files, you need to rapidly insert and remove the drive several times rather than just plugging it in.

In all seriousness, this new approach makes a lot more sense. As entertaining as it might have been, the whole idea of a device that could detect moisture on the user’s fingers was fraught with problems. It was a bit more of a meme than a real solution, and if we’re being honest, kind of disgusting. This new approach sounds far more reliable, especially when combined with the new “Lite” self-destruct mode.

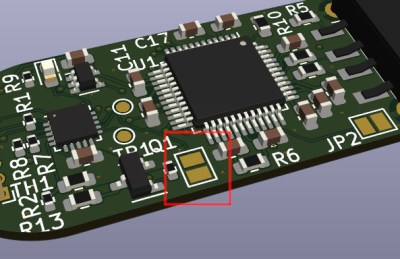
While the original capability of literally frying the flash chip by way of several capacitors and a voltage doubler is still here, there’s also a non-destructive approach that’s enabled by default. Unless you open up the drive and desolder the jumper pad on the PCB, the onboard ATtiny24A will simply use the enable pin on the flash chip to make it appear empty. This means that you’ve got to really want to cook your flash chip on the first hint of funny business.

Ultimately, whether it’s self-destructing or not, we just really like the idea of a hacker-developed open source hardware USB flash drive. Admittedly it would be a lot cheaper and more practical to just buy one like a normal person, but we strongly believe that if there’s a way for the community to build a OSHW version of something, they should at least give it a shot.

Continue reading “Updated OSHW Flash Drive Keeps Data Safe, Fingers Dry”

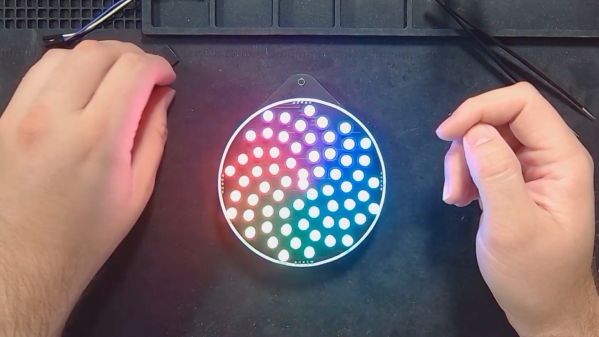
A black work mat holds a circular badge with 64 addressable LEDs in a spiraling shape akin to the center of a sunflower. The LEDs have a rotating rainbow spiraling around the circle with red touching violet on one end. The colors extend in bands from the center to the rim of the circle.

Math You Can Wear: Fibonacci Spiral LED Badge

Fibonacci numbers are seen in the natural structures of various plants, such as the florets in sunflower heads, areoles on cacti stems, and scales in pine cones. [HackerBox] has developed a Fibonacci Spiral LED Badge to bring this natural phenomenon to your electronics.

To position each of the 64 addressable LEDs within the PCB layout, [HackerBox] computed the polar (r,θ) coordinates in a spreadsheet according to the Vogel model and then converted them to rectangular (x,y) coordinates. A little more math translates the points “off origin” into the center of the PCB space and scale them out to keep the first two 5 mm LEDs from overlapping. Finally, the LED coordinates were pasted into the KiCad PCB design file.

An RP2040 microcontroller controls the show, and a switch on the badge selects power between USB and three AA batteries and a DC/DC boost converter. The PCB also features two capacitive touch pads. [HackerBox] has published the KiCad files for the badge, and the CircuitPython firmware is shared with the project. If C/C++ is more your preference, the RP2040 MCU can also be programmed using the Arduino IDE.

For more details on beautiful RGB lights, we’ve previously presented Everything You Might Have Missed About Addressable LEDs, and for more details on why they can be so fun to wear, check out our Hackaday Badgelife Documentary.

(Editor’s note: HackerBox makes and sells kits, is run by Hackaday Contributor [Joseph Long] IRL.)

Continue reading “Math You Can Wear: Fibonacci Spiral LED Badge”

Linux Fu: Easy And Easier Virtual Networking

One of the best things about Linux is that there are always multiple ways to do anything you want to do. However, some ways are easier than others. Take, for example, virtual networking. There are plenty of ways to make a bunch of Internet-connected computers appear to be on a single private network. That’s nothing new, of course. Linux and Unix have robust networking stacks. Since 2018, though, Wireguard has been the go-to solution; it has a modern architecture, secure cryptography, and good performance.

There’s only one problem: it is relatively difficult to set up. Not impossible, of course. But it is a bit difficult, depending on what you want to accomplish.

How Difficult?

You must set up a wireguard server and one or more clients. You’ll need to pick a range of IP addresses. You might need to turn on routing. You have to generate keys. You might need to configure DNS and other routing options. You’ll certainly need to modify firewall rules. You’ll also need to distribute keys.

None of these steps are terribly difficult, but it is a lot to keep straight. The wg program and wg-quick script do most of the work, but you have a lot of decisions and configuration management to keep straight.

Browse the official “quick start,” and you’ll see that it isn’t all that quick. The wg-quick script is better but only handles some use cases. If you want really limited use cases, there are third-party tools to do a lot of the rote work, but if you need to change anything, you’ll still need to figure it all out.

That being said, once you have it set up, it pretty much works without issue and works well. But that initial setup can be very frustrating. Continue reading “Linux Fu: Easy And Easier Virtual Networking”