Horror Instrument Is Truly Astounding To Listen To

Truly new musical instruments don’t come along every day; much of the low hanging fruit has already been taken. [Simon the Magpie] has been working on something that’s just a little innovative, and built what he refers to as an “Incredible Horror Instrument.” It’s all about feedback.

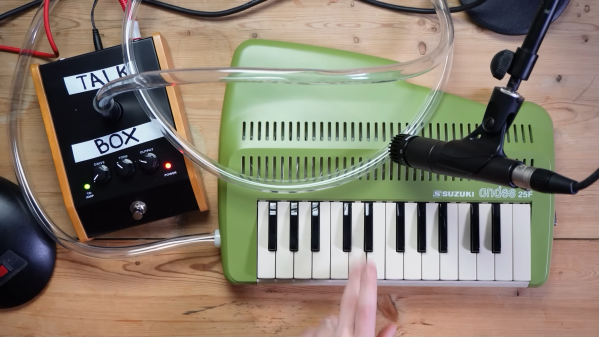
The build started with the Suzuki Andes 25F, a so-called “keyboard recorder.” It has the appearance of a melodion but produces flute-like sounds. [Simon]’s idea was to combine the breath-powered instrument with a talk box. If you’re unfamiliar, a talk box is designed for playing amplified guitar sounds through a tube that is placed in a player’s mouth so they can “shape” the guitar sound with their mouth.

In this role, though, the talk box’s input is hooked up to a microphone which captures the output of the Andes 25F. It then plays this back through a tube connected to the breath input of the Andes 25F. [Simon] thus created a feedback look that can effectively be “played” via the keyboard on the Andes 25F.

The audible results are eerie and haunting, and seem more than fitting for even a well-budgeted horror film. [Simon] also demonstrates some neat possibilities when combining the setup with a further feedback loop that feeds in other tones.

We’ve covered [Simon’s] work before; it’s often noisy and always entertaining. Video after the break.

Continue reading “Horror Instrument Is Truly Astounding To Listen To”

PicoDebugger Makes Development Easier

Debugging a Raspberry Pi Pico is straightforward enough; it simply involves hooking up something up to the USB and SWD pins. [Mark Stevens] whipped up the PicoDebugger to make this job easier than ever before.

The Raspberry Pi Foundation developed the Picoprobe system to allow a RP2040 to act as a USB to SWD and UART bridge for debugging another Pico or RP2040. The problem is that hooking it up time and time again can be fussy and frustrating.

To get around this, [Mark] whipped up the PicoDebugger board, which directly connects most of the important pins for you. Drop a Pico into the “Target” slot, and you can hook up the PicoDebugger to its UART lines with the flick of a DIP switch. The SWD pins can then also be connected via jumpers if so desired.  It also features a 2×20-pin header to allow the target to be wired into other hardware as necessary.

It’s a neat project, and it certainly beats running a bird’s nest of jumper wires every time you want to debug a Pico project. Simply dropping a board in is much more desirable.

We’ve seen some other neat debug tools over the years, too. If you’ve got your own development productivity hacks in the works, don’t hesitate to let us know!

AC-DC Converter Is Reliable, Safe, And Efficient

When first starting an electronics project, it’s not uncommon to dive right in to getting the core parts of the project working. Breadboarding the project usually involves working with a benchtop power supply of some sort, but when it comes to finalizing the project the actual power supply is often glossed over. It’s not a glamorous part of a project or the part most of us want to be working with, but it’s critical to making sure projects don’t turn up with mysterious issues in the future. We can look to some others’ work to simplify this part of our projects, though, like this power supply from [hesam.moshiri].

The power supply is designed around a switch-mode topology known as a flyback converter. Flyback converters work by storing electrical energy in the magnetic field of a transformer when it is switched on, and then delivering that energy to the circuit when it is switched off. By manipulating the switching frequency and turns ratios of the transformer, the circuit can have an arbitrary output voltage. In this case, it is designed to take 220V AC and convert it to 8V DC. It uses a simplified controller chip to decrease complexity and parts count, maintains galvanic isolation for safety, and is built to be as stable as possible within its 24W power limitation to eliminate any potential issues downstream.

For anyone trying to track down electrical gremlins in a project, it’s not a bad idea to take a long look at the power supply first. Any noise or unwanted behavior here is likely to cause effects especially in projects involving sensors, ADC or DAC, or other low-voltage or sensitive components. The schematic and bill of materials are available for this one as well, so anyone’s next project could use this and even make slight adjustments to change the output voltage if needed. And, if this is your first introduction to switched-mode power supplies, check out this in-depth look at the similar buck converter circuit to better understand what’s going on behind the scenes on these devices.

Continue reading “AC-DC Converter Is Reliable, Safe, And Efficient”

Building A Digital Compass With An Arduino

The magnetic compass has been a crucial navigational tool for around a thousand years or so, perhaps longer. While classical versions still work perfectly well, you can now get digital magnetometers that work in much the same way. [mircemk] decided to whip up a digital compass to demonstrate the value of these parts.

The build uses a HMC5883L magnetometer. While this can detect magnetic fields in three axes, just one is necessary for building a device that operates akin to a traditional compass. The output of the device is read by an Arduino Nano, which is hooked up to a string of WS2812B LEDs and a small OLED display. The LEDs display the bearing of magnetic north, while the OLED screen shows the current angle between the compass’s arrow and magnetic north.

It’s a tidy build that would be a great educational resource for teaching both electronics and navigational skills. We’ve seen similar projects before, like the hilarious Pizza Compass. Video after the break.

Continue reading “Building A Digital Compass With An Arduino”

No Acid: Open ICs With A Tesla Coil

We’ve taken ICs apart before, but if they are in an epoxy package, it requires some lab gear and a lot of safety. Typically, you’ll heat the part and use fuming nitric acid (nasty stuff) in a cavity milled into the part to remove the epoxy over the die. While [100dollarhacker] doesn’t provide much detail, he appears to have used a Tesla coil to do it — no hot acid required.

Initial results were promising but took a long time to work. In addition, the coil gets very hot, and there is a chance of flames. The next attempt used a 3D printed cone with a fan to push the plasma over the chip. The first attempt shorted something out, and so far, each attempt eventually burns out the MOSFET driver.

We are always interested in the practical uses of Tesla coils and what’s inside ICs, so this project naturally appealed to us. We hope to see more success reported on the Hackaday.io page soon. Meanwhile, if you have a coil and an old IC lying around, try it. Maybe you’ll figure out how to make it work well and if you do, let us know.

The easiest chips to open are ceramic packages with a gold lid. Just use a hobby knife. There are less noxious chemicals you can use. If you want to use fuming nitric, be sure you know what you are doing and maybe make some yourself.

Discussing The Tastier Side Of Desktop 3D Printing

Not long after the first desktop 3D printers were created, folks started wondering what other materials they could extrude. After all, plastic is only good for so much, and there’s plenty of other interesting types of goop that lend themselves to systematic squirting. Clay, cement, wax, solder, even biological material. The possibilities are vast, and even today, we’re still exploring new ways to utilize additive manufacturing.

Ellie Weinstein

But while most of the research has centered on the practical, there’s also been interest in the tastier applications of 3D printing. Being able to print edible materials offers some fascinating culinary possibilities, from producing realistic marbling in artificial steaks to creating dodecahedron candies with bespoke fillings. Unfortunately for us, the few food-safe printers that have actually hit the market haven’t exactly been intended for the DIY crowd.

That is, until now. After nearly a decade in development, Ellie Weinstein’s Cocoa Press chocolate 3D printer kit is expected to start shipping before the end of the year. Derived from the Voron 0.1 design, the kit is meant to help those with existing 3D printing experience expand their repertoire beyond plastics and into something a bit sweeter.

So who better to host our recent 3D Printing Food Hack Chat? Ellie took the time to answer questions not just about the Cocoa Press itself, but the wider world of printing edible materials. While primarily designed for printing chocolate, with some tweaks, the hardware is capable of extruding other substances such as icing or peanut butter. It’s just a matter of getting the printers in the hands of hackers and makers, and seeing what they’ve got an appetite for.

Continue reading “Discussing The Tastier Side Of Desktop 3D Printing”

CP/M Porting In A Few Hours

If you’ve ever wanted to watch someone bring CP/M up on a new system and you have a couple of hours to spare, check out the recorded live stream of [Poking Technology]. The system in question is an Agon Light, a modern board with a Z-80-derived CPU. If you want to get right to the porting part, you might want to skip about 31 minutes of the nearly 2.5-hour video.

The first half hour is more about the built-in assembler and the board in general. If you’ve ever ported CP/M before, you know it isn’t as hard as bootstrapping a modern operating system. There are two major things you need: A BIOS, which is specific to your machine, and a BDOS, which is usually taken verbatim from the operating system sources. Your programs typically call one of the 40 or so functions in the BDOS.

Continue reading “CP/M Porting In A Few Hours”