There’s Already A Nixie Addon For The 2024 Supercon Badge

Nixie tubes are cool, and hackers like them. Perhaps for those reasons more than any other, [Kevin Santo Cappuccio] has developed a very particular Simple Add-On for the 2024 Hackaday Supercon badge.
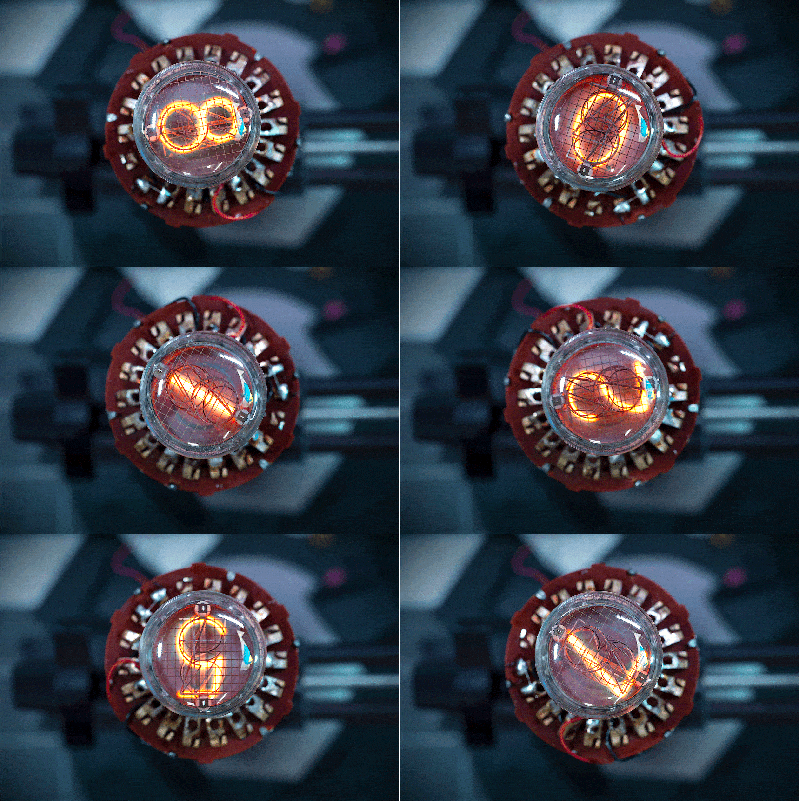
Rad, no?

The build began with a Burroughs 122P224 Nixie tube, and a HV8200 power supply. The latter component is key—it’s capable of turning voltages as low as 3 V into the 180V needed to power a Nixie. Then, an 18-position selector switch was pulled out of a resistance substitution box, and [Kevin] whipped up a basic DIY slip ring using some raw copper clad board.

Smoosh it all together, and what do you get? It’s a Nixie tube you can spin to change the number it displays. Useful? Hardly, unless you want to display varying glowing numbers to people at unreadable angles. Neat? Very. Just don’t touch any of the pins carrying 180 V, that’ll sting. Still, [Kevin] told us it’s pretty tucked away. “I’m totally comfortable touching it, but also would get sued into oblivion selling these on Amazon,” he says.

As [Kevin] notes in his post, the 2024 badge is all about the add-ons— and there’s actually a contest! We suspect [Kevin] will have a strong chance of taking out the Least Manufacturable title.

If you need more information about the Simple Add-On (SAO) interface, [Brian Benchoff] posted the V1.69bis standard on these very pages back in 2019. Apparently the S used to stand for something else. Video after the break.

Continue reading “There’s Already A Nixie Addon For The 2024 Supercon Badge”

Back Up Your Data On Paper With Lots Of QR Codes

QR codes are used just about everywhere now, for checking into venues, ordering food, or just plain old advertising. But what about data storage? It’s hardly efficient, but if you want to store your files in a ridiculous paper format—there’s a way to do that, too!

QR-Backup was developed by [za3k], and is currently available as a command-line Linux tool only. It takes a file or files, and turns them into a “paper backup”—a black-and white PDF file full of QR codes that’s ready to print. That’s legitimately the whole deal—you run the code, generate the PDF, then print the file. That piece of paper is now your backup. Naturally, qr-backup works in reverse, too. You can use a scanner or webcam to recover your files from the printed page.

Currently, it achieves a storage density of 3KB/page, and [za3k] says backups of text in the single-digit megabyte range are “practical.” You can alternatively print smaller, denser codes for up to 130 KB/page.

Is it something you’ll ever likely need? No. Is it super neat and kind of funny? Yes, very much so.

We’ve seen some other neat uses for QR codes before, too—like this printer that turns digital menus into paper ones. If you’ve got your own nifty uses for these attractive squares, let us know!

A Simon game built into an ATtiny84 in a DIP-14 package.

2024 Tiny Games Contest: Spectacular Sub-Surface Simon

When you work with tiny things on the regular, they start to seem normal-sized to your hands and eyes. Then, if you work with even smaller packages, stuff like 0603 might as well be through-hole components.

Soldering fine wires to the leadframe of an ATtiny84 in a DIP-14 package.[alnwlsn] is no stranger to the small, having worked almost exclusively with surface mount components for a few years now. Even so, they’ve built up an admirable stock of DIP chips, including the ATtiny84 DIP-14 that their incredible Simon game is built into.

How in the world did [alnwlsn] accomplish this? As you’ll see in the video after the break, the answer lies in milling, but with the motors disconnected and manually turning the knobs.

Soldering didn’t require anything special, just the usual suspects like a fine-tipped iron, an X-acto knife, some tweezers, and a few other things like a hot air gun for soldering fine wires to the leadframe. Oh, and of course, really steady hands, and lots of patience.

The 2024 Tiny Games Contest officially closed on Tuesday, September 10th. We’ll have the results out as soon as possible. Best of luck to all who entered!

Continue reading “2024 Tiny Games Contest: Spectacular Sub-Surface Simon”

Digital Bumper Sticker Tells Everyone What You’re Listening To

Bumper stickers are usually political, crude, or otherwise inflammatory. Rather a more fun example is this digital creation from [Guy Dupont], who made a bumper sticker that broadcasts what he’s listening to on the stereo.

[Guy] found a nice wide 11-inch bar LCD that was the right aspect ratio to suit the “bumper sticker” aesthetic. It had an HDMI interface, so he decided to drive it with a Raspbery Pi Zero 2W. Power for the system was derived from 12-volt lines going to his vehicle’s rear view camera. For an enclosure, he simply stuck the Pi and a buck converter on the back of the display and heat shrinked the whole thing. He also threw some magnets in there to stick it to the car.

How does the screen know what song to display? Well, [Guy] already has his Spotify listens scrobbling to Last.fm. Thus, he just made a script that scrapes his Last.fm page, which runs on a Particle Boron microcontroller, which has a cellular connection of its own. The Boron gets the song data, and spits it over to the Pi via Bluetooth. Then the Pi generates an image for the display.

Oh, and there’s also a neat Easter Egg. In honor of brat summer, the background changes to #8ACE00 green if the system detects you’re listening to Charli XCX. Neat.

It’s a neat build with a lot of moving parts. We’re surprised we haven’t seen anything like this before though, it’s really rather fun. Also, how’s about that taste of the old Internet—when was the last time you heard somebody mention scrobbling? Gosh, we’re getting old.

We’ve featured some of [Guy’s] works before, too, like the amusing Mailblocks project. Video after the break.

Continue reading “Digital Bumper Sticker Tells Everyone What You’re Listening To”

How Photomultipliers Detect Single Photons

If you need to measure the presence of photons down to a very small number of them, you are looking at the use of a photomultiplier, as explained in a recent video by [Huygens Optics] on YouTube. The only way to realistically measure at such a sensitivity level is to amplify them with a photomultiplier tube (PMT). Although solid-state alternatives exist, this is still a field where vacuum tube-based technology is highly relevant.

Despite being called ‘photomultipliers’, these PMTs actually amplify an incoming current (electron) in a series of dynode stages, to create an output current that is actually easy to quantify for measurement equipment. They find uses in everything from Raman spectroscopy to medical diagnostics and night vision sensors.

The specific PMT that [Huygens Optics] uses in the video is the Hamamatsu R928. This has a spectral response from 185 nm to 900 nm. The electrode mesh is where photons enter the tube, triggering the photo cathode which then ejects electrons. These initial electrons are then captured and amplified by each dynode stage, until the anode grid captures most of the electrons. The R928 has a gain of 1.0 x 10⁷ (10 million) at -1 kV supply voltage, so each dynode multiplies the amount of electrons by six, with a response time of 22 ns.

PMTs are unsurprisingly not cheap, but [Huygens Optics] was lucky to find surplus R928s on Marktplaats (Dutch online marketplace) for €100 including a cover, optics and a PCB with the socket, high-voltage supply (Hamamatsu C4900) and so on. Without documentation the trick was to reverse-engineer the PCB’s connections to be able to use it. In the video the components and their function are all briefly covered, as well as the use of opamps like the AD817 to handle the output signal of the R928. Afterwards the operation of the PMT is demonstrated, which makes clear just how sensitive the PMT is as it requires an extremely dark space to not get swamped with photons.

An interesting part about the demonstration is that it also shows the presence of thermionic emissions: anode dark current in the datasheet. This phenomenon is countered by cooling the PMT to prevent these emissions if it is an issue. In an upcoming video the R928 will be used for more in-depth experiments, to show much more of what these devices are capable of.

Thanks to [cliff claven] for the tip.

Continue reading “How Photomultipliers Detect Single Photons”

Building A Subwoofer Box Out Of Decking Material

When you go to build a subwoofer box, wood is the most common choice. When it came to his project, though, [Startup Chuck] decided to go a different route entirely. Rather than the usual plywood or MDF, he decided to try Trex decking instead. Why? He had some lying around, and he suspected it might just sound good.

If you’re unfamiliar with it, Trex decking is a composite material made of recycled materials like reclaimed wood and plastic film. The best part, though? Trex decking is twice as dense as MDF. That makes it good for speaker box use because it flexes less and thus absorbs less energy from the subwoofer. [Chuck] walks us through cutting out the parts for the box and the subsequent assembly. Ultimately, it’s not dissimilar from building a speaker box out of wood; the material is simply not that different—just denser.

[Chuck] also puts his new sub through some quick little tests, demonstrating that minimal vibration is passed through to the enclosure itself. He reports that the final build has a “nice, deep sound.” Meanwhile, if you don’t like working with your hands, you could always 3D-print your speaker enclosures instead.

Continue reading “Building A Subwoofer Box Out Of Decking Material”

Review: IFixit’s FixHub May Be The Last Soldering Iron You Ever Buy

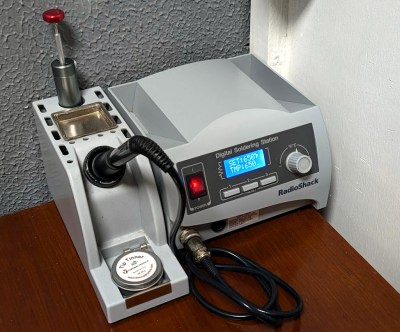
Like many people who solder regularly, I decided years ago to upgrade from a basic iron and invest in a soldering station. My RadioShack digital station has served me well for the better part of 20 years. It heats up fast, tips are readily available, and it’s a breeze to dial in whatever temperature I need. It’s older than both of my children, has moved with me to three different homes, and has outlived two cars and one marriage (so far, anyway).

When I got this, Hackaday still used B&W pictures.

As such, when the new breed of “smart” USB-C soldering irons started hitting the scene, I didn’t find them terribly compelling. Oh sure, I bought a Pinecil. But that’s because I’m an unrepentant open source zealot and love the idea that there’s a soldering iron running a community developed firmware. In practice though, I only used the thing a few times, and even then it was because I needed something portable. Using it at home on the workbench? It just never felt up to the task of daily use.

So when iFixit got in contact a couple weeks back and said they had a prototype USB-C soldering iron they wanted me to take a look at, I was skeptical to say the least. But then I started reading over the documentation they sent over, and couldn’t deny that they had some interesting ideas. For one, it was something of a hybrid iron. It was portable when you needed it to be, yet offered the flexibility and power of a station when you were at the bench.

Even better, they were planning on putting their money where their mouth is. The hardware was designed with repairability in mind at every step. Not only was it modular and easy to open up, but the company would be providing full schematics, teardown guides, and spare parts.

Alright, fine. Now you’ve got my attention.

Continue reading “Review: IFixit’s FixHub May Be The Last Soldering Iron You Ever Buy”