Tiny, Hackable Telepresence Robot For Under $100? Meet Goby

[Charmed Labs] are responsible for bringing numerous open-source hardware products to fruition over the years, and their latest device is an adorably small robotic camera platform called Goby, currently crowdfunding for its initial release. Goby has a few really clever design features and delivers a capable (and hackable) platform for under 100 USD.

Goby embraces its small size, delivering what its creators dub “tinypresence” — or the feeling of being there, but on a very small scale. Cardboard courses, LEGO arenas, or even tabletop gaming scenery hits different when experienced from a first-person perspective. Goby is entirely reprogrammable with nothing more than a USB cable and the Arduino IDE, while costing less than most Arduino starter kits.

Recharging happens by driving over the charger, then pivoting down so the connectors (the little blunt vampire fangs under and to each side of the camera) come into contact with the charger.

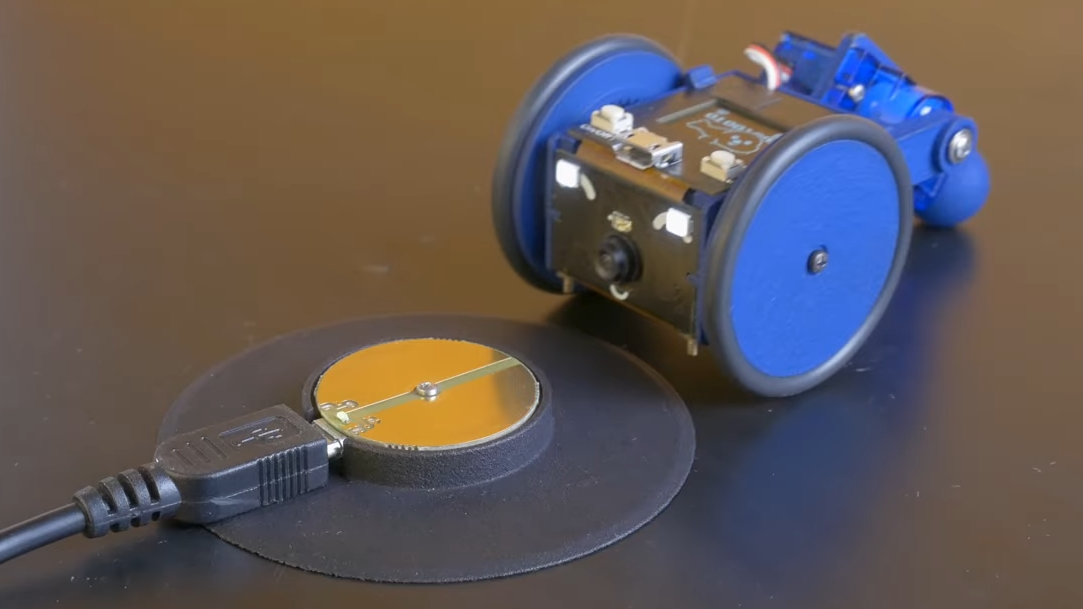
One of the physical features we really like is the tail-like articulated caster at the rear. Flexing this pivots Goby up or down (and can even flip Goby completely over), allowing one to pan and tilt the view without needing to mount the camera on a gimbal. It also comes into play for recharging; Goby simply moves over the disc-shaped charger and pivots down to make contact.

At Goby‘s heart is an ESP32-S3 and OmniVision OV2640 camera sensor streaming a live video feed (and driving controls) with WebRTC. Fitting the WebRTC stack onto an ESP32 wasn’t easy, but opens up possibilities beyond just media streaming.

Goby is set up to make launching an encrypted connection as easy as sharing a URL or scanning a QR code. The link is negotiated between bot and client with the initial help of an external server, and once a peer-to-peer connection is established, the server’s job is done and it is out of the picture. [Charmed Labs]’s code for this functionality — named BitBang — is in beta and destined for an open release as well. While BitBang is being used here to make it effortless to access Goby remotely, it’s more broadly intended to make web access for any ESP32-based device easier to implement.

As far as tiny remote camera platforms go, it might not be as small as rebuilding a Hot Wheels car into a micro RC platform, but it’s definitely more accessible and probably cheaper, to boot. Check it out at the Kickstarter (see the first link in this post) and watch it in action in the video, embedded just below the page break.

Continue reading “Tiny, Hackable Telepresence Robot For Under $100? Meet Goby

Rise Of The Robots: How Robots Are Changing Dairy Farms

Running a dairy farm used to be a rather hands-on experience, with the farmer required to be around every few hours to milk the cows, feed them, do all the veterinarian tasks that the farmer can do themselves, and so on. The introduction of milking machines in the early 20th century however began a trend of increased automation whereby a single farmer could handle a hundred cows by the end of the century instead of only a couple. In a recent article in IEEE Spectrum covers the continued progress here is covered, including cows milking themselves, on-demand style as shown in the top image.

The article focuses primarily on Dutch company Lely’s recent robots, which range from said self-milking robots to a manure cleaning robot that looks like an oversized Roomba. With how labor-intensive (and low-margin) a dairy farm is, any level of automation that can improve matters will be welcomed, with so far Lely’s robots receiving a mostly positive response. Since cows are pretty smart, they will happily guide themselves to a self-milking robot when they feel that their udders are full enough, which can save the farmer a few hours of work each day, as this robot handles every task, including the cleaning of the udders prior to milking and sanitizing itself prior to inviting the next cow into its loving embrace.

As for the other tasks, speaking as a genuine Dutch dairy farm girl who was born & raised around cattle (and sheep), the idea of e.g. mucking out stables being taken over by robots is something that raises a lot more skepticism. After all, a farmer’s children have to earn their pocket money somehow, which includes mucking, herding, farm maintenance and so on. Unless those robots get really cheap and low maintenance, the idea of fully automated dairy farms may still be a long while off, but reducing the workload and making cows happier are definitely lofty goals.

Top image: The milking robot that can automatically milk a cow without human assistance. (Credit: Lely)

A Blacksmith Shows Us How To Choose An Anvil

No doubt many readers have at times wished to try their hand at blacksmithing, but it’s fair to say that acquiring an anvil represents quite the hurdle. For anyone not knowing where to turn there’s a video from [Black Bear Forge], in which he takes us through a range of budget options.

He starts with a sledgehammer, the simplest anvil of all, which we would agree makes a very accessible means to do simple forge work. He shows us a rail anvil and a couple of broken old anvils, before spending some time on a cheap Vevor anvil and going on to some much nicer more professional ones. It’s probably the Vevor which is the most interesting of the ones on show though, not because it is particularly good but because it’s a chance to see up close one of these very cheap anvils.

Are they worth taking the chance? The one he’s got has plenty of rough parts and casting flaws, an oddly-sited pritchel and a hardy hole that’s too small. These anvils are sometimes referred to as “Anvil shaped objects”, and while this one could make a reasonable starter it’s not difficult to see why it might not be the best purchase. It’s a subject we have touched on before in our blacksmithing series, so we’re particularly interested to see his take on it.

Continue reading “A Blacksmith Shows Us How To Choose An Anvil”

Designing An FM Drum Synth From Scratch

How it started: a simple repair job on a Roland drum machine. How it ended: a scratch-built FM drum synth module that’s completely analog, and completely cool.

[Moritz Klein]’s journey down the analog drum machine rabbit hole started with a Roland TR-909, a hybrid drum machine from the mid-80s that combined sampled sounds with analog synthesis. The unit [Moritz] picked up was having trouble with the decay on the kick drum, so he spread out the gloriously detailed schematic and got to work. He breadboarded a few sections of the kick drum circuit to aid troubleshooting, but one thing led to another and he was soon in new territory.

The video below is on the longish side, with the first third or so dedicated to recreating the circuits used to create the 909’s iconic sound, slightly modifying some of them to simplify construction. Like the schematic that started the whole thing, this section of the video is jam-packed with goodness, too much to detail here. But a few of the gems that caught our eye were the voltage-controlled amplifier (VCA) circuit that seems to make appearances in multiple places in the circuit, and the dead-simple wave-shaper circuit, which takes some of the harmonics out of the triangle wave oscillator’s output with just a couple of diodes and some resistors.

Once the 909’s kick and toms section had been breadboarded, [Moritz] turned his attention to adding something Roland hadn’t included: frequency modulation. He did this by adding a second, lower-frequency voltage-controlled oscillator (VCO) and using that to modulate the drum section. That resulted in a weird, metallic sound that can be tuned to imitate anything from a steel drum to a bell. He also added a hi-hat and cymbal section by mixing the square wave outputs on the VCOs through a funky XOR gate made from discrete components and a high-pass filter.

There’s a lot of information packed into this video, and by breaking everything down into small, simple blocks, [Moritz] makes it easy to understand analog synths and the circuits behind them.

Continue reading “Designing An FM Drum Synth From Scratch”

Bicycle Gearbox Does It By Folding

If you’ve spent any time on two wheels, you’ve certainly experienced the woes of poor bicycle shifting. You hit the button or twist the knob expecting a smooth transition into the next gear, only to be met with angry metallic clanking that you try to push though but ultimately can’t. Bicycle manufacturers collectively spent millions attempting to remedy this issue with the likes of gearboxes, electronic shifting, and even belt-driven bikes. But Praxis believes to have a better solution in their prototype HiT system.

Rather then moving a chain between gears, their novel solution works by folding gears into or away from a chain. These gears are made up of four separate segments that individually pivot around an axle near the cog’s center. These segments are carefully timed to ensure there is no interference with the chain making shifting look like a complex mechanical ballet.

While the shift initialization is handled electronically, the gear folding synchronization is mechanical. The combination of electronic and mechanical systems brings near-instant shifting under load at rotational rates of 100 RPM. Make sure to scroll through the product page and watch the videos showcasing the mechanism!

The HiT gearbox is a strange hybrid between a derailleur and a gearbox. It doesn’t contain a clutch based gear change system or even a CVT as seen in the famous Honda bike of old. It’s fully sealed with more robust chains and no moving chainline as in a derailleur system. The prototype is configurable between four or sixteen speeds, with the four speed consisting of two folding gear pairs connected with a chain and the sixteen speed featuring a separate pair of folding gears. The output is either concentric to the input, or above the input for certain types of mountain bikes.

Despite the high level of polish, this remains a prototype and we eagerly await what Praxis does next with the system. In the meantime, make sure to check out this chainless e-drive bicycle.

Supercon 2024: Exploring The Ocean With Open Source Hardware

If you had to guess, what do you think it would take to build an ocean-going buoy that could not only survive on its own without human intervention for more than two years, but return useful data the whole time? You’d probably assume such a feat would require beefy hardware, riding inside an expensive and relatively large watertight vessel of some type — and for good reason, the ocean is an unforgiving environment, and has sent far more robust hardware to the briny depths.

But as Wayne Pavalko found back in 2016, a little planning can go a long way. That’s when he launched the first of what he now calls Maker Buoys: a series of solar-powered drifting buoys that combine a collection of off-the-shelf sensor boards with an Arduino microcontroller and an Iridium Short-Burst Data (SBD) modem in a relatively simple watertight box.

He guessed that first buoy might last a few weeks to a month, but when he finally lost contact with it after 771 days, he realized there was real potential for reducing the cost and complexity of ocean research.

Wayne recalled the origin of his project and updated the audience on where it’s gone from there during his 2024 Supercon talk, Adventures in Ocean Tech: The Maker Buoy Journey. Even if you’re not interested in charting ocean currents with homebrew hardware, his story is an inspirational reminder that sometimes a fresh approach can help solve problems that might at first glance seem insurmountable.

Continue reading “Supercon 2024: Exploring The Ocean With Open Source Hardware”

Budget Schlieren Imaging Setup Uses 3D Printing To Reveal The Unseen

We’re suckers here for projects that let you see the unseeable, and [Ayden Wardell Aerospace] provides that on a budget with their $30 Schlieren Imaging Setup. The unseeable in question is differences in air density– or, more precisely, differences in the refractive index of the fluid the imaging set up makes use of, in this case air. Think of how you can see waves of “heat” on a warm day– that’s lower-density hot air refracting light as it rises. Schlieren photography takes advantage of this, allowing to analyze fluid flows– for example, the mach cones in a DIY rocket nozzle, which is what got [Ayden Wardell Aerospace] interested in the technique.

Shock diamonds from a homemade rocket nozzle imaged by this setup.
Examining exhaust makes this a useful tool for [Aerospace].
This is a ‘classic’ mirror-and-lamp Schlieren set up.  You put the system you wish to film near the focal plane of a spherical mirror, and camera and light source out at twice the focal distance. Rays deflected by changes in refractive index miss the camera– usually one places a razor blade precisely to block them, but [Ayden] found that when using a smart phone that was unnecessary, which shocked this author.

While it is possible that [Ayden Wardell Aerospace] has technically constructed a shadowgraph, they claim that carefully positioning the smartphone allows the sharp edge of the case to replace the razor blade. A shadowgraph, which shows the second derivative of density, is a perfectly valid technique for flow visualization, and is superior to Schlieren photography in some circumstances– when looking at shock waves, for example.

Regardless, the great thing about this project is that [Ayden Wardell Aerospace] provides us with STLs for the mirror and smartphone mounting, as well as providing a BOM and a clear instructional video. Rather than arguing in the comments if this is “truly” Schlieren imaging, grab a mirror, extrude some filament, and test it for yourself!

There are many ways to do Schlieren images. We’ve highighted background-oriented techniques, and seen how to do it with a moiré pattern, or even a selfie stick. Still, this is the first time 3D printing has gotten involved and the build video below is quick and worth watching for those sweet, sweet Schlieren images. Continue reading “Budget Schlieren Imaging Setup Uses 3D Printing To Reveal The Unseen”