Raspberry Pi RP2350 A4 Stepping Addresses E9 Current Leakage Bug

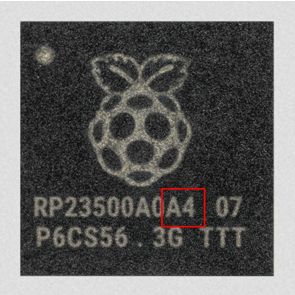
The RP2350 MCU in A4 stepping.

When Raspberry Pi’s new RP2350 MCU was released in 2024, it had a slight issue in that its GPIO pins would leak a significant amount of current when a pin is configured as input with the input buffer enabled. Known as erratum 9 (E9), it has now been addressed per the July 29 Product Change Note from Raspberry Pi for the A4 stepping along with a host of other hardware and software issues.

Although the PCN is for stepping A4, it covers both steppings A3 and A4, with the hardware fixes in A3 and only software (bootrom) fixes present in A4, as confirmed by the updated RP2350 datasheet. It tells us that A3 was an internal development stepping, ergo we should only be seeing the A4 stepping in the wild alongside the original defective A2 stepping.

When we first reported on the E9 bug it was still quite unclear what this issue was about, but nearly a month later it was officially defined as an input mode current leakage issue due to an internal pull-up that was too weak. This silicon-level issue has now finally been addressed in the A3 and thus new public A4 stepping.

Although we still have to see whether this is the end of the E9 saga, this should at least offer a way forward to those who wish to use the RP2350 MCU, but who were balking at the workarounds required for E9 such as external pull-downs.

Railway Time: Why France’s Railways Ran Five Minutes Behind

With us chafing at time zones and daylight saving time (DST) these days, it can be easy to forget how much more confusing things were in the late 19th century. Back then few areas had synchronized their clocks to something like Greenwich Mean Time (GMT) or other standards like London time or Paris time, with everyone instead running on local time determined by as solar time. This created a massive headache for the railways, as they somehow had to make their time schedules work across what were effectively hundreds of tiny time zones while ensuring that passengers got on their train on time.

In a recent video [The Tim Traveller] explains how the creation of so-called Railway time sort-of solved this in France. As railroads massively expanded across the world by the 1850s and travel times dropped rapidly, this concept of Railway time was introduced from the US to Europe to India, creating effectively a railway-specific time zone synchronized to e.g. London time in the UK and Paris time in France. In addition to this, French railways also set the clocks inside the stations to run five minutes behind, to give travelers even more of a chance to get to their train on time when stuck in a long goodbye.

By 1911, across Europe GMT was adopted as the central time base, and the French five minute delay was eliminated as French travelers and trains were now running perfectly on time.

Continue reading “Railway Time: Why France’s Railways Ran Five Minutes Behind”

2025 One Hertz Challenge: 4-Function Frequency Counter

Frequency! It’s an important thing to measure, which is why [Jacques Pelletier] built a frequency counter some time ago. The four-function unit is humble, capable, and also an entry into our 2025 One Hertz Challenge!

The build began “a long while ago when electronic parts were still available in local stores,” notes Jacques, dating the project somewhat. The manner of construction, too, is thoroughly old-school. The project case and the sweet red digits are both classic, but so is what’s inside. The counter is based around 4553 BCD counter chips and 4511 decoder ICs. Laced together, the logic both counts frequency in binary-coded decimal and then converts that into the right set of signals to drive the 7-segment displays. Sample time is either 1 Hz or 0.1 Hz, which is derived from an 8MHz oscillator. It can act as a frequency meter, period meter, chronometer, or a basic counter. The whole build is all raw logic chips, there are no microprocessors or microcontrollers involved.

It just goes to show, you can build plenty of useful things without relying on code and RAM and all that nonsense. You just need some CMOS chips and a bucket of smarts to get the job done!

Double The Sensors, Double The Fun, With 2-in-1 Panoramic Camera

When film all came in rolls, it was fairly easy to play with the frame of the image. Companies like Hasselblad (and many others) made camera backs that would expose longer strips of 35 mm film to create stunning panoramic images in one single shot. [snappiness] wanted to bring that style of camera into the digital age, and ended up with a 2-in-1 Sony-based frankencamera.

Sensors just aren’t readily available in the wide aspect ratio [snappiness] was looking for, and even if they were, bare sensors are hugely expensive compared to consumer cameras. Lacking the budget for high-res scientific CMOS, [snappiness] did what any of us would do, and hacked two Sony A7ii full-frame mirrorless cameras together to get a combined 24x72mm sensor frame.

Conceptually, the hack is really very simple: a 3D print acts like a T-fitting, with the two cameras held parallel off the arms of the T and the lens making the shaft. Inside, the only optics are a pair of mirrors serving as a beam splitter. Each camera sees half the FOV of the lens in its corresponding mirror, which means the images can be stitched together later to make the double-wide pictures [snappiness] is after.

Of course both cameras must be triggered at the same time, but with what looks like a headphone splitter and an aftermarket remote shutter button, that part works perfectly. The optics, not so much– as always with conceptually simple projects, the devil is in the details, and here it’s the mirror alignment where you’ll find Old Nick. [snappiness] made no provision for adjustments, so everything needed to be designed and built with very stringent tolerances. Somewhere along the way, those tolerances were exceeded; as a result, the two cameras don’t share a focal plane.

That means half the composite image will always be out of focus, or that the main lens needs to be refocused and two snaps taken, rather defeating the point the frankencamera. If [snappiness] attempts a version two, perhaps an adjustment mechanism to focus each sensor would be in order. Still, even if it didn’t work perfectly, he’s proven that the idea is sound, and we can’t imagine many people will see this and argue it isn’t a hack.

The world of film did make all of this easier, perhaps– we’ve seen large-format film cameras out of lego, and a panorama made from four full rolls of 35 mm film. If you know of any other great photography hacks– film or digital– don’t hesitate to send us a tip.

Continue reading “Double The Sensors, Double The Fun, With 2-in-1 Panoramic Camera”

A sine wave and triangle wave on a black background

2025 One Hertz Challenge: Op-Amp Madness

Sometimes, there are too many choices in this world. My benchtop function generator can output a sine, square, or saw wave anywhere from 0.01 Hz up to 60 MHz? Way too many choices. At least, that’s what we suspect [Phil Weasel] was thinking when he built this Analog 1 Hz Sinewave Generator.

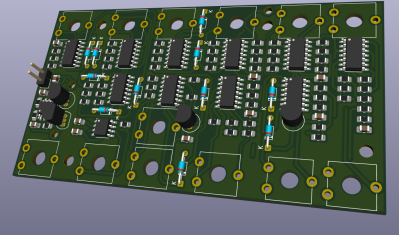
Rendering of a PCB
A KiCad rendering of [Phil]’s design
[Phil]’s AWG (which in this case stands for Anything as long as it’s a 1 Hz sineĀ WaveĀ Generator) has another unique feature — it’s built (almost) entirely with op-amps. A lot of op-amps (37, by our count of the initial schematic he posted). His design is similar to a Phased Locked Loop (PLL) and boils down to a triangle wave oscillator. While a 1 Hz triangle wave would absolutely satisfy judges of the One Hertz Challenge, [Phil] had set out to make a sine wave. Using a feedback loop and some shaping/smoothing tricks (and more op-amps), he rounded off the sharp peaks into a nice smooth sine wave.

Sometimes we make things much more complicated than we need to, just to see if we can. This is one of those times. Are there much simpler ways to generate a sine wave? Yes — but not exclusively using op-amps! This entry brings stiff competition to the “Ridiculous” category of the 2025 One Hertz Challenge.

When Online Safety Means Surrendering Your ID, What Can You Do?

A universal feature of traveling Europe as a Hackaday scribe is that when you sit in a hackerspace in another country and proclaim how nice a place it all is, the denizens will respond pessimistically with how dreadful their country really is. My stock response is to say “Hold my beer” and recount the antics of British politicians, but the truth is, the grass is always greener on the other side.

There’s one thing here in dear old Blighty that has me especially concerned at the moment though, and perhaps it’s time to talk about it here. The Online Safety Act has just come into force and is the UK government’s attempt to deal with what they perceive as the nasties on the Internet, and while some of its aspirations may be honourable, its effects are turning out to be a little chilling.

As might be expected, the Act requires providers to ensure their services are free of illegal material, and it creates some new offences surrounding sharing images without consent, and online stalking. Where the concern lies for me is in the requirement for age verification to ensure kids don’t see anything the government things they shouldn’t, which is being enforced through online ID verification. There are many reasons why this is of concern, but I’ll name the three at the top of my list.
Continue reading “When Online Safety Means Surrendering Your ID, What Can You Do?”

Hexagonal Lighting Brings A Touch Of Elegance To The Workshop

Sometimes, we’re faced with what should be simple household tasks that we choose to make more difficult. Sure, you could buy a clock, hang it on your wall, and move on with your day, or could spend a week or two building the perfect one. [Nejc Koncan] was in one such situation recently when he needed some new overhead lighting. He wanted hexagonal lights — and since none of the off-the-shelf solutions met his exacting requirements, he built his own.

Unlike most of the cycling RGB hexagonal lighting solutions available on the market, [Nejc] wanted elegant white outlines that he could control via HomeAssistant. After some careful design and quite a bit of trial-and-error, he ended up with a highly modular and very professional-looking installation. The hexagons are constructed from LED strips set into aluminum extrusions, with junction PCBs at each intersection. To complete the look, all of the strips and wiring are hidden by diffusers that slot into the extrusions — and of course, the whole thing is open source.

We see lots of lighting projects here at Hackaday, and even other hexagonal lights — but this might just be one of the most refined. Sometimes it’s worth the extra effort to build a totally over-engineered custom solution.