a 3d printed case, sitting on a table with cactuses in the background, with a 3d rendered holo assistant reflected in a cone of polycarbonate sheets from a flat HDMI display pointed up

Anime Inspired Holographic Virtual Assistant

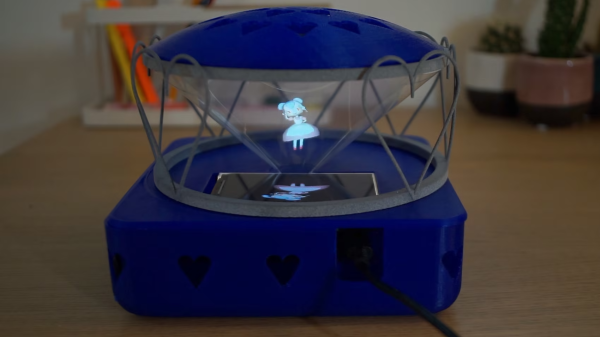
[Jessp] has created a very cute and endearing DIY virtual assistant called Maria. The build combines a 3D printed housing that uses a modern take on the “Pepper’s Ghost” illusion to render a virtual, three-dimensional anime inspired assistant that can take commands to get information about the weather, play music or set timers.

The hub houses a Raspberry Pi 4B and a 3.2 inch LCD HDMI screen mounted flat on its back to render the perspective corrected “Maria” character using a technique borrowed from the Pepper’s Cone project. Polycarbonate sheets are formed into a cone, allowing for the 3D effect of rendering the virtual assistant model. A consumer grade mini USB microphone is used to receive voice commands along with a consumer grade USB speaker for audio feedback. The virtual assistant offloads the text to speech services to Google Cloud, along with using a weather API and Spotify developer account to for its musical options.

All source code is available on [Jessp]’s GitHub page, including build instructions and STL files for the housing. We’ve featured open source voice assistants in the past, including Mycroft and a even a HAL-9000 virtual assistant (running Kalliope) but it’s nice to see further experimentation in this space.

Continue reading “Anime Inspired Holographic Virtual Assistant”

A Gaggia classic espresso machine with an LCD screen attached to the top, sitting on a table with vase of yellow lily flowers to its left and sunlight coming in from a window from the right.

Homebrew Espresso Maker Modding With Gaggiuino

For those that don’t know, Gaggia is a company that produces a line of affordable “entry-level” espresso coffee makers that offer good quality consumer espresso machines at reasonable prices. The entry level machines don’t offer fine grained control over temperature, pressure and steam which is where the Gaggiuino project comes in.

A schematic of the Gagguino project

The Gaggiuino project is an “after market” modification of many espresso makers, such as the Gaggia classic and Gaggia classic pro. The main additions are a MAX6675 thermocouple module paired with a K-Type thermocouple sensor for closed loop control over the temperature. Options for adding an AC dimmer module that attaches to the pump motor and a 0 Mpa to 1.2 Mpa ranged XDB401 pressure sensor, installed in line between the pump and the boiler, provide further closed loop control over the pressure and flow profiling.

Load cells can be attached to the drip tray to allow for feedback about the pour weight with a Nextion 2.4″ LCD touchscreen provides the user interface for profile selection and other interactivity. The project offers a “base” modification using an Arduino Nano as the microcontroller, in line with its namesake, but has an option for an STM32 Blackpill module that can provide more functionality beyond the scope of the Nano.

The Gaggiuino project is open source with code and extensive documentation available on GitHub. There is also a Discord community for those wanting help with their build or that have the inclination to share their passion for DIY espresso modding with the Gaggiuino. Espresso machine hacks are a favorite of ours and we’ve featured many projects on espresso machine builds and mods ranging from PID control of classic espresso makers to beautifully minimal closed loop homebrew espresso machines.

Continue reading “Homebrew Espresso Maker Modding With Gaggiuino”

A two picture montage with the left montage showing a pair of hands holding an assembled and closed turbidity sensor and the right picture showing A pair of hands holding the screw on cap for the turbidity sensor and a prototype board against a backdrop of green leave

Rapid Prototyping To Measure Turbidity In Rapids

[RiverTechJess] is in the process of getting a PhD in environmental engineering and has devoted a chapter to creating a turbidity sensor for river network monitoring. Environmental sensing benefits from being able to measure accurately and frequently, so providing low cost devices helps get more data and excuse the occasional device loss that’s bound to happen when deploying electronics out in the wild. Towards this end, [RiverTechJess] has created a low cost turbidity sensor that rivals the more expensive alternatives in cost and accuracy.

The turbidity sensor is designed to be at least partially submerged allowing for the LED and light sensors to be be able to take measurements. [RiverTechJess] has made a 3D printed prototype to test the design, allowing for rapid experimentation and deployment of the sensors to work out issues. The 3D printed enclosure prototype uses rubber o-rings and “vacuum grease” to provide a watertight seal. An ESP32 microcontroller is used to store logged data on an SD card and drive the TSHG6200 850nm infrared LED and the two TSL237S-LF sensors.

The resulting paper on the turbidity sensor, in addition to the blogs of the process, provide a wealth of data that show what goes into developing and calibrating a device that is meant to be used for environmental monitoring. All source code is available on GitHub and development continues on a newer revision of the turbidity sensor with updated electronics and hardware.

We’re no strangers to water sensors and we’ve seen devices from internet connected water pollution monitors to small handheld potable water detectors.

Video after the break!

Continue reading “Rapid Prototyping To Measure Turbidity In Rapids”

an RGB LED display showing expected arrival times of trams and buses sitting on a table

A Private View Of A Public Transport Sign

[Stefan Schüller] was a fan of the LED signs that display arrival information for the trams and buses in their city of Zürich. [Stefan] was having trouble finding a source to purchase the signs so, instead, decided to build one himself.

[Stefan] decided to recreate the 56×208 single color 2mm dot pitch display with an 128 x 64 P2 RGB LED screen respecting the same 2 mm pitch. The display is driven by an ESP32 DMA RGB LED matrix shield utilizing a HUB75 RGB LED matrix library, all being powered from a 5 V 4 A power supply.

In addition to driving the LED matrix display, the ESP32 polls Zürich’s public transportation API and then parses the XML for the relevant information. Since [Stefan] wanted to match the fonts as closely as possible,
he created a new font from scratch, including the bus and accessibility icons. The new font was encoded into a glyph bitmap distribution format (BDF) that was then converted to work with Adafruit’s GFX library, with [Stefan] creating a custom conversion tool, called bdf2adafruit, to do the last leg of the conversion.

Since the LED matrix had full color capability, [Stefan] decided to add a little extra flourish and color code the transportation lines with the official tram colors. All source code is available on his GitHub repository for the project, for those looking for more detail.

We’ve featured DIY builds of public transportation feeds before. With the ubiquity of low cost RGB LED displays and public APIs, hopefully we’ll see many more!

A Muppet On A Tricycle

[Donald Bell] wanted to recreate the magic of seeing Kermit on a tricycle from a 2018 NY Maker Faire he attended, so he created his own take of a Muppet on a Radio Flyer kids tricycle bike.

The underside of the back axle of a red radio flyer tricycle with electronics for, two motors and a battery pack

He started by attaching a ready made puppet to a classic Radio Flyer dual deck toddler tricycle using zip ties and split pipe insulation to give the limbs stiffness. [Donald] then put all the electronics, including the 12 V 50 RPM DC motor, 24 V 22.4 Ah Li-Ion battery pack, TB67H420FTG motor driver, and the Arduino Uno microcontroller under the back axle.

The motor transfers power to one of the back wheels via pulleys and timing belts with an additional ASMC-04B 24 V servo used to steer the tricycle via a steel pushrod. The RC communication is done with a FlySky FS-GT2 2.4 GHz 2-channel system. [Donald] gives a detailed list of parts that he uses in a Google doc for anyone wanting to know more.

[Donald] goes into great length about the limitations of the build, including the low clearance of the electronics underneath, the finicky nature of the timing belts and the “uncanny valley” that the size of the puppet induces to a casual observer. Regardless, the build is exceptional and paves the way for a variety of improvements for anyone wanting to extend the idea either further into the creepy or cute domain.

Retrofitting vehicles with motorized control are a crowd favorite, as seen with some projects like a stroller controller from Maker Faires of the past.

Continue reading “A Muppet On A Tricycle”

Mini Ultrasonic Levitation Kit Is An Exercise In Sound Minimalist Design

For those that haven’t heard, ultrasonic levitation is a process by which two or more ultrasonic transducers are set opposite to each other and excited in such a way as to create a standing wave between them. The sound is, as the name implies, ultrasonic — so outside the range of human hearing — but strong enough so that the small, light objects can be positioned and held fixed in mid-air where there’s a pressure minimum in the standing wave. [Olimex] has created a small ultrasonic levitation kit that exemplifies this phenomena.

The kit itself is made using through-hole components, with an ATTiny85 as the core microcontroller to drive two TCT40-16T ultrasonic speakers, and a MAX232 to provide a USB interface drives the transducers (thanks to the folks in the comments for the correction). Two slotted rectangular PCB pieces that solder connect to the main board, provide a base so that the device stands upright when assembled. The whole device is powered through the USB connection, and the ultrasonic speakers output in the 40KHz range providing enough power to levitate small Styrofoam balls.

The project is, by design, an exercise in minimalism, providing a kit that can be easily assembled, and providing code that can be easily flashed onto the device, examined and modified. All the design files, including the bill of materials, KiCAD schematics, and source code are provided under an open source hardware license to allow for anyone wanting to know how such a project works, or to extend it themselves, ample opportunity. [Olimex] also has the kit for sale for those not wanting to source boards and parts themselves.

We’ve featured ultrasonic levitation devices before, from bare bones system driven by a NE555 to massive phased arrays.

a kinetic bar framework mounted on a wooden base made of 3d printed bars of alternative black and grey color, each joined with m3 bolts and nuts

Kinetic Cyclic Scissors

[Henry Segerman] and [Kyle VanDeventer] merge math and mechanics to create a kinetic cyclic scissors sculpture out of 3D printed bars adjoined together with M3 bolts and nuts.

a kinetic bar framework with 3d printed bars of alternative black and grey color, each joined with m3 bolts and nuts being held by a person at two points with a quadrilateral tiling overlay

The kinetic sculpture can be thought of as a part of an infinite tiling of self similar quadrilaterals in the plane. The tiling of the plane by these self similar quadrilaterals can be realized as a framework by joining the diagonal points of each quadrilateral with bars. The basic question [Henry] and [Kyle] wanted to answer was under what conditions can the realized bar framework of a subsection of the tiling be made to move. Surprisingly, when the quadrilateral is a parallelogram, like in a scissor lift, or “cyclic”, when the endpoints lie on a circle, the bar framework can move. Tweaking the ratios of the middle lengths in a cyclic configuration leads to different types of rotational symmetry that can be achieved as the structure folds in on itself.

[Henry] and [Kyle] go into more detail in their Bridges Conference paper, with derivations and further discussions about the symmetry induced by adjusting the constraints. The details are light on the actual kinetic sculpture featured in the video but the bar framework was chosen to have a mirror type of symmetry with a motor attached to one of the central, lower bars to drive the movement of the sculpture.

The bar framework is available for download for anyone wanting to 3D print or laser cut their own. Bar frameworks are useful ideas and we’ve seen them used in art sculptures to strandbeests, so it’s great to see further explorations in this space.

Video after the break!

Continue reading “Kinetic Cyclic Scissors”