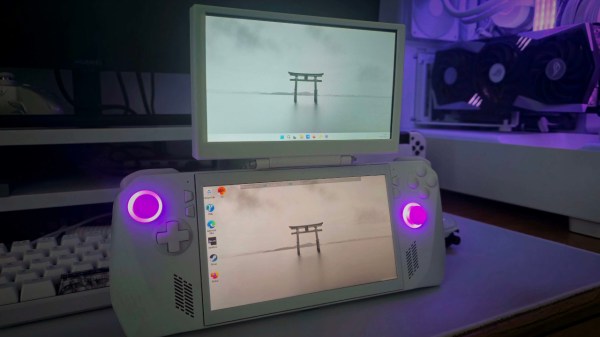
The assembled PCB on red foam, with both a USB-C connector and the ASM2464PD chip visible

Finally Taming Thunderbolt With Third-Party Chips

Thunderbolt has always been a functionally proprietary technology, held secret by Intel until “opening” the standard in a way that evidently wasn’t enough for anyone to meaningfully join in. At least, until last year, when we saw announcements about ASMedia developing two chips for Thunderbolt use. Now, we are starting to see glimmers of open source, letting us tinker with PCIe at prices lower than $100 per endpoint.

In particular, this board from [Picomicro] uses the ASM2464PD — a chipset that supports TB3/4/USB4, and gives you a 4x PCIe link. Harnessing the 40 Gbps power to wire up an NVMe SSD, this board shows us it’s very much possible to design a fully functional ASM2464PD board without the blessing of Intel. With minimal footprint that barely extends beyond the 2230 SSD it’s designed for, curved trace layout, and a CNC-milled case, this board sets a high standard for a DIY Thunderbolt implementation.

The main problem is that this project is not open-source – all we get is pretty pictures and a bit of technical info. Thankfully, we’ve also seen [WifiCable] take up the mantle of making this chip actually hobbyist-available – she’s created a symbol, fit a footprint, and made an example board in KiCad retracing [Picomicro]’s steps in a friendly fashion. The board is currently incomplete because it needs someone to buy an ASM2464PD enclosure on Aliexpress and reverse-engineer the missing circuitry, but if open-source Thunderbolt devices are on your wish list, this is as close as you get today – maybe you’ll be able to make an eGPU adapter, even. In the meantime, if you don’t want to develop hardware but want to take advantage of Thunderbolt, you can build 10 Gbps point-to-point networks.

USB HID And Run Exposes Yet Another BadUSB Surface

You might think you understand the concept of BadUSB attacks and know how to defend it, because all you’ve seen is opening a terminal window. Turns out there’s still more attack surface to cover, as [piraija] tells us in their USB-HID-and-run publication. If your system doesn’t do scrupulous HID device filtering, you might just be vulnerable to a kind of BadUSB attack you haven’t seen yet, rumoured to have been the pathway a few ATMs got hacked – simply closing the usual BadUSB routes won’t do.

The culprit is the Consumer Control specification – an obscure part of HID standard that defines media buttons, specifically, the “launch browser” and “open calculator” kinds of buttons you see on some keyboards, that operating systems, surprisingly, tend to support. If the underlying OS you’re using for kiosk purposes isn’t configured to ignore these buttons, they provide any attacker with unexpected pathways to bypass your kiosk environment, and it works astonishingly well.

[piraija] tells us that this attack provides us with plenty of opportunities, having tested it on a number of devices in the wild. For your own tests, the writeup has Arduino example code you can upload onto any USB-enabled microcontroller, and for better equipped hackers out there, we’re even getting a Flipper Zero application you can employ instead. While we’ve seen some doubts that USB devices can be a proper attack vector, modern operating systems are more complex and bloated than even meets the eye, often for hardly any reason – for example, if you’re on Windows 10 or 11, press Ctrl+Shift+Alt+Win+L and behold. And, of course, you can make a hostile USB implant small enough that you can build them into a charger or a USB-C dock.

USB image: Inductiveload, Public domain.

Ultimate Power: Lithium-Ion Batteries In Series

At some point, the 3.6 V of a single lithium ion battery just won’t do, and you’ll absolutely want to stack LiIon cells in series. When you need high power, you’ve either got to increase voltage or current, and currents above say 10 A require significantly beefed up components. This is how you’re able to charge your laptop from your USB-C powerbank, for instance.

Or maybe you just need higher voltages, and don’t feel like using a step-up converter, which brings along with it some level of inefficiency. Whatever your reasons, it’s time to put some cells into series. Continue reading “Ultimate Power: Lithium-Ion Batteries In Series”

The printer's display with the exploit-loaded animation playing, saying "hacked by blasty" and a bunch more stuff

A Fun Exploit For Canon Printers Brings GDB Gifts

Modern printers make it all that much more tempting to try and hack them — the hardware generally tends to be decent, but the firmware appears to be designed to squeeze as much money out of you as possible while keeping your annoyance level consistently high. That’s why it’s nice to see this exploit of the Canon imageCLASS MF74XCdw series (MF742Cdw/MF743Cdw) by [blasty], triggerable over a network connection, with a story for our amusement.

In this post, we get a tale of how this hack came out of a Pwn2Own Toronto challenge, notes on the hardware involved, and we’re shown the journey to a successful hack. The Canon printer OS is built without many of the protections, which makes playing with it easier than with more modernized targets, but it’s nevertheless not straightforward. Still, exploiting a couple things like the SOAP XML implementation and the UTF8 encoder nets you an ability to play nice animations on the display, and most certainly, control over the entirety of the hardware if you wanted it.

One of the most fun things about this hack is the GDB stub recently included in the repo. If you wanted to debug Canon printers for fun or profit, [blasty] brings you a GDB stub to do that comfortably, with a respectable README that even has porting notes for other Canon ImageCLASS printer models, should you lay your hands on a different machine of despair. WiFi connectivity appears to be enough for this hack, so you better make sure you don’t have your network-connected printers exposed on the Internet — not that you needed more reasons to avoid that.

PCB of the antenna about to be modded, with components desoldered and different parts of the circuit highlighted

Make A GPS Antenna Compatible With Same Manufacturer’s Receiver

GPS can be a bit complex of a technology – you have to receive a signal below the noise floor, do quite a bit of math that relies on the theory of relativity, and, adding insult to injury, you also have to go outside to test it. Have you ever wondered how GPS antennas work? In particular, how do active GPS antennas get power down the same wire that they use to send signal to the receiver? Wonder not, because [Tom Verbeure] gifts us a post detailing a mod letting a fancy active GPS antenna use a higher-than-expected input voltage.

[Tom]’s post has the perfect amount of detail – enough pictures to illustrate the entire journey, and explanations to go with all of it. The specific task is modifying a Symmetricom antenna to work with a Symmetricom GPS receiver, which has a puzzling attribute of supplying 12V to the antenna instead of more common 3.3V or 5V. There’s a few possible options detailed, and [Tom] goes for the cleanest possible one – replacing the voltage regulator used inside of the antenna.

With a suitable replacement regulator installed and a protection diode replaced, the antenna no longer registers as a short circuit, and gets [Tom] a fix – you, in turn, get a stellar primer on how exactly active GPS antennas work. If your device isn’t ready to use active GPS antennas, [Tom]’s post will help you understand another GPS antenna hack we covered recently – modifying the Starlink dish to use an active antenna to avoid jamming on the frontlines.

Showing the ESP-Prog-Adapter board plugged into the ESP-Prog adapter, wired to a SOIC clip, that then attaches to a PCB under test

ESP-Prog-Adapter Makes Your ESP32 Tinkering Seamless

Did you ever struggle with an ESP32 board of yours, wishing you had exposed that UART, or seriously lacking the JTAG port access? If so, you should seriously check out [0xjmux]’s ESP-PROG-Adapter project, because [0xjmux] has put a lot of love and care into making your ESP32 hardware interfacing a breeze. This project shows you how to add JTAG and UART headers with extra low board footprint impact, gives you a KiCad library to do so super quickly, and shares a simple and helpful adapter PCB you can directly use with the exceptionally cheap Espressif’s ESP-Prog dongle you should have bought months ago.

The hardware is perfect for ZIF no-soldering interfacing – first of all, both UART and JTAG can be connected through a SOICBite connection, a solderless connector idea that lets you use SPI flashing clips on specially designed pads at the edge of your board. For the fancy toolkit hackers among us, there’s also a Tag Connect symbol suggested and a connector available, but it carries JTAG that you will already get with the SOICBite, so it’s maybe not worth spending extra money on.

Everything is fully open-source, as one could hope! If you’re doing ESP32 hacking, you simply have to order this board and a SOIC clip to go with it, given just how much trouble [0xjmux]’s board will save you when programming or debugging your ESP32 devices. Now, you don’t strictly need the ESP-Prog dongle – you could remix this into an adapter for the Pi Pico board instead. Oh, and if designing boards with ARM CPUs are your thing, you might benefit from being reminded about the Debug Edge standard!

The BR55 battle rifle held in its creator's hands during test firing

Making The Halo 2 Battle Rifle Real

We’ve just been shown a creation that definitely belongs on the list of impressive videogame replicas. This BR55 rifle built by [B Squared Mfg] not only looks exactly like its in-game Halo 2 counterpart, it’s also a fully functional firearm chambered in 5.56. The attention to detail even brings us a game-accurate electronic ammo counter.

The rifle and magazine communicate over three pins.

Unfortunately, the only information we have on the weapon currently is the video below. But he does at least go into detail about the practical aspects: caliber choice, the arduous journey of bolt carrier sourcing, and how the ammo counter works.

Each magazine has a potentiometer built into it to detect the number of rounds loaded, but there’s a bit of trickery involved. In the real world, there’s no way a magazine this size could hold the 36 rounds of ammunition depicted in the game, so for each shot fired, the counter subtracts three. It takes a little imagination, but this way it looks as close to the game version as possible.

There will be no published files due to legal concerns, but there’s nothing you couldn’t build yourself, as long as said legal concerns are sorted out for yourself. Depending on where you live, you might have to settle for building a Gauss gun in the same frame, we’ve even seen slimmer ones done commercially. Whatever you build, make sure you store it in a way others can’t access it easily — not all gun safes pass this test.

Continue reading “Making The Halo 2 Battle Rifle Real”