Adding LoRa Long Range Radio To Smartphones And Connected Devices

Would you add another radio to your smartphone? No, not another WiFi or cellular radio; a smartphone already has that. I’m talking about something that provides connectivity through ISM bands, either 433 or 915 MHz. This can be used where you don’t have cell phone coverage, and it has a longer range than WiFi. This is the idea behind Skrypt, a messaging system that allows you to send off-the-grid messages.

Skrypt is an ESP32-based hardware modem that can communicate with a smartphone, or any other device for that matter, over Bluetooth or USB. Inside, there are two modules, an ESP32 WROOM module that provides the Bluetooth, WiFi, USB connectivity, and all of the important software configuration and web-based GUI. The LoRa module is the ubiquitous RFM95W that’s ready to drop into any circuit. Other than that, the entire circuit is just a battery and some power management ICs.

While LoRa is certinaly not the protocol you would use for forwarding pics up to Instagram, it is a remarkable protocol for short messages carried over a long range. That’s exactly what you want when you’re out of range of cell phone towers — those pics can wait, but you might really want to send a few words to your friends. That’s invaluable, and LoRa makes a lot of sense in that case.

A Drop-In Controller Replacement For Commercial Reflow Ovens

If you need a reflow oven, you can very easily head down to Walmart or Target and pick up a toaster oven for fifteen bucks or so. Even without any control electronics, a bone-stock toaster oven works well enough for reflow soldering, but if you want to do it right you’ll also want to add a themocouple, a microcontroller, and maybe a fancy display. That’s option one.

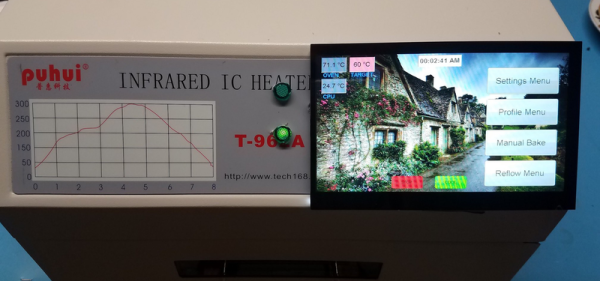
If you value your time more than your money, you’ll probably just plonk down a few hundred bucks for a T-962A reflow oven, the standard infrared oven that’s meant for reflowing solder. It’s a good oven, but as with all bargain basement tools from China, the user interface isn’t great. [PhillyFlyers] is working on a drop-in controller for what is probably the most popular reflow oven on the planet, and this thing looks good.

This is a controller for the T-962A oven that includes all the connectors as the stock control board. We’ve seen a few of these projects to improve cheap tools, from 3D printer controllers to a replacement board for the ubiquitous K40 laser cutter. Now the most popular reflow oven is getting the same treatment.

The specs for this replacement board include a five-inch, 800 x 480 display, powered by an STM32H7 microcontroller. All of the usual functionality of the oven is retained, but it adds the ability to hand-draw reflow profiles, save reflow profiles to an SD card, and support for four K-type thermocouples. Basically, it’s what you would expect from an upgraded version of the T-962 oven.

Most importantly, this is a direct drop-in replacement for the stock electronics. Grab one of these boards, and all you have to do for installation is break out a screwdriver. It makes a great tool even better, which is exactly what this very popular reflow oven needs.

Maker Media Reboots Itself As Make Community

At a community meeting this week, Dale Dougherty, former CEO of Maker Media announced the relaunch of the Make brand. Maker Media is dead, but the brand may live on as Make Community, LLC. Dougherty will remain the CEO of Make Community, and Todd Sotkicwicz, former CFO of Maker Media, was identified as the current CFO of Make Community. This is the same organization that brought you Make Magazine and the Maker Faires gearing up to give you even more Make Magazines and more Maker Faires.

Early this year, we heard rumors about the future of Maker Media and its flagship Maker Faires. Then in May, just before the Bay Area Maker Faire, Dougherty told the San Francisco Chronicle that it was ‘quite possible this could be the last Bay Area Maker Faire’. The Bay Area Faire came and went, and early last month we received news that employees were let go and Maker Media had ceased operations.

Now, according to Dougherty’s summary at the meeting, what remained has now been reformed into a new LLC, Make Community, and he was holding this meeting to gauge how much the community would be willing to contribute. The official launch of Make Community will supposedly be next week, but you can check out the future home of the Make Community at make.co.
Continue reading “Maker Media Reboots Itself As Make Community”

Giving The Pi 4 PCI Express

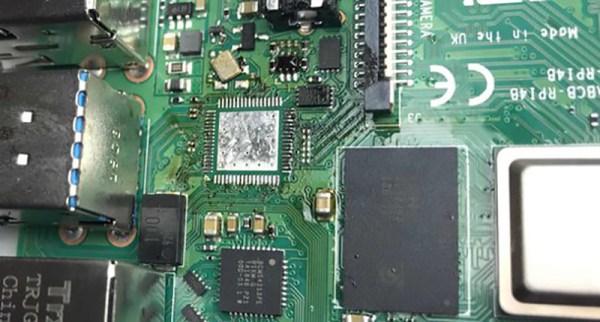
The release of the Raspberry Pi 4 brought us a new SoC, up to 4 Gigs of memory, and most importantly, got away from that janky USB to USB and Ethernet solution. The Raspberry Pi 4 has a PCI Express interface buried under some chips, and if you’re very good at soldering you can add a PCIe x1 device to the new best single board computer.

[Thomasz] took a look at the Raspberry Pi 4 and realized the new USB 3.0 chip is attached to the PCI Express interface on the SoC. That is, if you remove this chip and you have some very fine wires, you can patch in a real PCI Express slot. Removing the chip is easy enough with a hot air gun, although a few caps did get messed up. Throw that in an ultrasonic cleaner, and you have a blank canvas to work PCI magic.

This hack requires six wires, or three differential pairs, there’s a reference clock, a lane 0 transmit, and a lane zero receive. Working backwards from a PCI Express riser, [Thomasz] traced out these connections and soldered a few wires in. On the Pi side, a few capacitors were required to be compliant with the PCI Express spec, but the soldering isn’t too bad. You can do a lot with a small tip on an iron and a microscope.

The Pi was successfully wired up to a PCI Express riser card, along with the lines for ground, 5V, link reactivation, and a power good signal. The only thing left to do was to plug in a PCI card and test. This didn’t go as well as expected, because the PCI Express adapter didn’t like being enumerated by the Raspberry Pi kernel. In subsequent experiments, an Adaptec SAS controller worked. Does this mean external graphics cards for the Pi? No, not quite; this is only one lane of PCIe, where modern graphics cards require an x16 slot for the best performance. Still, if you’ve ever wanted a SCSI card for a Pi, this is the best option yet.

Four Chips To Retro Perfection

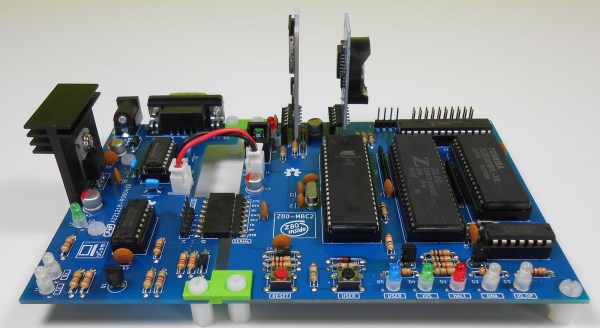
Over the years, we’ve seen many people build a computer from the ground up. It’s always great, but this one takes the cake. I’m not just saying that because there’s a cute little ‘Z80 Inside’ logo on the silk screen, either. It’s a four IC Z80 computer, a tiny board, and [Just4Fun]’s entry into this year’s Hackaday Prize.

This single board computer is only four chips, the most important being the CMOS Z80 CPU. This is the same CPU as was found in the TRS-80 and the ZX Spectrum, both classics from the early days of computing. In addition to the PCU, there’s a Toshiba SRAM with 128 whole kilobytes of random access memories. A 74HC00 is thrown into the mix for glue logic, and everything else happens through a specially-programmed ATMega32A. This last chip provides a universal I/O subsystem, the EEPROM, and the 4/8MHz clock for the CPU.

Those four chips are really all you need for a fully functional computer, but you can do so much more with this little board. There’s a uCom board, or basically a ‘transparent’ USB-to-serial emulator that will allow you to upload a hex file to the board. Of course this means you can also connect it to a terminal, and with FuzixOS, there’s Unix for the Z80. It’s a wonderment of retrocomputing, and one of the best ways to build an old computer today.

Continue reading “Four Chips To Retro Perfection”

Raspberry Pi 4 Benchmarks: Processor And Network Performance Makes It A Real Desktop Contender

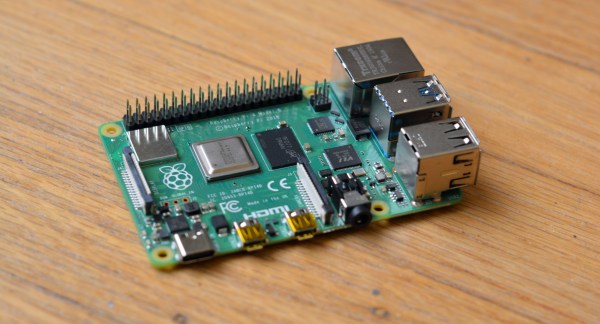
The new Raspberry Pi 4 is out, and slowly they’re working their way from Microcenters and Amazon distribution sites to desktops and workbenches around the world. Before you whip out a fancy new USB C cable and plug those Pis in, it’s worthwhile to know what you’re getting into. The newest Raspberry Pi is blazing fast. Not only that, but because of the new System on Chip, it’s now a viable platform for a cheap homebrew NAS, a streaming server, or anything else that requires a massive amount of bandwidth. This is the Pi of the future.

The Raspberry Pi 4 features a BCM2711B0 System on Chip, a quad-core Cortex-A72 processor clocked at up to 1.5GHz, with up to 4GB of RAM (with hints about an upcoming 8GB version). The previous incarnation of the Pi, the Model 3 B+, used a BCM2837B0 SoC, a quad-core Cortex-A53 clocked at 1.4GHz. Compared to the 3 B+, the Pi 4 isn’t using an ‘efficient’ core, we’re deep into ‘performance’ territory with a larger cache. But what do these figures mean in real-world terms? That’s what we’re here to find out.

Continue reading “Raspberry Pi 4 Benchmarks: Processor And Network Performance Makes It A Real Desktop Contender”

New Part Day: Two Millimeter Addressable LEDs

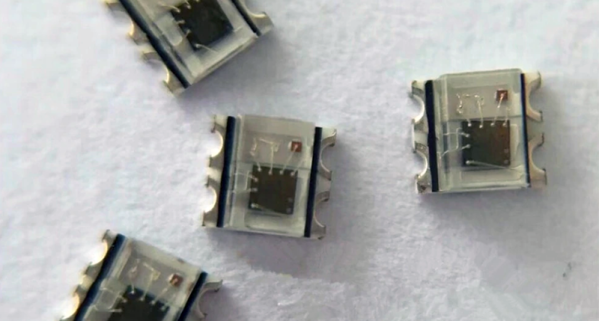
The WS2812, or “Neopixels”, or whatever you want to call them, are the standard when it comes to adding blinky to anything. These chips are individually addressable RGB LEDs, which you’ve seen in many LED strips and a thousand other products. These LEDs are rather big compared to normal, dumb LEDs, measuring 5 mm on each side. Here are WS2812s packed into a 2 mm x 2 mm square package. It’s the smallest and brightest blinky that works the same as the WS2812s you know and love.

This is the latest product from Worldsemi. We’ve heard of these before, but damned if we could find a supplier or even a price. Now they’re on AliExpress, at a price of $8 USD per 100, shipping not included.

Electrically, these appear to have the same properties of the normal, 5050-size WS2812 LEDs. Apply power and ground to two pins, send data in on one pin, and connect the next LED in the strand to the remaining pin. Yes, it requires a bit of work to turn this into a display, but microcontrollers are very fast now and have plenty of RAM. Attach a BeagleBone and you’ll be able to drive as many as your glowing heart desires.

If you’re wondering what the coolest project imaginable for these LEDs is, here’s the math: the largest (common) PCB panel for your random board house is 16 by 22 inches. Assuming a 3 mm pixel pitch, that means the largest PCB display you can make with these LEDs is 135 by 186 pixels, call it 120 by 180 just to make things easy. That’s 21,600 LEDs, at a cost of about $2,000. I would not recommend reflowing these, and assuming soldering a LED every thirty seconds, it will take about a month to solder them all by hand. There’s your project, now get to it.