Even More Power Wheels Racers

With the Power Wheels Racing series wrapping up for the year, the teams are winding down and writing up their build and rebuild logs for their cars. In previous years, the kids from MIT, a.k.a. MITERS, have brought small electric cars to the races, but nothing like this. It’s a true Power Wheels, or at least the plastic shell, an alternator, a huge battery pack, and a completely custom drivetrain.

[Dane], [Ben], [Rob], [Mike], and [Ciaran] started their build with an alternator that was salvaged from [Charles]’ Chibi-Mikuvan, added a motor from a CDROM drive for a sensor, and basked in the glory of what this cart would become. The frame was crafted from 1″ square tube, a custom disc brake machined, and a 10S2P battery pack built.

The alternator the team used for a motor had a rather small shaft, and there were no readily available gearboxes. The team opted to build their own with helical gears milled on the MITERS Bridgeport mill. That in itself is worth of a Hackaday post. Just check out this video.

With the build held together with duct tape a baling wire, the team headed out to the races in Detroit. Testing the racer before getting to Detroit would have been a good idea. During the endurance race, a set of 10″ rear tires were torn apart in just four laps, impressively bad, until you realize the smaller pink tires that were also from Harbor Freight fared even worse.

After a few races, the MITERS team figured out the weaknesses of their car and managed to get everything working perfectly for the race at Maker Faire NY.

Continue reading “Even More Power Wheels Racers”

THP Hacker Bio: Neil Jansen

If we were running a contest to give away a trip to space for building the most innovative open hardware project a few years ago, the winner would inevitably be a 3D printer. Times have changed, 3D printing is reaching the limits of what can be done with simple plastic extrusion, and there are new hardware challenges to be conquered. One of the challenges facing hardware designers is the ability to create and assemble electronic circuits quickly. For that, there are a few pick and place machines being developed, the lowest cost being the FirePick Delta. It sells itself as a $300 pick and place machine borrowing heavily from the RepRap project, enabling tinkerers and engineers to assemble PCBs quickly.

[Neil Jansen] is the project lead for the FirePick Delta, and along with team members ranging from software developers in the bay area, to electronics technicians and high school students, they’ve created what will become the lowest cost and most capable pick and place machine available. Already the machine has tape feeders, tray feeders, a vision system, and modules to dispense solder paste. It’s an astonishing accomplishment, and were it not for some damage in shipping, we would have a video of [Neil] demoing the FirePick at Maker Faire NY.

In lieu of that, we do have a bio on [Neil] and what challenges he’s faced in building the FirePick. You can read that below, or check out their second demo video for The Hackaday Prize:

https://www.youtube.com/watch?v=46pLeLBYVTs

Continue reading “THP Hacker Bio: Neil Jansen”

GCC For The ESP8266 WiFi Module

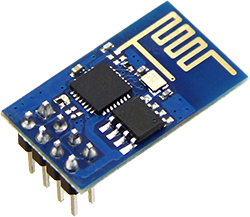
When we first heard about it a few weeks ago, we knew the ESP8266 UART to WiFi module was a special beast. It was cheap, gave every microcontroller the ability to connect to a WiFi network, and could – possibly – be programmed itself, turning this little module into a complete Internet of Things solution. The only thing preventing the last feature from being realized was the lack of compiler support. This has now changed. The officially unofficial ESP8266 community forums now has a working GCC for the ESP8266.
The ESP8266 most people are getting from China features a Tensilica Xtensa LX3 32-bit SOC clocked at 80 MHz. There’s an SPI flash on the board, containing a few dozen kilobytes of data. Most of this, of course, is the code to run the TCP/IP stack and manage the radio. There are a few k left over – and a few pins – for anyone to add some code and some extended functionality to this module. With the work on GCC for this module, it’ll be just a few days until someone manages to get the most basic project running on this module. By next week, someone will have a video of this module connected to a battery, with a web-enabled blinking LED.

Of course that’s not the only thing this module can do; at less than $5, it will only be a matter of time until sensors are wired in, code written, and a truly affordable IoT sensor platform is created.

If you have a few of these modules sitting around and you’d like to give the new compiler a go, the git is right here.

Using The Boxee Remote With A PC

When it was first announced in 2010, the Boxee remote was a stroke of genius. Not because it controlled the BoxeeBox, the set-top media center PC, mind you. It was impressive because the reverse side of the remote had a small qwerty keyboard, just the thing for searching menus loaded up with movies and TV shows and entering URLs. [Martin]’s BoxeeBox loved his BoxeeBox, but it’s an old device now, with some support for web streaming (including Netflix) gone.

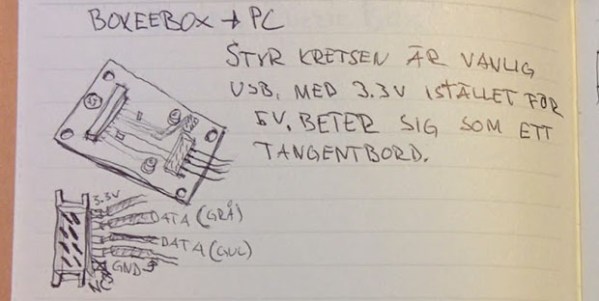
Other media center devices have filled the void in [Martin]’s life, but he loved that Boxee remote. Getting it working on his XBMC-equipped PC was a top priority. This meant figuring out a way to connect the RF receiver from a BoxeeBox to a USB port. It turns out this is pretty easy, requiring only a few parts and half of a USB cable.

[Martin] traced out the connectors on the RF receiver for the BoxeeBox, and found the usual V+, V-, Power, and Ground connections found in a USB cable. The receiver operated at 3.3 Volts, so stepping down the voltage required regulator. The rest of the project was simply putting everything in a project box and stuffing it behind his PC.

Windows identifies the RF receiver as a normal keyboard, so everything went swimmingly. Since [Martin] built this small device, a few people have come up with better keyboard layouts for XBMC and the Boxee remote, allowing this device to function far into the future.

Console Controllers For JAMMA Boards

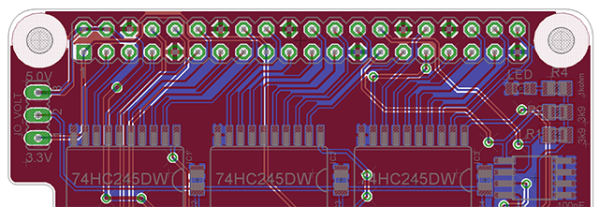
Back in the day, and by that we mean the late 80s and early 90s, arcade machines started using the JAMMA standard, a means for a single arcade board to be wired in to the controllers, video output, and other ephemera found in arcade cabinets. Since then, quite a few people have amassed a collection of these vintage arcade boards. Putting them to use requires a means of providing power, video output and controller connections. The usual way of wiring in a joystick and buttons is with a wiring harness, but [Mike] and [Jasen] are connecting Xbox 360 and PS3 controllers to their machines with the help of a Raspberry Pi Hat.

[Mike] and [Jasen] created Project Kajitsu to replace the expensive ‘Supergun’ controllers arcade game collectors usually use to play Street Fighter, X-Men, and Battletoads. They’re using the USB ports on a Raspberry Pi B+ to listen to two XBox or PS3 controllers and translate button mashing into something these old games can understand.

The guys are using a custom Linux Kernel that boots in just a few seconds, providing the bare minimum of an OS to support the controllers. The board itself is extremely simple; just a few bus transceivers, caps, resistors, and headers. They have an iPhone-quality vertical video proof of concept video (below), and although they’re still figuring out the best way to simplify the Bluetooth pairing process, they’re well on their way to supporting wireless controllers.

This board only provides controller input. If you have one of these old boards, you will need video output. That’s another project entirely, but very simple if you have an SCART monitor.

Continue reading “Console Controllers For JAMMA Boards”

The Chibi-Mikuvan, Or A Power Wheels With A Ford Fusion Battery

At all the big Maker Faires, the Power Racing Series makes an appearance, turning old Power Wheels into race cars that whip around the track at dozens of miles an hour. [Charles] is somewhat famous in the scene – there’s even a clause in the official rules named after him – so of course anything he brings to race day will be amazing. It was. It used a battery pack from a Ford Fusion plugin hybrid, a custom body, and a water cooling unit from a dead Mac G5.

A few months ago, we saw [Charles] tear into the battery pack he picked up for $300. This is the kind of equipment that will kill you before you know you’ve made a mistake, but [Charles] was able to take the pack apart and make a few battery packs – 28.8v and 16Ah – enough to get him around the track a few times.

The chassis for the Chibi-Mikuvan was built from steel, and the bodywork was built from machined pink foam, fiberglassed, and finished using a few tips [Charles] gleaned from [Burt Rutan]’s book, Moldless Composite Sandwich Aircraft Construction. The motor? That’s an enormous brushless motor meant for a 1/5th scale RC boat. The transmission is from an angle grinder, and the electronics are a work of art.

The result? A nearly perfect Power Wheels racer that has a curb weight of 110 pounds and tops out at 25 mph. It handles well, too: in the videos below, it overtakes the entire field of hacky racers in the Power Wheels Racing competition at Maker Faire NYC, and afterwards still had enough juice to tear around the faire.

Continue reading “The Chibi-Mikuvan, Or A Power Wheels With A Ford Fusion Battery”

The Teensy Audio Library

There are a few ways of playing .WAV files with a microcontroller, but other than that, doing any sort of serious audio processing has required a significantly beefier processor. This isn’t the case anymore: [Paul Stoffregen] has just released his Teensy Audio Library, a library for the ARM Cortex M4 found in the Teensy 3 that does WAV playback and recording, synthesis, analysis, effects, filtering, mixing, and internal signal routing in CD quality audio.

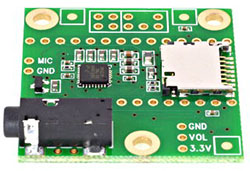
This is an impressive bit of code, made possible only because of the ARM Cortex M4 DSP instructions found in the Teensy 3.1. It won’t run on an 8-bit micro, or even the Cortex M3-based Arduino Due. This is a project meant for the Teensy, although [Paul] has open sourced everything and put it up on Github. There’s also a neat little audio adapter board for the Teensy 3 with a microSD card holder, a 1/8″ jack, and a connector for a microphone.

In addition to audio recording and playback, there’s also a great FFT object that will split your audio spectrum into 512 bins, updated at 86Hz. If you want a sound reactive LED project, there ‘ya go. There’s also a fair bit of synthesis functions for sine, saw, triangle, square, pulse, and arbitrary waveforms, a few effects functions for chorus, flanging, envelope filters, and a GUI audio system design tool that will output code directly to the Arduino IDE for uploading to the Teensy.

It’s really an incredible amount of work, and with the number of features that went into this, we can easily see the quality of homebrew musical instruments increasing drastically over the next few months. This thing has DIY Akai MPC/Monome, psuedo-analog synth, or portable effects box written all over it.