The Most Minimal Homebrew Computer

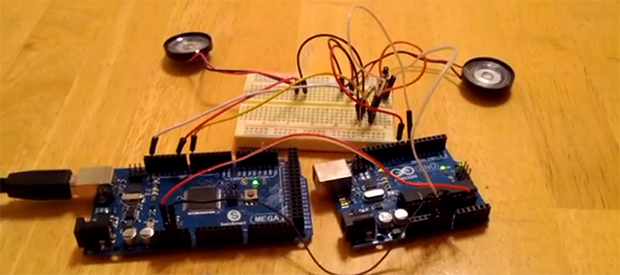
Perfection is achieved not when there is nothing more to add, but when there is nothing left to fail. Going by that metric, [Stian]’s three-chip 6502 homebrew computer is the epitome of perfection. It’s a real, working, homebrew retrocomputer using only three chips: a CPU, some RAM, and a microcontroller to bootstrap the computer and provide a video output,

The key to this minimalist build is having the entire boot process controlled by an ATMega16 microcontroller, This interfaces to the 6502 through a dual-port SRAM, a 1 kilobyte Cypress CY7C130. This dual-port RAM allows the CPU and microcontroller to access the same bit of memory, making it easy to bootstrap a computer from a bit of AVR code.

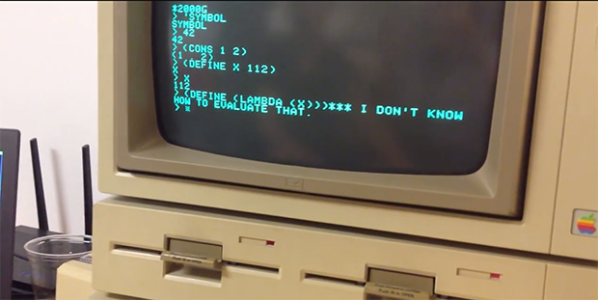
Output is provided with [Stian]’s ATMega video text generator putting a 37×17 characters on any television with an RCA jack. While input isn’t handled yet, [Stian] says it should be possible with his AVR PS/2 keyboard library.

While other 6502 homebrew computers such as [Quinn Dunki] Veronica can reach unparalleled heights of complexity, there is a lot to be said about the minimalism of [Stian]’s three-chip computer. With some clever coding and a modified parts list, it may well be possible to put a retrocomputer in the hands of everyone with a bare minimum of cost and parts.

Introducing The Shapeoko 2

For all the 3D printers that hit the Hackaday tip line, it’s surprising we don’t see more CNC routers. They’re arguably more useful tools, and with the ability to mill wood, plastic, and non-ferrous metals, open up the door to a whole bunch more potential builds. One of the most popular – and certainly one of the least expensive – CNC routers out there, the Shapeoko, just received a huge update that makes this minimal machine even more capable.

The new Shapeoko 2 keeps the same V wheel on an aluminium extrusion design with Makerslide, but fixes a few problems that limited the original Shapeoko. There’s a larger work area on this version, and the Y axes feature dual stepper motors. The biggest feature, we think, is the ability to handle materials larger than the machine itself thanks to its open front and back.

The Shapeoko 2 is available in two versions, a $300 mechanical kit that requires you to go out and get some motors, a power supply, and a grblShield, the full version, for $650, includes everything you’ll need to start routing wood metal and plastic at home.

The Apple IIe Becomes A Lisp Machine

Way back in the late 1970s and early 1980s, a few very awesome people around MIT were working on Lisp machines. These computers were designed specifically to run Lisp as their main programming language. Around the same time, a few [Steves] in California were working on the Apple II, which would soon become one of the most popular computers of all time. The Apple II ran BASIC as its main programming language, fine for the time, but surely not as elegant as Lisp. It took more than 30 years, but [Alex] and [Martin] figured out a way to turn the lowly Apple IIe into a Lisp machine.

Developing Lisp for the Apple IIe was surprisingly easy for these guys – they simply wrote a Lisp interpreter in C and used a 6502 compiler to generate some machine code. The main problem of porting Lisp to an Apple II was simply getting the code onto the Apple. We’re assuming this would have been easier had the same project been attempted in the 80s.

To get their interpreter onto the Apple, they used the very awesome ADTPro library that allows data to be loaded onto an Apple II via the cassette port and a modern computer’s microphone and speaker jack. After a solid minute of loading analog data onto this digital dinosaur, [Alex] and [Martin] had a Lisp interpreter running on ancient yet elegant hardware.

The source for the 6502 Lisp interpreter can be found on the GitHub along with all the necessary tools to load it via a modern computer. That’ll give you all the ancient lambdas and parens you could ever want. One warning, though: backspace doesn’t exactly work, so be prepared for a lot of frustration.

You can check out the demo video below.

Continue reading “The Apple IIe Becomes A Lisp Machine”

Polyphonic Arduino Sketches

MIDUINO

Creating music for the Arduino is simple – just use the tone() library – but it truthfully doesn’t sound that great. That’s because this library is monophonic, making chords difficult or at the very least sound a little weird. [Connor]’s miduino aims to change that, turning raw MIDI files into polyphonic Arduino sketches.

To convert MIDI files into Arduino sketches, [Connor] whipped up a Python script based on midiCSV that reads the notes and channels of a MIDI file and converts it into the language of the Arduino. Unlike the built-in tone() library, miduino is polyphonic making the music produced from any Arduino sound great. It’s basically the difference between writing music for a PC speaker and a true keyboard; sure, you’re only getting square waves, but it sounds much better.

Oddly, [Connor] hasn’t put up his Python script as far as we can tell. All the MIDI songs are being converted on [Connor]’s own Raspberry Pi. This is supposed to be cheaper than a VPS, and makes for a very cool project to boot.

Edit: Miduino isn’t polyphonic yet, but [Connor] says he should have that wrapped up in a week or two.

Woodcut Stamps And Conductive Ink

circuit

Even though it’s been a while since the Rome Maker Faire, we’re still getting some tips from the trenches of Europe’s largest gathering of makers. One of these is a 30-minute experiment from [Luong]. He wondered if it would be possible to create SMD circuit boards by using a 3D printer to fabricate a stamp for conductive ink.

[Luong] told this idea  to a few folks around the faire, and the idea eventually wound up in the laps of the guys from TechLab. the Chieri, Italy hackerspace. They suggested cutting a wooden stamp using a laser cutter and within 30 minutes of the idea’s inception a completed stamp for an Atari Punk Console PCB was in [Luong]’s hands.

As an experiment, the idea was a tremendous success. As a tool, the stamp didn’t perform as well as hoped; the traces didn’t transfer properly, and there’s no way this wooden laser cut stamp could ever create usable PCBs.

That being said, we’re thinking [Luong] is on the right track here with printed PCBs. One of the holy grails of home fabrication is the creation of printed circuit boards, and even a partial success is too big to ignore.

This idea for CNC-created PCB stamps might work with a different material – linoleum or other rubber stamp material, or even a CNC milled aluminum plate. If you have any ideas on how to use this technique for PCB creation, leave a note in the comments, or better yet, try it out for yourself.

Rebuilding A 1940s TV

TV

There’s a lot of cool stuff to be found under piles of trash in an antique store. [dijt] discovered this when he found a tiny 7″ Motorola television from the 1940s under a stack of trinkets from earlier eras. We can understand [dijt]’s impulse buy, and the trials of rebuilding this ancient TV more than qualifies it as a hack.

If you know where to look, there are hundreds of resources available for old televisions, Hi-Fis, and radio equipment from the dawn of the electrical era to the modern day. After consulting with a few forums, [dijt] got his hands on a schematic for his television set and began work on diagnosing what was wrong with it.

It turned out the original ballast tube in this set had long since given up the ghost. Luckily, this is a common problem in old TVs, and after consulting some forums [dijt] had a schematic to replace this ballast tube with some newer caps and resistors.

After constructing the circuit and testing it out, [dijt] mounted it in the old ballast tube to replicate the original look and feel of the 1949 television. Interestingly, this is the second time this TV had been restored; the 1960s-era caps and resistors told [djit] this TV had once went into a television repair shop. Let’s just hope [djit] remembered to glue the schematics to the inside of the chassis this time.

Making Use Of The Trancend WiFi SD Card

had

[CNLohr] spends most of his time on the Internet, but sometimes real life drags him away from his keyboard. These “vacations”, as he calls them, don’t have a good Internet connection and forces him to rely on flaky cell phone connections that go up and down at the drop of a hat. Figuring this would be a great opportunity for some hardware hacking, [CNLohr] came up with an ‘Internet-o-mometer’ – a device powered by a Trancend WiFi SD card that uses an 8×8 LED display to show the current status of his phone’s Internet connection.

This build uses the Trancend WiFi SD card motherboard we’ve seen before. When the card boots, it tries to connect to his phone’s WiFi connection.  When it connects, a green smiley face is displayed on the LED matrix. When a whole lot of files are downloaded or, more specifically, the ping to google.com is more than 4 seconds, a red frowny face indicates the Internet connection is down.

In other Trancend WiFi SD card news, a whole lot of people including [Dan Krause] (thanks for the tip) have been working on a complete replacement OS for these neat little cards. Right now the OS is in very rough shape, but there is a pre-built system available should anyone want to experiment. [CNLohr] is also working on a compact, double-sided version of his SD card motherboard and we’ll be happy to feature a link to his Tindie store when he sends that in.