Wiimote Missile Launcher


[toelle] has shown yet another use for the Wiimote by having it auto aim his USB missle launcher. The bill of materials is pretty simple: a Wiimote, a motorized USB missile launcher, some duct tape and glovepie.

Simply tape the Wiimote to the missile launcher, install glove pie and follow his instructions for some custom code and off you go. He goes in depth on how to connect the Wiimote to the PC, as well as details on how the custom code works. It only tracks IR targets right now, which is a bit of a bummer, but that would see TV remotes right?

Is there any way this could be combined with the sonar controlled missle launcher that we covered in July?

[via Hack N Mod]

Biometric Locks Turned Trojan


In the same vein as our recent Defcon article on biometric cloning, White Wolf Security has released this article about turning a biometric door lock into a trojan. They note that there are many common ways to break into one, from harvesting fingerprints to using gummy bears to fake a finger. This hack involves having full access to the unit so you can disassemble it.

The unit has a system built-in where you can touch a 9-volt battery to some connectors on the bottom to power it in case of a building power failure. The researchers simply routed some wires from the motorized lock to the plates used for the 9-volt and then reassembled the lock. The door can then be opened at any time without verification, even if the software on the unit is reset.

[Thanks, dwight]

Modding The Acer Aspire One With Bluetooth


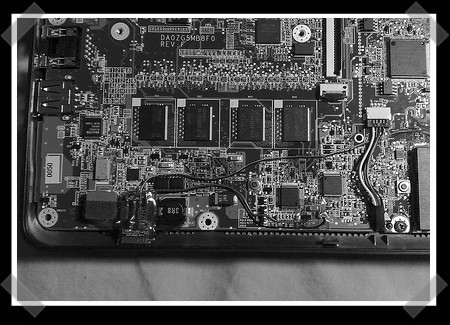
[tnkgrl], a regular around here, is at it again. This time she has modded an Acer Aspire One subnotebook to have internal Bluetooth. She’s released part 1 of a multi part tutorial on beefing up the Aspire One. In this part, she covers disassembly, adding more RAM, and adding the Bluetooth hardware. She suggests that you look at her Bluetooth install on an Asus 701 to find more information as the process is nearly identical.

Part 2 of the tutorial is going to cover upgrading the SSD to a 1.8″ PATA hard drive and putting it back together.

PoiPlay – LED Poi


PoiPlay is an elegant mix of new technology and traditional medium. Poi, Maori for ball, is a traditional form of juggling originating in New Zealand. In poi, a ball at the end of a rope or chain is swung in circular motion to develop visual patterns. Often augmented by flame, and more recently LEDs and glow sticks.

The PoiPlay device has 28 RGB LEDs in a 1 foot long enclosure at the end of a rope. They have a 1mbit per second bidirectional wireless interface, three Atmel processors, a lithium ion battery, and a charger. The base station controls not only the PoiPlay but the music as well. All the control software that resides on the PC was written in Perl and communicates via USB port under Cygwin.

They have built the devices to be individually addressable with the capability of being grouped by subnet. This feature isn’t supported by the software yet, but they say it should be done by the next show in 2009.

The site, while pretty offers very little information. Some construction shots would be fantastic. Go check it out though, the pictures are mesmerizing.

[thanks Jm]

Burning In The Siftables


[Curiouslee] put up some pictures of his Siftables burn in. He got them in the mail with all their accessories and decided to make a special box to carry it all. He started with an ArtBin parts box and cut out dividers where necessary to make everything fit nice and tidy.

The Siftables are quite interesting. They are an information interface that is supposed to be more physical and natural. The analogy they use is a container of nuts and bolts can be sifted through quite easily using your hands. They envision us being able to sift through data similarly. They also mention that it could be used as a gestural interface as well.

Continue reading “Burning In The Siftables”

RGB Monome Clone


[Julien Bayle] has posted this great breakdown of building an RGB monome clone. He is a musical performer using Ableton Live. He wanted to do away with the need for a computer screen and found that the monome would have been perfect had it been RGB. So he decided to build his own.

The parts list for the entire project is as follows:

  • 1x Arduino board
  • 4x Sparkfun breakout PCB
  • 4x Sparkfun buttons pads (like our door lock)
  • 4x Sparkfun buttons bezel
  • 64x RGB LEDs common cathode
  • 64x Diodes Small Signal (1N4148)
  • 1x MAX7221 (LED Driver)
  • 1x 74HC164 (8-Bit Serial-In, Parallel-Out Shift Register)
  • 1x 74HC165 (8-Bit Parallel-In, Serial-Out Shift Register)

He also has files for the schematics and source code as well as information on how to assemble and test it.

The RGB aspect is still under development. He is using the LEDMatrix-Serial Interface-RGB from Sparkfun Electronics to run it. It is expensive, but is exactly what he was looking for.

There aren’t very many pictures of the project, and none of the working RGB unit. He makes up for it in sheer information. Many parts have links to manufacturers or support forums. Hopefully he’ll post some pictures and video of the final product soon.

Arduino Tux Plant Care


Some of us need a little help keeping our green leafy friends happy. The Arduino Tux (translated) plant care system was built to make things a little easier.

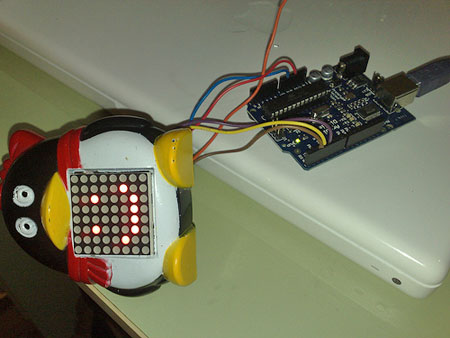
The author had a broken tux toy laying around and wanted to do something fun with it. He cut a hole in the front to mount an LED matrix and connected it all to an Arduino. A couple of metal rods serve as a resistivity sensor in the plant’s dirt.

When you water the plant, tux flashes some hearts and a smiley face. As the moisture drops, tux gets less happy with the end result being a big frown.

These are the same people who brought you the Arduino Photolab.

[via Hack a Day Flickr Pool]